8/29/22

TLC Designs Poetic Pixie

Hi everyone, I'm on the TLC blog.  I'm using Poetic Pixie Digital Stamps to create a sweet card.


Digital stamps are fun because you are able to size them as you want.  
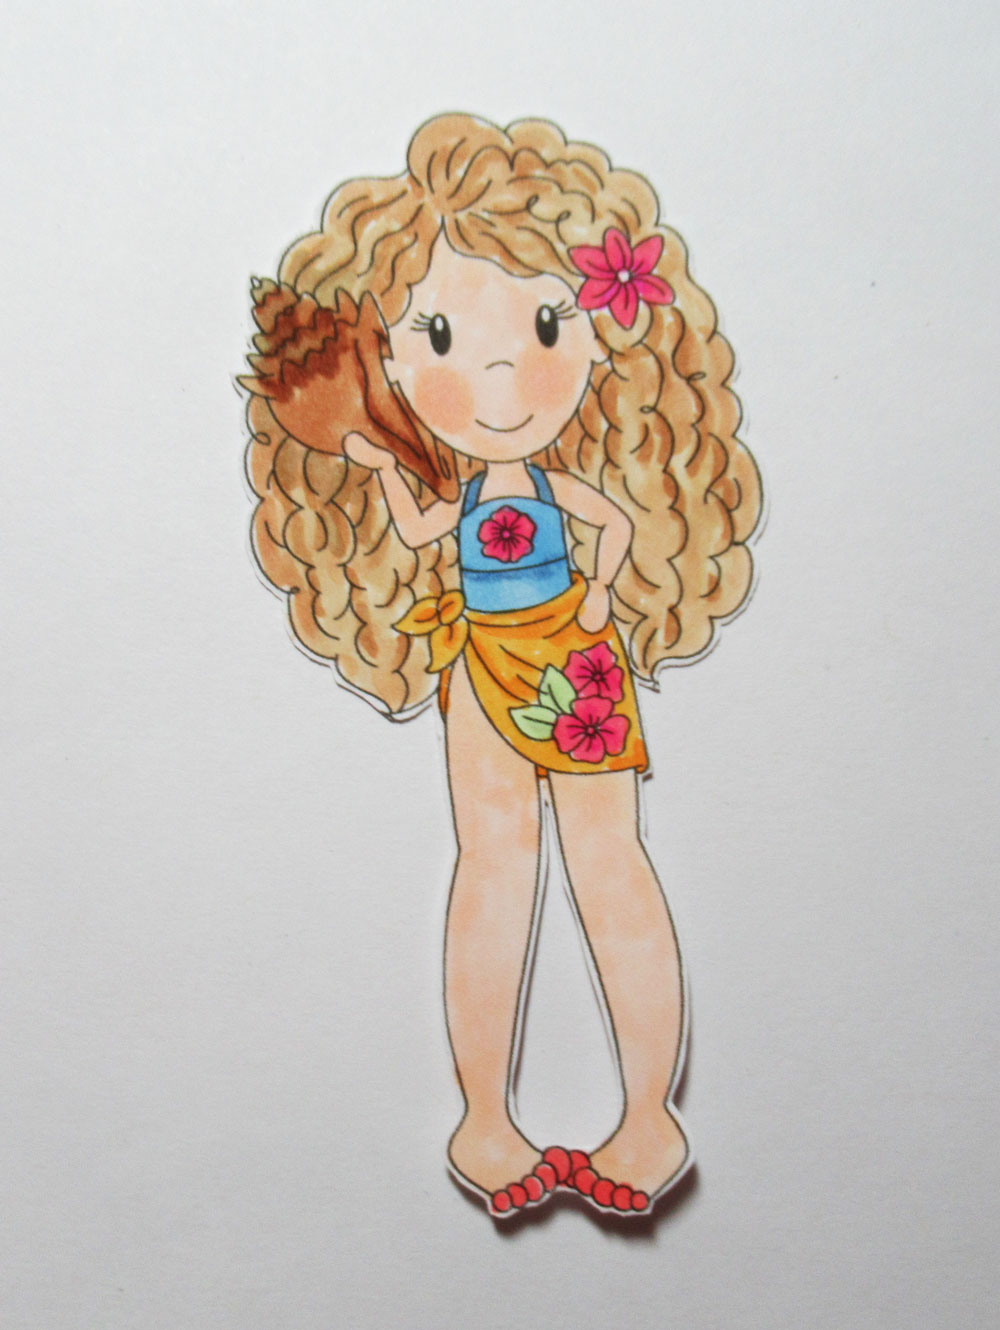
This is such a cute image.  I colored him with Copic Markers.


Using the die from the Celebrate Frame Die, I die cut the phrase.


Next, I fussy cut the Pixie and the books, placing them slightly above the printed sentiment.  I then matted the panel with the die from the Rosie Sentiment Die, corner rounding the edges to coordinate with the panel.


Since the colors coordinated with the Magical Delight Paper Pack, I cut the panel to fit a gray card and wrapped it with ribbon before adhering to the card.
The Masterpiece panel was then added on top with foam adhesives for dimension.


Thanks for stopping by.

Steph

8/27/22

Happy Birthday with Fairy Hugs

Hi everyone, I have another Fairy Stamper project to share.  


I've used Fairy Hugs Ginger's Tropicals and Fairy Words.


Using the MISTI allowed me to get the different colors aligned with the design.


Ginger was stamped at the bottom of the card and colored with Copic Markers.  
Happy Birthday was stamped, matted and added to the card with foam adhesives.
It was set as if Ginger were holding it.

Thanks for stopping by.

Steph


8/26/22

PPCF - Lawn Farm Winter Skies

Hi everyone, big thanks to Lawn Fawn for supplying this wonderful stamp and die set called Winter Skies.  I absolutely adore this stamp and die set.


Supplies:

Lawn Fawn Woodgrain Cardstock - Dark Brown
Lawn Fawn Winter Skies Stamps 
Lawn Fawn Winter Skies Die Set
Lawn Fawn Stitched Mountain Border
Lawn Fawn Large Stitched Stacked Circles
Lawn Fawn Outside In Stitched Rectangles
Lawn Fawn Small Stitched 4 Bar Rectangles


Die cut 2 layers of mountains and layer together on blue cardstock.
Use the large rectangle die to die cut the background.


Stamp assorted snowflakes on the background with white ink.
Stamp and die cut all images and place them about the card.
Color each with Copic markers.


Create a card from the woodgrain paper.
Die cut blue cardstock for the base.
Die cut a circle for the card base and stamp the sentiment.
Add one of the colored images.


Assemble the card, adding an off-cut circle as the moon.
Place the sleigh across the moon.

Thanks for stopping by.

Steph

8/22/22

Hello Hula with TLC Designs

Hi everyone, I'm on the TLC Blog today sharing some amazing new stamps - Hello Hula Digital Stamps.


I colored the images with Copic Markers, then die cut them with the center die from the Rosie Sentiment Die.  I also die cut the sun and clouds from the Aztec Sunshine Circle Die.


To create the effect of sand mounds, I die cut the road die, separated the 2 layers, inked them and adhered them to the background.


Creating a card from navy cardstock, I cut paper from the Magical Delight paper pack, inserted the scalloped die from the Happy dragonfly circle and placed the hula girls.  I surrounded them with the sun and clouds.


This is such an adorable collection and all the TLC products work so well together.

Thanks for stopping by.

Steph

BPM - Pumpkin Season

 Hi everyone, I'm using some amazing stamps from Blank Page Muse and I Brake for Stamps.

We are heading into Fall and this Pretty Pumpkin girl is perfect for a Fall card.


Use an assortment of layers for a Fall effect.  

Color the girl with Copic Markers, then fussy cut her.

Add her to the card atop a die cut circle, add a fall tag.

Thanks for stopping by.

Steph


Looking for more Inspiration? Click the links below!
The Blank Page Muse Shop https://blankpagemuse.com/

Save 15% of your Blank Page Muse orders with discount code:  BPMSteph

8/20/22

Feel Better Soon with Fairy Hugs

 Hi everyone, I have another Fairy Stamper project to share.  


Ive used Fairy Hugs stamps:  Alaina's Peruvian Lily and Fairy Words.
The background is from the Bumbletwinkle Paper Pack.

Thanks for stopping by.

Steph


8/16/22

Hello Sunshine with Paper Nest

Hi everyone, so excited to be creating with Paper Nest Dolls  this weekend.  I've used Avery with a Seashell.  She is a beauty and perfect for summer creations.


I colored her with Copic Markers, then fussy cut her.


Assembling assorted papers on the card, I created the background.  
For the waves, I used TLC Designs - Land and Seas Dies, layering them with foam adhesives for dimension.


Thanks for stopping by.

Steph

8/15/22

TLC Designs Mix and Match Challenge

The challenge at TLC Designs this month is to mix and match products from the New Release with older products.  Stop by their instagram account and see all the samples.  Plus, follow along for a chance to win a GC to the store.


I used the new stamp sets - Summer Time Friends and Peek-A-Boo Hollow and paired them with the Turtle-icisous stamp set.


Using the Daisy Frame Die, I placed the large die over the folded cardstock, taped it in place and die cut it to create the card base.


I used the 2nd largest Daisy Frame Die to die cut paper from the Fairy Land Paper Pack for the background and the Land and Seas Die Set, to die cut paper from the Snowy Skies Paper Pack to create the grass.  Assembling the layers, I die cut it again so the design appeared on the grass.
Stamping the images, I colored them with Copic Markers and fussy cut each one.


Die cutting the floral paper, I added it to the card and placed the grass layer on top.
Clouds and birds were die cut from the Aztec Sunshine Circle Die and lightly inked.
Mushrooms, from the Land and Seas Dies, were slipped behind the grass.
The stamped images were layered on the card.
To finish, I added a sentiment from the Turtle-icious stamp set.


What do you think?
Isn't this adorable?
Thanks for stopping by.

Steph

8/13/22

Best Wishes with Fairy Hugs

 Hi everyone, I have another Fairy Stamper project to share.  


I've used Fairy Hugs stamps: Nikko's Hydrangea, Fairy Words, and Stacked Mushrooms.

I loved posing Nikko on the Mushrooms.

When finished, I lightly added the Fairy Hugs Flow Stencil.

Thanks for stopping by.

Steph


8/8/22

Happy Birthday with TLC Designs

 Hi everyone, I'm on the TLC Designs blog today with a birthday card.


I created a sweet birthday card using assorted stamps, dies and papers from TLC Designs. 


Create a 6x6 card from pink cardstock.
Place the Celebrate Border Die approximately 2" down and run through a die cut machine.


Use the outer die to die cut red cardstock creating the solid border design.


Using a sheet of paper from the Sincerely Yours paper pack, adhere it to the card base.


Stamp a phrase from the Celebrate Stamp set and die cut with dies from the Loving Petals Square.


Stamp another phrase from the Celebrate Stamp set, die cut the phrase using the oval from the Oval Lily Frame for the front of the card.

Thanks for stopping by.

Steph

LOTV - Close Your Eyes

Hi everyone, I've just discovered LOTV, who makes some amazing images.   I've used the Close Your Eyes image.


Use the TLC Designs Rosie Sentiment Die to create the card.  
Folding cardstock in half, die cut over the folded edge.  
To achieve the full die effect, die cut a separate layer and adhere it to the folded card.


Die cut the image from the center die and mat with the filigree die.


Assemble the card and stamp a phrase from TLC Designs Gift of Love stamp set in the corner.


Thanks for stopping by.

Steph

8/6/22

Fairy Hugs Cottage Rose Die

 Hi everyone, I have another Fairy Stamper project to share.  


Fairy Hugs:  Cottage Rose Die

Using the Cottage Rose Die as the centerpiece, I created a gatefold card.  
Adding a large circle to the front of the card, I then die cut the Cottage Rose Die from 3 colors of cardstock.
I used the green layer as the base, added the darker layer for the Rose, then paper pieced in the lighter color to complete the Rose.  Adding the Fairy Dwellers around the Rose just added to the sweet effect.


Inside I added the remaining lightest color Rose, then stamped the Dance sentiment and several Fairy Dwellers.

Thanks for stopping by.

Steph

8/3/22

BPM - Happy Birthday

 Hi everyone, I'm using some amazing stamps from Blank Page Muse and I Brake for Stamps.


Stamp and emboss the birthday text on background panel.


Mat with white cardstock, then add to a black card.


Stamp the angel, color with Copic Markers, fussy cut and add to card with foam adhesives for dimension.  Finish the card by adding flowers in the left corner.

Thanks for stopping by.

Steph


Looking for more Inspiration? Click the links below!
The Blank Page Muse Shop https://blankpagemuse.com/

Save 15% of your Blank Page Muse orders with discount code:  BPMSteph

8/1/22

Thank You Card

Hi everyone, it's a new month and the challenge on the Scor-Pal blog is to create anything you want, just be sure it includes more than one score.

This month has flown by and I realized I needed a Thank You card.


Cut 12"x12" cardstock in half.
Score each piece at 6".


Score each panel at 3".


On the 3" panels, score every 1/4".
Assemble the 2 panels together with Scor-Tape creating a gatefold card.


Cut a panel for the inside of the card and score 1/2" around.
Add to the card with Scor-Tape.
Cut white cardstock to fit inside the scored lines.
Using stamps from the new Fairy Hugs collection - Janie's Mairgold,  I stamped them on the panel in assorted colors of ink, then lightly stamp the Fairy Poem on top.
Add to the panel with Scor-Tape.


Die cut 2 panels for the card front using TLC Designs See You In the Center Die.
Using the Fairy Hugs Thank You stamp set, create the front panel.


Use Scor-Tape to adhere the panel to the left front panel.

Thanks for stopping by.

Steph