6/26/21

Pretty Pretty Peacock

Hi everyone, I have another Fairy Stamper project to share.  Since we've been showing off the new release, I thought I'd share this amazing Peacock stamp.


I created the background panel by stamping the FH Chinese Lantern Stems in blue ink.  To showcase the FH Peacock, I used a panel I had spritzed with several colors of spray inks.  The Peacock was stamped and embossed and it's design allows some of the shimmer of the background to show.
  
The panel was die cut with TLC Designs See You In the Center Dies.  A second panel was die cut and the outer layer was used to bring the design together.  The FH Who You Are was stamped just inside the frame.

Thanks for stopping by.


6/24/21

Clear Scraps Underwater Scene

Hi everyone, I'm on the Clear Scraps blog with a new project today.


I've created a sweet underwater scene which starts with the Circle Pallet Shape.


The pallet was painted with several shades of blue paint.  Once dry, I used the 6" Beach Fun Stencil to add several elements to the background with brown ink.


Next, I painted the Octopus Chipboard Embellishment with dark blue paint so he would stand out against the background.


The Octopus was adhered to the right side.  Then I added a crab from the 6" Beach Fun Stencil in a different color for a more dramatic effect.

Thanks for stopping by.

Steph

6/23/21

Friendship Card with Rinea Foiled Papers

 Hi everyone, I'm on the Rinea blog today with this sweet friendship card.


Using a panel of Arctic Starstruck, I placed it in the MISTI.  Inking up my background stamp with   Versa Fine Clair in Purple Delight, I stamped the panel.


Then I inked up other portions of the stamp with Versa Fine Clair Green Oasis.  Then I re-stamped portions with Purple Delight.


Isn't this a pretty background?


Since these inks are very juicy, they don't dry on foiled papers.  I poured on clear embossing powder and carefully heat set the panel, moving the heat gun around the panel, heating both the front and back sides.  TIP:  Constantly move the heat gun - do not leave it in one place as that will buckle the paper.  Moving the heat gun constantly allowed the embossing powder to melt.


The panel was then matted with Ebony/Gold Glossy Foiled Paper, then Lavender/Gold Glossy Foiled Paper and then another layer of Ebony/Gold Glossy Foiled Paper before being adhered to the card


Using a Crafter's Companion Friend die, I die cut Arctic Starstruck Foiled Paper, then used the coordinating stamp with Versa Fine Clair Black to ink; I also poured on clear embossing powder and carefully heat set it.


Ovals, die cut from Lavender/Gold Glossy Foiled Paper and Ebony/Gold Glossy Foiled Paper, were placed on the card.  Friends was then added on top with foam adhesives for dimension.


Isn't it pretty?

Thanks for stopping by

Steph

6/22/21

Bloom Floral Card

 Hi everyone, I have a new floral card to share.


Who doesn't love a beautiful floral card?  Blank Page Muse has some stunning stamps and I've repeatedly stamped the image on a panel of white.


Coloring with Copic Markers, the panel was matted with cardstock and added to an orange card.


Thanks for stopping by.

Steph

6/19/21

Who You Are

Hi everyone, I have another Fairy Stamper project to share.  Since we've been showing off the new release, I thought I'd share Fifi.


Fifi is one of the newest fairies and she is blowing bubbles while leaning against the largest FH Morel.  Also included with Fifi are some tiny dandelions so I added some of them floating in the wind.  I added some color to her wings so they stand out against the backdrop. 

The hillside was created for her to sit on from torn scraps of paper, then I added different colors of FH Flutter Dust.  Along the right I added some FH Frilly Branches and finished the card with the FH Who Your Are stamp.

Thanks for stopping by.


Sweet Summer Card

 Hi everyone, I'm on the Dies R Us blog today. 

This Tutti Designs Die just screams fun, doesn't it?  I chose to die cut it from 3 colors of cardstock.  Using the orange layer as the base, I cut apart the other colors so I could reassemble the die with the correct colors in place.  Realizing I needed to use yellow cardstock, I die cut that piece last.


Create a card from kraft cardstock and add a panel of blue on top.   Using the largest of the stitched circle dies, I die cut a black cardstock circle and adhered it to the card.  Then, I placee the reassembled die cut on the card.


Please stop by the Dies R Us Store for all the supplies I've used today.

Thanks for stopping by.


Steph


6/18/21

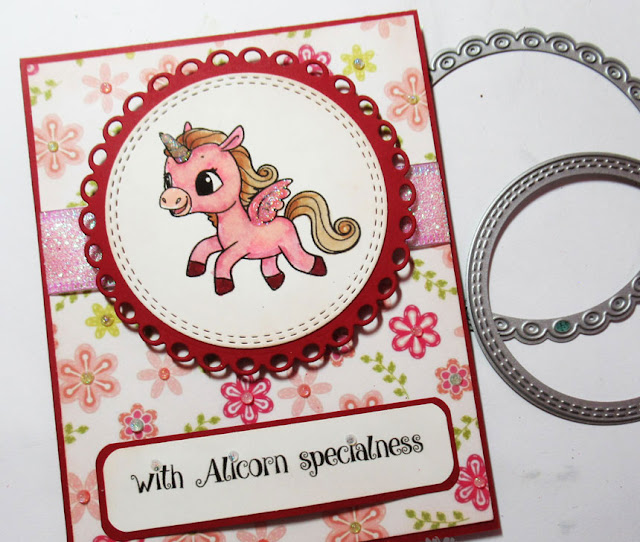
Alicorn Specialness with TLC Designs

 Hi everyone, I've got a sweet birthday card to share using some fun dies from TLC Designs.


This Alicorn Happiness stamp set is such a delight.  I've paired one of the images with the Happy Dragonfly Circle and the Soft Blush Digital Paper Pack.  Since the die set has 2 different sized circles, I could die cut the unicorn and mat her with a different colored circle.


I created a card from red cardstock and added the digital sheet, then wrapped ribbon around the card before adding the image.  The phrase was then added at the bottom. 


 Finally, I added dots of glitter glue to the flower centers.


Thanks for stopping by.

Steph


Clear Scraps Fall Decor

Hi everyone, I'm on the Clear Scraps blog sharing one of the new products available.  This new collection is called Frameables - which are changeable frames and embellishments.


I'm working with the a fall themed design.  I painted the large base and the frame with brown paint.  Rinea Marigold/Gold Glossy Foiled Paper was adhered to the smaller base.


For contrast, I adhered Rinea Marigold Starstruck and Rinea Mocha Starstruck to the pumpkin, then used the sanding tool to sand the edges.  FALL was inked with brown ink and also lightly sanded.


All the elements fit into the slots and you can arrange them as you like.


Place a photo in the frame.  If you leave one of the edges free, you can easily replace the photo as the season progresses.

Be sure to stop by the store to see all the designs that are available.

Thanks for stopping by.

Steph

6/14/21

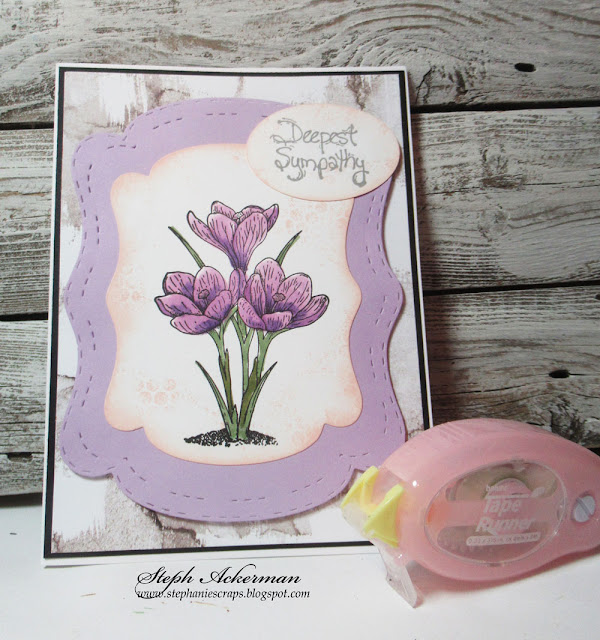
Sympathy Card

Hi everyone, I have a sympathy card to share.


Using Blank Page Muse Stamps, I stamped and colored the flowers with Copic Markers. Then I lightly stamped a bubble wrap stamp around the flowers with pink ink.


Die cut the image with TLC Designs See You in The Center Dies and die cut a larger frame.


Add the stamped image to a card and place a sentiment in the upper corner.


Thanks for stopping by.

Steph

6/12/21

An evening flight

  Hi everyone, I have another Fairy Stamper project to share.  


Have you seen the Fairy Hugs Wishing Well?  It's such an amazing stamp - it's so detailed.


I used the Fairy Scapes Slimline Background - Grayscale Sky - as I wanted to create a night scene, and it was perfect.  I stamped the Wishing Well, Fairy Hugs Flying Owls and Fairy Hugs Hanging Vines in black ink.


The stamped panel was die cut with Tutti Designs Slimline Dotted Rectangles and matted on black cardstock.   The card was also created from black cardstock .


What do you think?


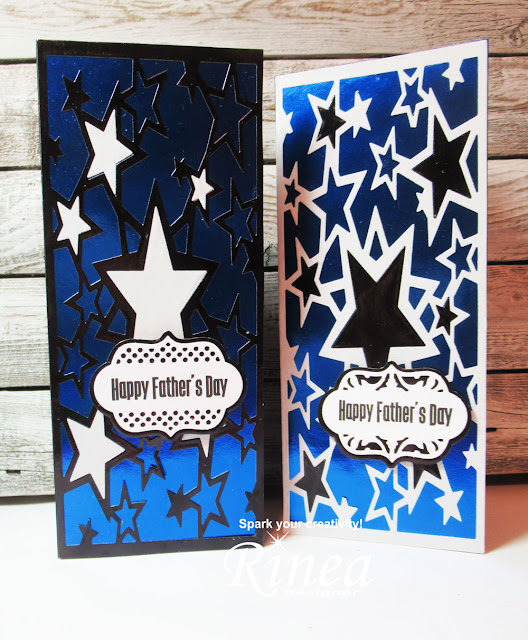
Happy Father's Day with Rinea Foiled Papers

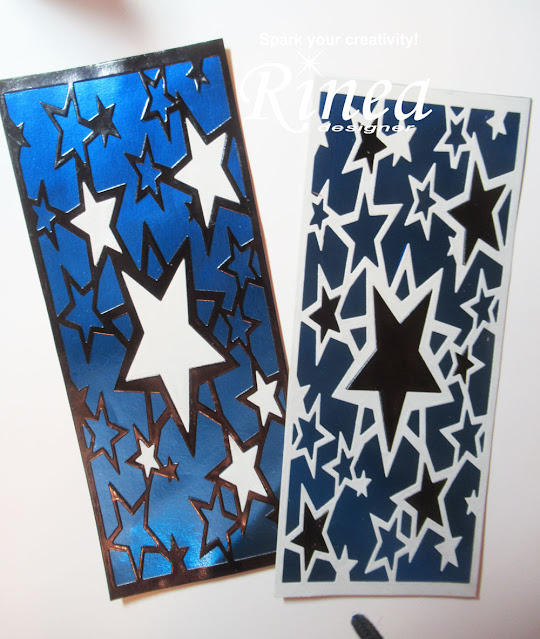
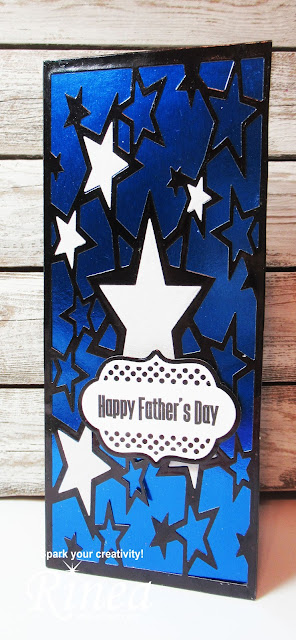
Hi everyone, I'm on the Rinea blog with a set of slim line cards for Fathers Day, but they would also work for birthday cards.


Using Tutti Designs Slimline Stars Background die, I die cut  Ebony/Gold Glossy Foiled Paper.


 I also die cut Arctic/Gold Glossy Foiled Paper.  The foils cut beautifully.


I saved all the die cut hearts because I wanted to mix the designs.


I adhered each die cut panel to Sapphire/Gold Glossy Foiled Paper.  Then I added different colored stars to each panel.


The panels were then added to cards.


Happy Father's Day was stamped on white cardstock and die cut.  It was then matted with a die cut  Ebony/Gold Foiled Paper panel.


A different die was used for the sentiment on the second card.


What dad wouldn't love getting one of these cards for Father's Day?

Thanks for stopping by.

Steph

6/11/21

Big Hugs with TLC Designs

 Hi everyone, sending Big Hugs today with this fun stamp set from TLC Designs.


Using the largest die from the Apple a Day Die, I created a card.  Since I wanted the full effect, I folded cardstock and die cut off the edge to keep the card in tact.  Then I die cut another layer and adhered on top for the full die effect.


After stamping and coloring the images from the Troll Cricket Fun stamp set, I colored them with colored pencils and gamsol, I die cut the panel with the next sized down die.


Wanting the kids to be running in the grass, I die cut grass and mushroom layers from the Land and Seas Dies.  Once layered I used the same die to cut the grass again so it fit perfectly on the card.


I also die cut different colored mushroom toppers.  How cute is that?
What a fun card to create!  After inking with brown ink, the panel was added to the card with foam adhesives for dimension.


Thanks for stopping by.

Steph