12/31/23

BPM- Balloons and Happiness

 Hi everyone, I'm using some amazing stamps from Blank Page Muse.


Blank Page Muse Stamps:  Special Day Clear Sentiments
Blank Page Muse Stencil:  Butterflies and Flowers Layering Stencil


Stamp the balloons randomly on a panel of white and color with Copic Markers.
Using the stencil, ink the small butterfly randomly about the panel.
Using the small butterfly from the stamp set, stamp over the stenciled butterflies.
Stamp the sentiment and add several stencilled butterflies.


Stamp the party streamers along the right edge of the card.


Adhere the balloon panel to the card, then add the sentiment with foam adhesives for dimension.
Add stickles as the butterfly tails.

Thanks for stopping by.

Steph


Looking for more Inspiration? Click the links below!
The Blank Page Muse Shop https://blankpagemuse.com/

Save 15% of your Blank Page Muse orders with discount code:  BPMSteph

12/30/23

Fairy Hugs Happy New Year

 Sharing a card using Fairy Hugs stamps available at Fairy Stamper.


Fairy Hugs Stamps:  Rooftops
Fairy Hugs Stencil:  Swirling Snow


Thanks for stopping by.

Steph

12/25/23

Merry Christmas

 Hi everyone, wishing you a very Merry Christmas.


Dies:  Spellbinders
The Stamp Doctor


This is a wonderful Spellbinders die set.
Following the directions on the package, create a slimline card.
Add the dies to the top layer and die cut the center panel.
Adhere the die cut poinsettia layer to the card.
Die cut the red panel to fit.
Die cut Merry Christmas and adhere to the base.


Using the included dies, die cut the poinsettias and vines from the appropriate colors and then adhere each piece to the card.

Thanks for stopping by.

Steph

12/24/23

Quick and Easy Christmas Projects - Day 10

Hi everyone.  Christmas will be here before we know it.  The last nine years I've blogged about last minute Christmas ideas you could make in under 60 minutes.  Well, it's that time again and I've got some new projects to share.

Today I'm sharing some sweet gift baskets using assorted dies.

Directions can be found here.


Christmas treat boxes are always a fun item to add to your holiday table.
Fill with little treats for everyone to enjoy.

If you missed my previous projects:


Thanks for stopping by.

Steph

12/23/23

Quick and Easy Christmas Projects - Day 9

 Hi everyone.  Christmas will be here before we know it.  The last nine years I've blogged about last minute Christmas ideas you could make in under 60 minutes.  Well, it's that time again and I've got some new projects to share.

Today I'm sharing some gift bags.


Fairy Hugs stamps:  Leaping Reindeer
Die:  TLC Designs


Cut white panels 2" x 3 1/2".
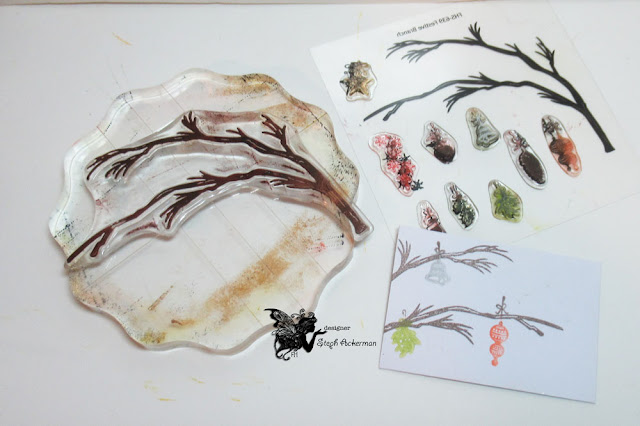
Stamp Festive Branch off the left side.
Then stamp several elements in assorted colors, hanging from the branches.


Die cut red cardstock and score in half.


Ink the edges of each white panel and adhere to the panels.


Stamp the reindeer on the gift bags.
Use stickles for the nose.
Align the panel on the bag, punch holes and thread twine through.
Tie off.

If you missed my previous projects:

Thanks for stopping by.

Steph

12/22/23

Quick and Easy Christmas Projects - Day 8

 Hi everyone.  Christmas will be here before we know it.  The last nine years I've blogged about last minute Christmas ideas you could make in under 60 minutes.  Well, it's that time again and I've got some new projects to share.

Today I'm sharing an ornament.


The most time consuming part of this project was letting the adhesive dry!


Using a metal shaped ornament, cover it with Mod Podge and placed it on Rinea Foiled Paper.
Allow to dry 24 hours before proceeding.


Once dry, use a sander to sand the edges.
This removes the excess foil and also distresses the edges of the ornament.


Add Silver Foil to the ornament top.
Punch a hole in the top, then slip rope through the hole.


Select an assortment of greenery and bind together with floral tape.
Create a bow using the Bowdabra and tie the bow around the greenery.


Using a hot glue gun, adhere the greenery to the ornament.
Hold the greenery in place for a few minutes until it sets.
Using the left over bow wire, tie a bell to the bow.
Adhere a metal word to the ornament.

If you missed my previous projects:


Thanks for stopping  by.

Steph

BPM - Fairy Sitting

 Hi everyone, I'm using some amazing stamps from Blank Page Muse.


Blank Page Muse Stamps: Fairy Sitting
Blank Page Muse background: Cyan Consortium


Stamp fairy and color with Copic Markers.


Cut around the fairy wings.
Place a circle die on the fairy allowing the wings to be free.


Die cut a larger circle.

Create a card from blue cardstock.
Tear 2 panels from the background papers and adhere to the card.


Add the fairy on the card with foam adhesives for dimension.

Thanks for stopping by.

Steph


Looking for more Inspiration? Click the links below!
The Blank Page Muse Shop https://blankpagemuse.com/

Save 15% of your Blank Page Muse orders with discount code:  BPMSteph

12/21/23

Quick and Easy Christmas Projects - Day 7

Hi everyone.  Christmas will be here before we know it.  The last nine years I've blogged about last minute Christmas ideas you could make in under 60 minutes.  Well, it's that time again and I've got some new projects to share.

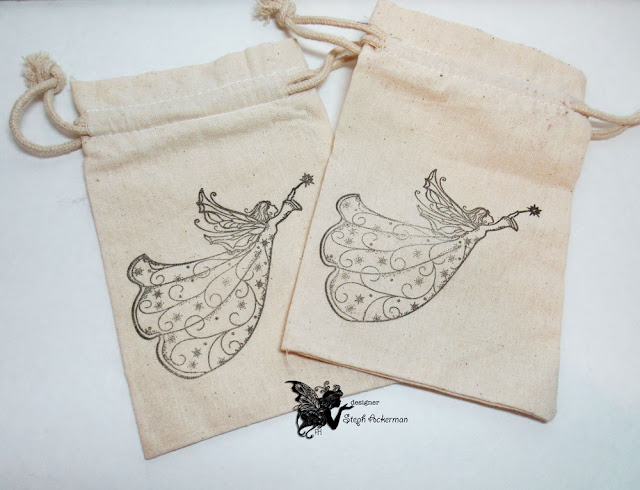
Today I'm sharing some muslin bags onto which I've stamped the Fairy Hugs Frosty Angel.


Fairy Hugs Stamps:  Frosty Angel


Insert cardboard inside the muslin bags.
Be sure the muslin bags are smooth and ready for the stamp.
Ink the angel with black ink and stamp firmly on the muslin bags.
Press and hold in place for several minutes.


Now these bags are ready for gift cards.

If you missed my previous projects:


Thanks for stopping by.

Steph

12/20/23

Quick and Easy Christmas - Day 6

Sharing a project using Fairy Hugs stencil available at Fairy Stamper.  And this is Day 6 of my 10 days of Christmas projects.  The last nine years I've blogged about last minute Christmas ideas you could make in under 60 minutes.  Well, it's that time again and I've got some new projects to share.

Today I'm sharing a holiday Peace sign.


Fairy Hugs Stencil:  Fairy Snowflakes


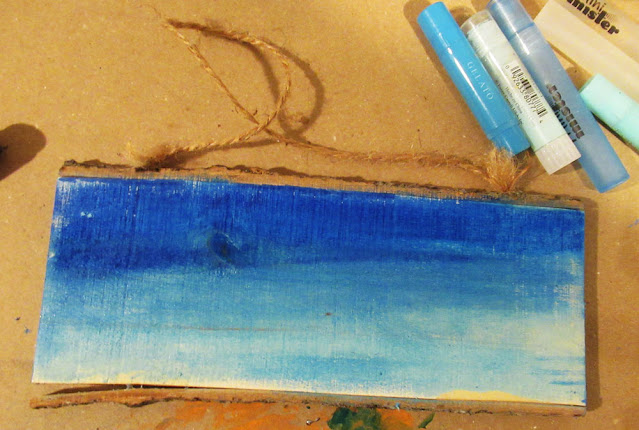
Color wood panel with 3-4 shades of blue Gelatos.
Spritz with water and use a baby wipe to blend the colors across the panel.


Place the Snowflake Stencil on the panel and add snowflakes with modeling paste.
Move the stencil around the panel to add additional snowflakes.


Allow the modeling paste to dry.


Adhere the metal word across the panel.

If you missed my previous projects:


Thanks for stopping  by.

Steph

12/19/23

Quick and Easy Christmas Projects - Day 5

 Hi everyone.  Christmas will be here before we know it.  The last nine years I've blogged about last minute Christmas ideas you could make in under 60 minutes.  Well, it's that time again and I've got some new projects to share.

Today I'm sharing some sweet gift tags.


Supplies:  
Pixi Dust Mug Dies - Christmas Gnome


Die cut all elements and assemble each design.


Wrap twine around the handles of die cut.


They are perfect gift tags for your holiday gifts.
Aren't they sweet?

If you missed my previous projects:


Thanks for stopping by.

Steph

12/18/23

Etchall December Quick and Easy Christmas Projects - Day 4

Hi everyone.  Christmas will be here before we know it.  The last nine years I've blogged about last minute Christmas ideas you could make in under 60 minutes.  Well, it's that time again and I've got some new projects to share.

Today I'm sharing etched Christmas ornaments using  EtchallⓇ Etching Creme.


Glass Ornaments


Die cut reindeers and adhere to the ornaments.
Add tape around the ornament to use as a boundary.


Spoon the etching creme over the ornaments and allow to sit for 15 minutes.


Remove the etching creme and put it back in the original container.
Etchall is reusable!


Rinse the ornaments and pat dry.


Decorate as desired.
I used assorted glitter inside the ornaments and added ribbons.


I used this one as a tag for a Christmas package.


If you missed my previous projects:


Thanks for stopping by.

Steph

12/17/23

Quick and Easy Christmas Projects - Day 3

Hi everyone.  Christmas will be here before we know it.  The last nine years I've blogged about last minute Christmas ideas you could make in under 60 minutes.  Well, it's that time again and I've got some new projects to share.

Today I'm sharing a decorative gift bag.


Who doesn't love decorating gift bags?


Create a bow using the Bowdabra and attach to a gift bag.
Slip some greenery and baubles behind the bow.
Tie to the bag.

If you missed my previous projects:


Thanks for stopping by.

Steph

12/16/23

Fairy Hugs Noel Sign Quick and Easy Christmas - Day 2

Hi everyone.  Christmas will be here before we know it.  The last nine years I've blogged about last minute Christmas ideas you could make in under 60 minutes.  Well, it's that time again and I've got some new projects to share.

Today I'm sharing a chipboard sign using Fairy Hugs stamps available at Fairy Stamper.


Fairy Hugs Stamps:  Santa's Sleigh


I inked the word with green ink; however, I also could have painted it.


Using the Festive Branch, I stamped it across the top of the word.
I stamped elements from the same stamp set in assorted colors, hanging some from the tree.
I also added them across the bottom of the sign.


Santa's sleigh was stamped in black ink.
The leaves were stamped around the O.


Next, I added the berries between the leaves.


Finally, I used Stickles to add dimension and pizzazz!

If you missed my previous project:


Thanks for stopping by.

Steph