6/30/18

Just for you Card

Hi everyone, I forgot to share this fun card I created for Imagine.


My card starts with the Crafter's Workshop stencil and Brilliance Pearlescent Lime Ink.


I then inked May Arts Sheer ribbon with the same ink so it would coordinate with the card.


I colored a stamp from Expressions Craft stamps with Memento Markers, then fussy cut it.


The stenciled panel was matted with brown cardstock then wrapped with the inked ribbon.  The panel was then added it to the card with foam adhesives.  I used graduated dies, cutting them in half and adhering them over the ribbon.  The flower was added on top and a sentiment was added to the corner. 


Lastly, twine was tied around the ribbon.

Thanks for stopping by.

Steph


6/29/18

Merry and Bright Christmas Card

Hi everyone, I'm starting Christmas cards, how about you?  I know it's early, but I find it's never too early to start preparing.


You can create an assortment of cards using the variety of Canvas Corp. and Tattered Angels products/  I used both Chalkboard and Glimmer Glaze to add color to the Ivory script background, randomly adding color.


I die cut leaves from the same script paper and spritzed it with Chalkboard.


Adding a panel of burlap to the card, I placed a die cut pointsettia and the leaves on top.  


A sentiment from Joy Clair was stamped, inked and cut into a pennant shape, then added across the card with foam adhesives.


The panel was added to a black card and the burlap was frayed for a distressed look.

Thanks for stopping by.

Steph


6/28/18

Fabulous Vacation

Hi everyone, it's vacation time so why not send someone a sweet card.


The background was created using The Crafter's Workshop stencil with brown ink.


Circles were die cut from the center panels so a ship could be added.   The sentiments were added around the ship.


Thanks for stopping by.

Steph


6/27/18

Friendship with Just For Fun Rubber Stamps

Hi everyone I've got a new card on the Just For Fun Rubber Stamps blog using some great stamps from the store to create my card.


I've used the Peacock Feather stamping it in 2 colors of ink, reversing the stamp for the 2nd image.  The panel was matted with red and blue cardstock to coordinate with the stamped images.


I've used the Your Friendship stamp, stamping it in black ink.  It was also matted with the same cardstock colors, then added to the card with foam adhesives for dimension.

Thanks for stopping by.

Steph


6/26/18

Fresh Start with Creative Vision Stamps

Hi everyone, I've created a new card using stamps from Creative Vision Stamps.


Using pink cardstock as the base, I placed a layer of burlap  on top, then added a strip of ribbon across the center.


The sentiment was foiled then die cut into shape and matted.  Then it was added to the card with foam adhesives.

You can shop at www.creativevisionstamps.com using my code (Steph10) to receive 10% off your next order of $20.00 or more.  Simply enter my code at checkout.  It's valid on regular priced items only, does not count toward shipping and taxes and cannot be used with the custom stamp service.

Thanks for stopping by.


Steph

6/25/18

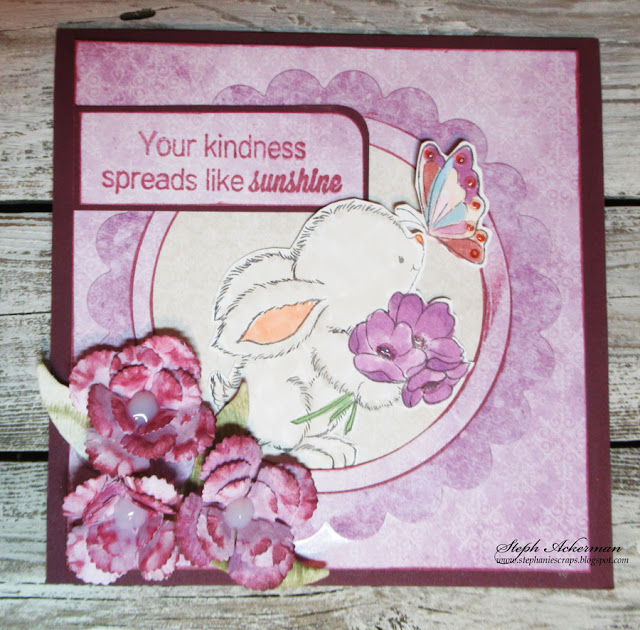
Bunny and Butterfly

Hi everyone, I love bunnies, don't you?


This amazing Wild Rose Studio stamp - Bunny and Butterfly - was colored with Copic Markers and then fussy cut.  I used Heartfelt Creations Sweet Peony stamps and dies to create the flowers, then used a stylus from the Deluxe Flower Shaping Kit to form the flowers.


I used Beacon Adhesives to adhere the flower layers together.  Holding the center with the stylus while the glue dried will help them stay together as well as retain a flower shape.


I created a card from Bazzill cardstock, then used Lemon Craft's Violence Silence papers to create the layers.  I used Spellbinders dies to create the center panel.


Flower flowers and leaves were adhered in the corner and Nuvo Crystal Drops were added to their centers.  The sentiment is from Art Impressions - Watercolor Sentiment Stamp set.


Thank you for visiting.

Steph

6/24/18

Post It Noteholders with Arnold Grummer's Papermaking Kits

Hi everyone, I'm on the Arnold Grummer blog today with a new project.

I created Post It Noteholders/Sticky Note Books using handmade papers created with Arnold Grummer's Papermill Kit and Arnold Grummer's Sticky Note Books Starter Kit.


This pads are perfect to put in your purse so you always have a pad for notes.  They also make great gifts for teachers, coworkers and friends.


Create an assortment of handmade papers using the Arnold Grummer's Papermill Kit.


Cut the paper using the template included with the Arnold Grummer's Sticky Note Books Starter Kit.


Place the cardboard elements in place and fold the flaps over.  Use the secondary template and cut a smaller layer to fit on top to cover the cardboard elements.


I selected 3 different handmade papers and inked the edges of each.  Place a post it note pad inside each book.


I decided to embellish each book differently.  This book was stamped with butterflies.


I used a stencil to add additional colors on this book.


My 3rd book was inked with a script stamp and clay flowers were added to the edge.


Pens were inserted in the spine of each book.  A stamped phrase was added to the butterfly book and   Cricut cuts were added to the other books.

You can purchase enough supplies to complete 24 notebooks with this Sticky Note Book Kit.

What do you think?

Steph


6/23/18

USA Sign with Proxxon Tools

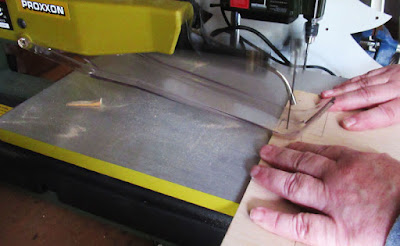
Hi everyone, I've got a new project  on the Proxxon blog using a wonderful assortment of Proxxon Tools.


I wanted a specific background so I drew the design I wanted to cut on a piece of wood, then used the Scroll Saw to cut the design.  Next I used the Drill Press to add a hole in the top.


Once cut, I used the Delta Sander to make it smooth.


Then I had fun decorating it.  I painted it with Plaid Dye, then cut Canvas Corp. 4th of July paper to fit the center panel. I matted it with cardstock, then adhered it to the panel.


Next, I cut fireworks and sparklers using my Cricut.


Then I die cut USA to fit across the panel.


Finally I added some jute and the sign was ready to hang.

What do you think?

Thanks for stopping by.

Steph


6/22/18

Whoop by Creative Vision Stamps

Hi everyone, I've created a new card using stamps from Creative Vision Stamps.


This stamp - Whoop De Freakin' Do! can be used for so many reasons, don't you think?  I chose to add it to a simple background created with the Feathers Mixed Media stencil from Expressions Craft. 


The stenciled panel was matted with green cardstock and wrapped with twine before being added to a kraft card.  The sentiment was die cut, matted with a larger die and added to the card where the right side was cut off.  To create the dots around the card, I used Imagine's texture medium - IrRESISTibles - Wedding Dress.  It added nice texture around the card.


You can shop at www.creativevisionstamps.com using my code (Steph10) to receive 10% off your next order of $20.00 or more.  Simply enter my code at checkout.  It's valid on regular priced items only, does not count toward shipping and taxes and cannot be used with the custom stamp service.

Thanks for stopping by.


Steph

6/21/18

May Your Ship Come In........

My newest post on the Imagine blog using fun inks and clay.


For complete details and supplies, stop by the Imagine blog.


Thanks for stopping by.

Steph


Happy Graduation with Tape Technologies


Hi everyone, I am participating in the Designer Crafts Connection blog hop.  This month we are working with  Styletech Craft/Tape Technologies.

With graduations on the horizon, I created a gift jar and coordinating gift bag using the colors of the graduating class - Silver and Rust vinyl.


I began by selecting a jar and with 4 squared areas.  I die cut GRAD from the Rust vinyl using my Cricut.  The vinyl die cut really well and it easily removed from its backing.


Once the letters were adhered to the jar, I began working on the top.  I used Spellbinders circle dies to die cut a Rust vinyl circle to fit the cap.  Next I die cut a smaller Silver layer.  Using My Favorite Things dies, I die cut the graduation cap in both colors.  These were adhered to the cap and a 1/2" strip of Rust vinyl was wrapped around the edge.


Finally, I thought it needed a little dressing up, so I adhered some lace trim from  Expo International,  around the edge of the cap.


Doesn't it look wonderful.  As I was giving this as a gift, I needed a gift bag so I cut  Silver vinyl to fit the front of a gift bag.


Then I die cut a large "G" from Rust vinyl using my Cricut.


I carefully applied the letter to the bag, peeling off the backing a bit at a time so I could get the letter straight.


Then I used the squeegee to smooth out the vinyl to remove any bubbles.  I also added some additional trim across the top of the gift bag so it coordinated with the jar.


Next, I die cut "rad" from Rust vinyl and adhered along the right edge.  Congratulations was cut from Rust vinyl using another metal die.  The backing pulled away easily even from those tiny letters and I was able to adhere it across the top of the bag.


 I put some money in the jar.  After all, what is a graduation gift without some cash!!


You can find links for all the designers creations at the Designer Crafts Connection blog.

Thanks for stopping by.

Steph