8/29/18

Dracula Cards with Just For Fun stamps

Hi everyone I'm on the Just for Fun Rubberstamps blog using some new stamps from the store to create my cards.  Halloween is right around the corner and the new Halloween stamps are awesome.


Dracula was stamped with black ink and colored with Copic Markers in shades of gray.  Dracula was die cut, matted with a larger die and added to a spider web background wrapped with twine.  Happy Halloween is from Sentiments 1.


My next card uses 2 of the new stamps - Dracula and the spray of bats.  I created a background from several colors of ink, then stamped the bats randomly about the panel.  Dracula was colored with Copic Markers and fussy cut.


The stamped panel was matted with black, wrapped with twine and added to a card.  Dracula was added to a large oval die.  Thinking of You from Sentiments 1 was added slightly behind Dracula.


I absolutely love these new stamps.  Happy shopping.

Steph

8/28/18

Skeleton Candy Jar with Etchall

Hi everyone, as we are heading into the Fall/Halloween season, I've got a new etching project to share.  If you are looking for a quick and easy project, this projects definitely fits the bill.


I found this glass skeleton container and wanted it etched to give it a more spooky appearance.

I filled the skeleton with Etchall dip 'n etch and allowed it to sit for 15 minutes.  Since dip 'n etch is reusable, simply pour it back in the jar to be used for another project.  Rinse the skeleton and dry off.


Fill with goodies and enjoy. ( I'm a little partial to Kit Kats!)


Thanks for stopping by.

Steph


Happy Halloween With Creative Vision Stamps

Hi everyone, I've created a new card using the new Foilables Mini Series from Creative Vision Stamps

The Happy Halloween set includes 3 Happy Halloween panels and 3 mini cards so you have endless ways to create with this set.


I foiled the  panel with WildFire Heat Transfer Foil.  Isn't that a wonderful color?  Depending on how you hold the image, you get several different colors!   I matted the panel on both black and orange cardstock.
 
To create the background, I repeatedly stamped the bat from the Pet Monsters stamp set, rotating the image as I stamped the panel.  This panel was then matted with black cardstock before being added to an orange card.

The Happy Halloween panel was added to the card with foam adhesives for dimension.


You can shop at www.creativevisionstamps.com using my code (Steph10) to receive 10% off your next order of $20.00 or more.  Simply enter my code at checkout.  It's valid on regular priced items only, does not count toward shipping and taxes and cannot be used with the custom stamp service.

Thanks for stopping by.

Steph


8/27/18

Embossed Cards with Handmade Papers

Hi everyone, I've got a new project on the Arnold Grummer blog.


Using assorted handmade papers made with Arnold Grummer's paper making kit, I cut each paper to fit my cards, then embossed each with a different embossing folder.  Next, I inked each panel with assorted colors of VersaMagic inks.


My blue card uses an  embossing folder from Craft-Too.  The flowers were inked and the panel was matted with kraft cardstock.  Twine was wrapped around the panel and several brads were placed within the flowers.  The panel was then added to the card with foam adhesives.  A sentiment was stamped on a left over scrap,  matted on cardstock and added to center of the card.


My green card was embossed with a Cuttlebug script embossing folder and inked with green ink.  The panel was matted with kraft cardstock then added to a card.  The sunflower was stamped on another piece of the handmade paper and colored with Memento Markers.  Once colored, it was fussy cut and matted with cardstock and fussy cut again.  It was then added to the card with foam adhesives.  The sentiment was stamped on a left over scrap and matted with cardstock before being added to the card.


My purple card was embossed with a Cuttlebug music embossing folder and lightly inked.  It was matted with 2 layers of purple cardstock.  The flowers were added to the upper right corner with a brad and the panel was then added to the card.  The phrase was stamped on a scrap of handmade paper and matted with cardstock before being added to the card with foam adhesives.


What do you think?  Handmade papers are perfect for creating personal cards.

Thanks for stopping by.

Steph


8/24/18

Hocus Pocus with Creative Vision

Hi everyone, I've created a new card using the new Foilables Mini Series from Creative Vision Stamps

The Hocus Pocus set includes a striped panel and the Hocus Pocus panel.


I foiled the Hocus Pocus panel with WildFire Heat Transfer Foil.  The stripes panel was foiled with Silver Bullet Heat Transfer Foil.  Don't you love the colors?


I created a card from black cardstock and added a pattern paper layer.  Next, I added a doily, then placed the foiled panels on top.  The witch and cauldron were die cut from black cardstock and placed about the card.


You can shop at www.creativevisionstamps.com using my code (Steph10) to receive 10% off your next order of $20.00 or more.  Simply enter my code at checkout.  It's valid on regular priced items only, does not count toward shipping and taxes and cannot be used with the custom stamp service.

Thanks for stopping by.

Steph

8/23/18

Happy Anniversary Joy Clair Blog Hop


Hi everyone, I am participating in the Joy Clair blog hop today to celebrate their Anniversary.  Joy Clair is now 4 years old and I was privileged to be on their inaugural design team.  Watching this company grow these last few years has been amazing.

I created two different cards for this hop. 

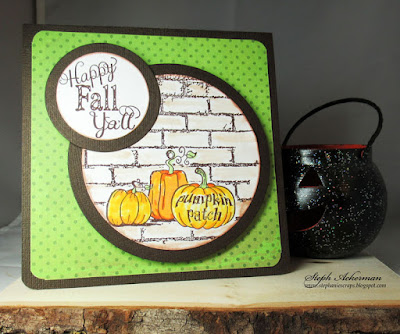
My first card is a fall card using a combination of both old and new stamps.


Using a masking technique, I stamped 3 pumpkins from the Fall Time Planner stamp set and the Harvest Blessings stamp set on a white panel.


I masked the pumpkins again and stamped the Broken Brick Background stamp on top.  Masking the pumpkins ensured they would remain in the front of the brick wall.


After coloring the pumpkins, I lightly inked the brick background.  Next I die cut the panel with a large Spellbinders die and matted it with a larger panel of cardstock.


I created a 5 1/2" x 5 1/2" square card, added a panel of green and placed the image on the card with foam adhesives.  Then I stamped and die cut a phrase from the Harvest Blessings stamp set, adding it to the left corner.  Does it feel like fall yet?


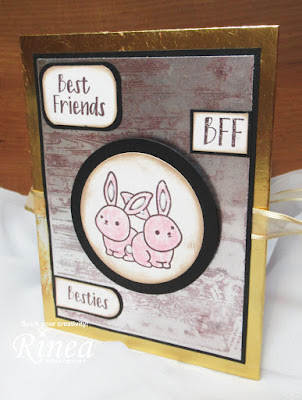
My next card using the Born to Sparkle stamp set.  Going for a totally different look, I stamped a panel of  Rinea Silver/Gold Glossy Foiled Paper with the included small stamps.  As I wanted the small stamps to sparkle, I used Rinea's Ghost Ink.


The panel was matted with black and white cardstock, then wrapped with silver glittery ribbon before adding the panel to a glittery card.


The sentiment was stamped on Rinea Gold/Gold Glossy Foiled Paper with black ink then die cut and added to the card with foam adhesives.

Please visit the Joy Clair store to see all their amazing stamps and stop by the Joy Clair blog to see lots of inspiration.


Thanks for stopping by

Steph

8/21/18

Very Merry Christmas with Creative Vision Stamps

Hi everyone, I've created a new card using stamps from Creative Vision Stamps.


Using the Beary Merry stamp set, I stamped the tree twice.  Next, I used a masking technique to add the third tree, just slightly darker than the other two.


The panel was die cut and matted with a larger die before being added to the card.
 
The sentiment, from the same set, was added across the trees.
 
As it needed a little "something" extra, I added some assorted colors of  Robin's Nest dew drops about the trees to simulate Christmas tree lights.


You can shop at www.creativevisionstamps.com using my code (Steph10) to receive 10% off your next order of $20.00 or more.  Simply enter my code at checkout.  It's valid on regular priced items only, does not count toward shipping and taxes and cannot be used with the custom stamp service.

Thanks for stopping by.

Steph

8/18/18

Good Friend Card

Hi everyone, I've got a sweet card to share today.


I die cut Rinea's Violet/Gold Glossy Foiled Paper with a lovely Spellbinders die.  Next  I die cut ovals from Silver/Silver Starstruck Foiled Paper and Violet/Gold Glossy Foiled Paper.  The phrase was stamped on cardstock and all ovals were assembled on the card.


I created a lock from white Makin's ClayⓇ using a Prima mold.  With all the detailing, I decided to ink it with Imagine's Perfect Plumeria Ink.


Then I tied some tiny flowers to the lock before adhering it to the card.

Thanks for stopping by.

Steph

8/17/18

Mini Album with Rinea Foiled Paper

Hi everyone, I'm on the Rinea blog with a mini album using the Rinea Princess Foiled Paper Variety Pack  and Joy Clair Stamps.


I've used a 5x7 Zig Zag book from Arnold Grummer to create a Friendship Mini Album using the Princess Foiled Paper Variety Pack  and Joy Clair Stamps.

Begin by stamping the Wood Background stamp in brown ink on Glossy Silver/Gold Foiled Paper.


Cut Glossy Silver/Gold Foiled Paper to 6x8, then glue the chipboard panel to the silver side.  Score around the chipboard.  Fold along the scored lines and adhere the flaps to the chipboard panel.  Repeat for the second chipboard panel using Glossy Blush Pink/Gold Foiled Paper for the back cover.


Mat the stamped panel with black cardstock.  Wrap ribbon around the book and add the stamped panel on top.  Add several stamped phrases from the Joy Clair Best Buds stamp set.


Stamp one of the images from the Best Buds stamp set for the center of the front cover.


Adhere the Z-Fold pages to the front and back covers.  Then decorate the pages with stamps and assorted foiled papers.  


Repeat for the other side.  This is the perfect sized album to use up your scraps of foiled papers.


At 5x7 the Z-Fold booklet is the perfect size to put in your child's back pack so they can add photos of their friends as well as some notes about their days with friends. 


Thanks for stopping by.

Steph


8/16/18

Decorative Mitten with Proxxon Tools

Hi everyone.  Summer is winding down and you know what that means, right?  Christmas is on the horizon and it's never, ever, too early to start creating holiday projects.


Supplies:
Proxxon Scroll Saw
Proxxon Delta Sander
Proxxon Bench Drill Press
Plaint Texture Coastal Paint
Delta Ceramcoat
Plaid Stencil
Rinea Foils
Tattered Angels Glimmer Mist
Chipboard
Ribbon


Draw a pattern on a piece of plywood.


Cut around the pattern using the Scroll Saw.


Punch a hole in the top with the Drill Press.
Use the Delta Sander to sand the mitten.


Paint the mitten with Plaid's Coastal Texture Paint in Seal Grey.  
I first painted it black then realized I wanted it grey.
The Coastal Texture Paint easily covered the black paint.


Use painters tape to mask off sections of the mitten.
Add stenciled effects with molding paste.


Remove the masking tape and add strips of Rinea Foiled Papers across the mitten.


Paint chipboard elements and add them as shown.
Wrap ribbon around the mitten.
Die cut a pointsettia from Rinea Ruby/Gold Glossy Foil.


Place the pointsettia atop the ribbon.


Thanks for stopping by.

Steph


8/15/18

It's Your Day with Just For Fun Rubber Stamps

I've got a new card on the Just For Fun blog.


I love this Landscape Tag stamp.  It has a fun collage look which lends itself to assorted colors of inks.


I matted the tag with kraft cardstock then added it to the card which was wrapped with twine.


The sentiment is from Sentiments 1 and was added to the left side.

Thanks for stopping by.

Steph