3/31/16

Sweet Altered Tray


Hi everyone, it's time for the Ann Butler Designs and ETI blog hop.

I began by painting a wood tray with Ann Butler Designs Aquamarine Iridescents.  I love how the color goes on smoothly and varies with the grain of the wood.  I painted it 3 times and the tray got a little darker with each application.


I inked up a variety of Ann Butler stamps by Unity Stamp Company with Ann Butler Designs Crafter's Ink and stamped them on white cardstock.  Using a 1" punch, I punched out a variety of stamped squares.  Then I painted Ultra Seal on the bottom of the tray and lined up the stamped squares.  I painted on another layer of Ultra Seal to seal the papers in place before proceeding.


Following the Manufacturer's directions, I mixed equal amounts of ETI's EasyCast Clear Casting Epoxy resin and hardener  in one cup for 2 minutes.  Then I poured the mixture into another cup and mixed again for another minute before pouring into the tray.


I put the tray aside for 24 hours to allow the resin time to cure and harden.


My tray perfect for holding all kinds of things that tend to get "lost" on my craft table!!  Check out all those resin goodies waiting to be used!


Please stop by everyone's blog to see what they've created.

Ann Butler

Beth Watson
Einat Kessler
Irit Shalom
Larissa Pittman
Madeline Arendt
Paula DeReamer
Steph Ackerman  HERE
Tammy Santana
Vishu Reberholt


Thanks for stopping by today.

Steph

Garden Burlap Panel


Click for Options

Hi everyone, I have an amazing canvas to share with you today.  It took awhile to create, but it was a lot of fun and the texture is amazing.


Begin by painting gesso on a burlap panel.  I'm not a fan of burlap and gesso allowed me to work with a lot of colors on the burlap and keep those colors vibrant.  While still wet, place several paper doilies in the gesso.  Allow the panel to dry, then use molding paste through the Crafter's Workshop stencil randomly about the panel.  Once dry, add flowers and chipboard elements and some torn papers. 


Paint gesso over the entire panel again (and all elements).  Once dry, spritz assorted colors about the panel.  Lay down the lightest color first and build up the colors.


Allow the colors to dry before adding the next color (use a heat gun if you are impatient).  Add color everywhere.


Add flowers to the upper left corner of the panel and sprinkle glitter around the flowers.  Add several Graphic 45 panels together with a clip.  Add a metal embellishment.


Spritz a ribbon with assorted colors and adhere under a strip of flowers.


Sprinkle some additional glitter around the canvas and add some additional flowers.  Adhere the Graphic 45 panels to the panel with foam adhesives to add dimension.


This is stunning in real life and you would never know it started as a burlap panel!

Check out the Colourarte blog and facebook pages.

Thanks for stopping by today.

Steph


3/29/16

Enough Money

Hi everyone.    It's a new  challenge at The Ink Spot.  This week's challenge is to create something funny.


Please visit the Ink Spot Design Team's cards on their blogs: 


Thanks for stopping by today

Steph

3/27/16

Happy Easter

Happy Easter everyone.  Hope your day is full of fun and chocolate.

I got this fun set of stamps and dies recently - so cute!

 
Thanks for stopping by today.
 
Happy Easter.
 
Steph
 

3/21/16

Seeds for the soul

Hi everyone, it's time for another share of Joy Clair Stamps.  Pop by the store, you will absolutely love their stamps.
 
Today I'm working with the Seeds of Faith stamp set.  This set contains 17 images and sentiments.
 

This is a beautiful set with lots of possibilities.

 
Thanks for stopping by today.
 
Steph
 

3/20/16

You Are Loved

Hi everyone,  today's project features some amazing products I received from CHA 2016. 

This is my entry into the FaveCraft Blogger Contest. Voting has started and I would love it if you voted for my project. Follow this link to vote for your favorite project - http://www.favecrafts.com/voting/Blogger-Contest/


Supplies:
Design Master - Tint It, Ultra Matte
Leisure Arts Coloring Book - Arts of Coloring Flowers
Sizzix Stamps
Testors Acrylic Wash Paint
Thermoweb - Deco Foil, Adhesives


This 6" x 6" canvas started out white. Using some amazing colors of Tint It from Design Master, I was able to transform this canvas.  Tint It dries almost immediately and I was able to achieve some layered effects by adding Ultra Matt as the top layer. 


I colored a page from a Leisure Arts Coloring Book - the Art of Coloring Flowers.  This coloring book is packed with flowers of all styles and sizes.  Once colored, I fussy cut a corner selection of flowers, then layered a number of them together.  Using Testors paint with an Art Screen from Clearsnap, I added the swirls in the blank space. 


I added foils to all the leaves using Therm-o-web green foil.  Then, for dimension, I used Therm-o-web foam squares to adhere the flowers to the canvas.


 The stamped phrase is from Sizzix.
 
What do you think?
 
Thanks for stopping by today.
 
Steph


3/19/16

Bow Genius Bow Maker


.

I had the pleasure of seeing and creating with the Bow Genius at the Offray booth while at CHA 2016 in January. 

I had the chance to create both the Enchanted Pomander and the Sweetheart Corsage at the Offray booth.  Aren't they sweet? 


Using the Bow Genius you can make bows from 3" to 18" just by extending the base.  Then, simply by inserting the pegs into the base, you can also create hair bows.

Stop by the website for more information.

Thanks for stopping by today.

Steph

3/18/16

Happy Easter Bunny

My newest project for Proxxon tools is an Easter Bunny with Easter Eggs created from Smoothfoam.

It was so easy creating this Bunny using the Proxxon Hotwire Cutter.


Supplies:
Proxxon Tools:  Hotwire Cutter
Smoothfoam
I easily cut Smoothfoam with the Hotwire Cutter.  Love the bunny and eggs.


And eggs don't scream Easter until they are decorated.  Rather than dying these eggs, I used stamps, inks and stencils.

 
So what do you think of my Easter Bunny and eggs?

 
Thanks for stopping by today.
 
Steph
 

3/17/16

OlyFUN Party Favors

Hi everyone.  Are you preparing for a party?  Have you thought about using Olyfun in your creations?  Olyfun is a fabric that won't fray, has no grain, is water repellent and comes in 18 colors.  4 metallic colors were displayed at CHA and the colors are gorgeous - Silver, Red, Gold and Rose Gold. 

I needed some invitations and gift bags for an upcoming birthday so I turned to the metallic Olyfun.  Trying to get into a summer mode, I created anchors and sailboats.   Olyfun die cuts well so these anchors and sailboats turned out amazing.

 
For the invitation, I used an assortment of Spellbinders dies, die cutting the anchor from Silver Metallic Olyfun.  Placing it on a slight angle, I adhered it to the card with Fabri-Tac.  I fit Hooray! and happy birthday around the anchor. 
 
 
I die cut more anchors from Silver Metallic and several sailboats from Rose Gold Metallic.  I also adhered them to the gift bags with Fabri-Tac, then inked around them with Clearsnap Chalk Ink. 
 
 
A few dew drops from the Robin's Nest were placed along the edges of the sailboats.
 
 
Now place candies and goodies in the bags you are ready for the party!


So what do you think? 


Please be sure to check out all the designers projects today on Designer Craft Connection blog.  There is a giveaway today - one bolt of Oly-Fun Metallic of your color choice will be the prize (US and Canada only).  Please leave me a comment then enter to win via the Rafflecopter on the Designer Craft Connection blog.

 
Thanks for stopping by today.
 
Steph
 

3/16/16

Hoppy Birthday

Hi everyone, it's time for another share of Joy Clair Stamps.  Pop by the store, you will absolutely love their stamps.
 
Today I'm working with the Hoppy Birthday stamp set.  This set of 6 stamps is adorable!!!  You need to check out the fun frogs and sentiments!!


These cute guys were stamped side by side and colored with Copic Markers.  The sentiment was popped between them.


This cutie was stamped and fussy cut - loving that balloon.
 
Thanks for stopping by today.
 
Steph


3/15/16

May Your Day Be Special

Hi everyone.    It's time for a new challenge at  The Ink Spot

This week's challenge is create with green.  Hey St. Patty's Day is only a few days away.


I've used Balloons Riley, coloring him with Copic Markers and fussy cutting him before adding him to my card.


Please visit the Ink Spot Design Team's cards on their blogs: 


Thanks for stopping by today

Steph

3/14/16

Spring Flowers

Hi everyone, it's time for another share of Joy Clair Stamps.  Pop by the store, you will absolutely love their stamps.
 
Today I'm working with April Showers.  This stamp set contains 13 stamps that are sure to get your creativity flowing.


Using yellows, oranges and reds, I created the background with the different flowers included in this set.  To keep the focus on the flowers, the umbrella was stamped in black and left uncolored. 


Here's hoping for an early spring.

Thanks for stopping by today.

Steph

3/13/16

Graphic 45 Design Team Audition 2016

It's that time again - Graphic 45 is having an open audition for their 2016 design team.  I have waited all year for this call and am thrilled to be submitting my work in the hopes of making the team this year.   Graphic 45 has a wide assortment of pattern papers and embellishments in a variety of styles and colors and I love creating with the collections.

Graphic 45 has asked for 4 of my favorite projects so here there are.

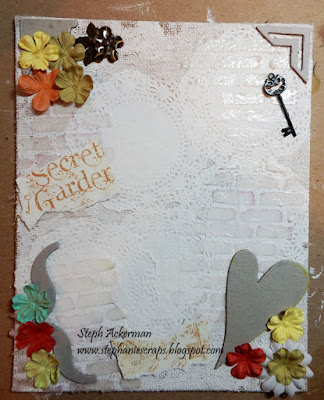
1.  Spring Canvas using papers from Secret Garden, The Crafter's Workshop Stencil, Tattered Angels Glimmer Mists, chipboard and flowers


2.  Free to be Adventurous layout using papers from Typography, An Eerie Tale with Cricut cuts, Unity Stamps.
 
 
3.  Confidence is Sexy Card using Time to Flourish papers along with stamps from So Suzy stamps.


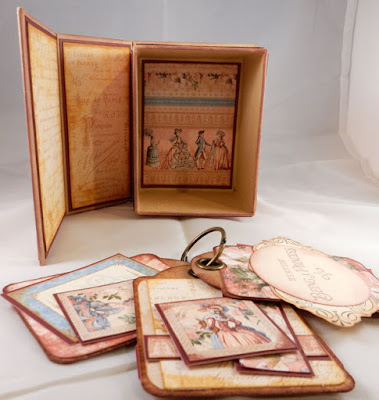
4.  For a tutorial, I worked with the Graphic 45 ATC Book Box and the Gilded Lily collection along with ColorBox Graphic 45 Decades Ink.


Directions:

Ink all edges of the box with Triumphant Red Ink using an art dauber.
You could ink the box directly with the ink pad, but since I wanted a softer look, I used a dauber.

 
Cut cardstock to fit the box, both exterior and interior.
 

Cut pattern paper slightly smaller than the cardstock.
Ink the edges of the pattern papers with Triumphant Red Ink and adhere to the cardstock.
Cut a second set of layers to fit the front of the box.


Cut cardstock and pattern paper to fit the spine.
Ink all with Triumphant Red Ink.  The ink coordinates beautifully with these papers.
Adhere "Gilded Lily" on top to reflect the title of a book.  It's just the right size!


For the front cover, fussy cut a 2nd layer of the woman and the flower.
Ink edges with Venetian Lace.  This provides some dimension between the layers.
Adhere the woman with Scrap Dots for a little dimension.
Form the flower to appear more realistic and also ink with Venetian Lace.
Adhere the flower with Scrap Dots.
 
 
For the interior, I cut pattern paper panels slightly smaller than the cardstock pieces.
I wanted to "age" the papers, so I inked over the panels with Venetian Lace.


Next, I cut panels to cover the edges of the box itself.
Then cut a panel to fit inside the box so when the box is empty you have a pretty page to look at.
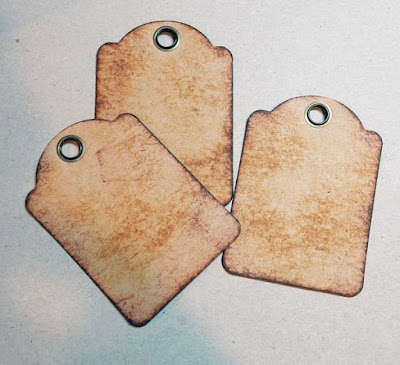
Now that the box was done, it was time to create the tags.

Ink the included tags with Venetian Lace and Triumphant Red Ink.
I used the direct to paper technique as I wanted a harsher look to the tags.

 
Cut assorted papers to fit.
Cut apart the ladies and add to the tags.
The patterns on Graphic 45 papers are well thought out and you can use any combinations of papers to create your projects.
 
 
Using the coordinating stamps, stamp phrases for the front cover and on several sides of the tags using Venetian Lace, Triumphant Red and Photogenic Inks.  You could easily use these tags as a mini album!
And a look at the completed tags.


They fit perfectly in the box.


Thanks for stopping by today.

Steph