8/29/21

Back to School Gift

As summer draws to a close are you getting ready to see the kids go back to school?  How about giving the teacher a sweet little gift to start the school year off right.

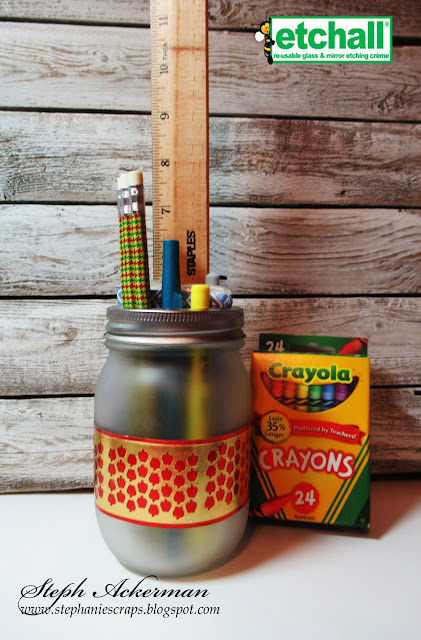
I've used etchallⓇ dip 'n etch on a glass jar to create a nice "frosty" appearance.


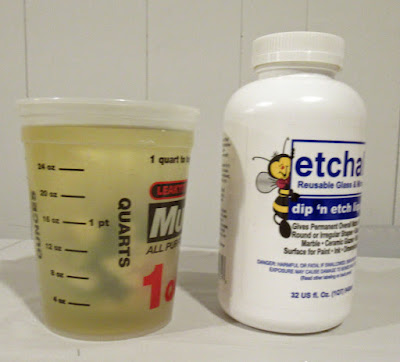
To begin, pour dip 'n etch into a container then place the jar in the liquid.  So the jar does not float, place little stones or pebbles in the jar to weigh it down.  


Let the jar sit for approximately 15 minutes, then remove, rinse and wipe dry.  Dip 'n etch is reusable, so pour it back into it's original container so it is available for other projects.


Once the jar is dry, simply decorate as desired.  I've decorated with Rinea Ruby/Gold Glossy Foiled Paper and Rinea Gold/Gold Glossy Foiled Paper which was die cut with a tiny apple die.  Adhering the layers together, I then wrapped them around the jar.


Then I added an assortment of pens, pencils, rulers and you have a perfect teacher gift.

Thanks for stopping by.

Steph

8/28/21

Fairy Hugs Fifi

  Hi everyone, I have another Fairy Stamper project to share.  


Using the FH Slimline Grayscale Sky panel, I've create a monochromatic card, only adding color to FH Fifi's wings and the stems of the Dandelion.  Fifi is enjoying a delightful day blowing flowers.  Chinese Lantern Stems were added as a final touch.


8/27/21

Hooray! with TLC Designs

Hi everyone, I'm on the TLC Designs blog today sharing a sweet card using assorted TLC Designs products.


I used one of the stamps from Tiptoe Fairy Dance, coloring her with Copic Markers, then fussy cutting her.  For more dimension, I added liquid pearl drops to the flowers in her hair and stickles on her wings.

 
After creating a card from red cardstock, I selected one of the papers from  You Are My Sunshine Slimline Digi Papers.  Wrapping the card with ribbon, I then added die cut circles using the Aztec Sunshine Dies, and placed the fairy in the center with pop dots for dimension.


Hooray! is from the Toga's and Bubbles stamp set.

Thanks for stopping by.

Steph

8/24/21

Decorative Candle with Gwen Studios

 Hi everyone.  I've got a new project to share using some lovely ribbons from Gwen Studios.


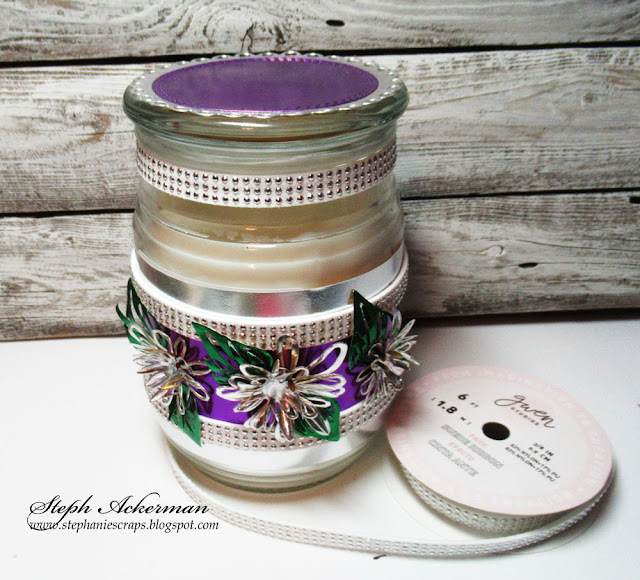
I love decorating candles and knew this ribbon would look lovely on this candle.


Covering the candle with Rinea Silver/Gold Glossy Foiled Paper, I added Fuchsia/Gold Glossy Foiled Paper as the second layer.  Faux Suede Ribbon was added where the foils joined as well as around the top edge.  I love the suede contrast against the foils.


To finish, I die cut flowers and leaves from TLC Designs Zinnia Slimline Die set using Rinea Silver/Gold Glossy Foiled Paper and  Rinea Emerald/Gold Glossy Foiled Paper.  Next, I adhered them around the jar and pulled the layers out for dimension.


Finally I added die cut circles from the same foils using the TLC Designs Happy Dragonfly Circle Die set and added to the top of the jar.


Thanks for stopping by.

Steph

8/21/21

Creeping It Real Halloween Card

Hi everyone, did you see the new TLC Designs Release?  It is amazing!!!!!  Stop by the TLC Designs Shop to see all the new products that are available.

I'm using the Creeping it Real Digital Stamps, Digital Paper Pack and Zinnia Slimline Die.


I chose this fun Trick or Treat phrase and die cut it with the smallest of the dies.  Then I paired it with Dracula and the Monster which I colored with Copic Markers, then fussy cut.


Using the Zinnia die, I die cut the digi paper.


I created a card using the main die.  Placing the die off the folded edge of the cardstock keeps the card intact, but you lose part of the pretty edging.   Easy solve - die cut a separate panel and add it to the card to complete the look of the die!


This card was fun to create and is absolutely adorable.


Thanks for stopping by.

Steph

Always Believe

  Hi everyone, I have another Fairy Stamper project to share.  


I've used FH Deer, Fairy Hive, Frilly Branches and Believe.

Thanks for stopping by.


8/19/21

Clear Scraps Flip Flop Chipboard Album

 Hi everyone, I'm on the Clear Scraps blog with one of their new albums - Chip Tab Slimline Album.

Containing 5 pages, this chipboard album is perfect for creating a wide assortment of projects.  I chose to create a vacation album and while, we haven't been able to take a vacation recently, I plan on using this album for an upcoming vacation.  


Because I don't know where we'll be going, I chose to decorate the front cover.  I'll fill in the interior pages once we've finally taken that trip!


These chipboard pages are very sturdy and can withstand paint and ink.  I chose to add pattern paper to the cover, then used the Expressions Small Vacation word as a stencil, inking around it with black ink.  I left the film in place while using it as a stencil so the word would not pick up the color.

Then I removed the film on the reverse side and inked it with blue ink and adhered it to the album cover.

Next, I used decorated the Mini Shaker Flip Flops, inking the top layer with blue ink and the bottom layer with salmon ink.  Once the ink dried, I adhered the bottom layers together.  

Small beads were placed in the bottom layer.  The film was removed from the acrylic layer and the flip flop was assembled.


The flip flop shaker was adhered to the album on a slight angle.


Thanks for stopping by.

Steph

8/18/21

Vacation Hideaway

Hi everyone, I've used stamps from Blank Page Muse and dies from TLC Designs to create this vacation hideaway.


Supplies:  Blank Page Muse Stamps Let's Get Away
TLC Designs Daisy Frame Dies
Copic Markers
Tim Holtz Oxide Ink


Stamp the image on white cardstock.
Color with Copic Markers.
Die cut into shape.
Die cut a larger panel.


Add additional color with Oxide Inks.


Assemble the card.
Stamp the phrase from the same stamp set and punch out.
Add to corner with foam adhesives for dimension.

Thanks for stopping by.

Steph

Looking for more Inspiration? Click the links below!
The Blank Page Muse Shop https://blankpagemuse.com/

Save 15% of your Blank Page Muse orders with discount code:  BPMSteph

8/14/21

Pond Fun

  Hi everyone, I have another Fairy Stamper project to share.  


FH Pixie, Trixie and Dixie are enjoying the FH Pond.  They are surrounded by FH Grass, Flutter Dust and Frilly Branches.

Thanks for stopping by.


8/13/21

Time to Celebrate with TLC Designs

Hi everyone, I'm on the TLC Designs blog today sharing a sweet card using assorted TLC Designs products.

 
I stamped the troll from Troll Cricket Fun on white cardstock, then stamped the bushes from Toga's and Bubbles around the troll.  I used a masking technique to get the different heights.  Toadstools and the cricket from the Troll Cricket Fun set were then added.  They appear to be having a conversation, don't they?  All images were colored with Copic Markers.


I used the See You in the Center Die to die cut the image, lightly inking the edges.  Stars from Star Spangled Confetti were placed above the stamped images.


I placed the design on a background created with a sheet of paper from the Simply Sweet Digital Paper Pack


Finally, I added Celebrate from Celebrate Sentiments to complete my card.

Thanks for stopping by.

Steph


Choose Happy Today

 Hi everyone, I'm on the Dies R Us blog today.


Please stop by the Dies R Us Store for all the supplies I've used today.

Thanks for stopping by.


Steph

8/12/21

Ann Butler and DCC Blog Hop

Hi everyone,  I'm participating in the Designer Crafts Connection blog hop, and this month we are partnering with Ann Butler Designs.


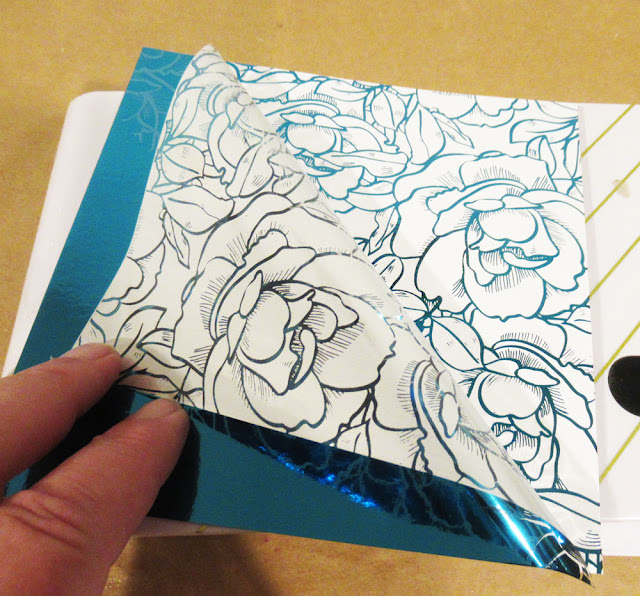
I received the  Black and White Toner Sampler Package and several colors of Deco Foil. Using the rose pattern with blue foil, I created several cards.  


The Toner sheets easily pass through a foiling machine and the color easily embeds itself in the Toner sheet.  Remember to save the foil and use it for another project.


I cut the panel in half, I using one panel as it was foiled and the other I added color with Copic Markers.  Both have a wonderful effect.  


 Sentiments are perfect for using your foil scraps.


Add a foiled sentiment to the cards with foam adhesives for dimension.


I also created another card using the leaf panel and green foil.  After foiling, I die cut the panel and then wrapped it with ribbon before adding it to a card.


Please stop by the Designer Crafts Connection blog to see what the designers have created this month with Ann Butler Designs.


Thanks for stopping by.