4/30/23

Fairy Hugs Trick or Treat

   Sharing a card using Fairy Hugs stamps available at Fairy Stamper.


Supplies:
Fairy Hugs Stamps: Trick or Treat
Die:  Anna Griffin


I know it's a ways before Halloween, but I recently got this slimline die and knew it would be perfect with the large Trick or Treat stamp.


Thanks for stopping by.

Steph

4/29/23

Fairy Hugs Gourwood Cottage

   Sharing a card using Fairy Hugs stamps available at Fairy Stamper.


Fairy Hugs stamps: Gourwood Cottage, Stone Walkway,


Create a background using Brushos.
Stamp the cottage in the center and stamp another on scrap paper.
Cut out the scrap paper cottage to use as a mask.


While masking off the cottage, stamp the scene around it.
Stamp assorted sizes of the rugged pines around the cottage.
Finish with the stone walkway grass and mushrooms.


Mat the panel with coordinating cardstock.
Created a 6" x 6" card and add the panel, closer to the left side.
Stamp the phrase and add to the card with foam adhesives.

Thanks for stopping by.

Steph

4/27/23

Etchall Wedding Jar

Hi everyone, as we head into the wedding season, I've created a wedding jar using  EtchallⓇ.


Etchall allows you to add "tooth" to glass items so paint will adhere easily.


Place the jar in a container and pour in etchallⓇ dip 'n etch liquid.


Allow to sit 15 minutes then remove and replace the liquid back in it's original container.
If you don't have enough liquid to completely cover the jar, place the lid on the jar and turn it upside down in the dip 'n etch and leave it for another 15 minutes.
Don't you love the frosted appearance?
Then return the liquid to its original container.


Going with the wedding colors, I painted the jar green, then placed a layer of silver on top.


Wrap burlap ribbon around the jar.


Stamp a phrase and die cut.
Add to a larger die and adhere to the top

Thanks for stopping by.

Steph

4/23/23

Fairy Hugs - Rainey

   Sharing a card using Fairy Hugs stamps available at Fairy Stamper.


Fairy Hugs Stamps:  Mabel's Lily of the Valley
Dies:  Crafters Companions


Stamp the larger Lily on a white panel and position Rainey under the Lily.
Add grass, then Wheat Stalks and the mini flowers from Rainey.


Die cut the edge of a card and assemble the stamped panel with 2 layers of cardstock.


Stamp the phrase in the upper right corner.

Thanks for stopping by.

Steph

4/22/23

Fairy Hugs - Fairy Dust Wishes

   Sharing a card using Fairy Hugs stamps available at Fairy Stamper.


Fairy Hugs Stamps:  Bluebell, Fairy Dust Wishes
Fairy Hugs Stencil: Woody
Fairy Hugs Paper Pack: Tumbleshine


Stamp Bluebell on a panel from the Tumbleshine pack using black ink.
Place the stencil over the panel and ink with Distress Ink.
Die cut Bluebell from the panel and mat with cardstock.
Reassemble on the base panel.


Stamp phrase and add to the upper right corner.

Mat panel with cardstock and add to a card.

Thanks for stopping by.

Steph

BPM - Girl with Kitten

 Hi everyone, I'm using some amazing stamps from Blank Page Muse and I Break for Stamps.


Supplies: 
Stamps:  Girl with Kitten
Paper Pack: Tattered & Worn


Creating a card from black cardstock, I added a panel from the paper pack.
The image was stamped and colored then die cut.
After matting with a larger die, it was added to the card.

The phrase was then stamped and also die cut.
Once matted with cardstock, it was added to the card with foam adhesives for dimension.

Thanks for stopping by.

Steph


Looking for more Inspiration? Click the links below!
The Blank Page Muse Shop https://blankpagemuse.com/

Save 15% of your Blank Page Muse orders with discount code:  BPMSteph


4/16/23

Fairy Hugs - Thinking of you

    Sharing a card using Fairy Hugs stamps available at Fairy Stamper.


Fairy Hugs Supplies: Alexa
Dies:  Spellbinders


Die cut a card using Spellbinders dies.
Die cut a large oval and stamp Alexa.
Add grass and the mini mushrooms along the bottom edge.
Stamp the dandelions in gray ink around Alexa.


Stamp a phrase from the Fairy Whispers collection.

Thanks for stopping by.

Steph

4/15/23

Fairy Hugs Cottage Garden

   Sharing a card using Fairy Hugs stamps available at Fairy Stamper.


Fairy Hugs Supplies:


Place tape along the right side of the card, about 1" from the edge.
Ink the Fairy Dictionary and stamp along the right side.


Carefully remove the tape to reveal a straight edge.


Stamp the Mini Stone Path (masking off the top of the path) so it lines up with the die.
Then stamp grass along the bottom edge.


Die cut the Cottage Garde from green cardstock and lavender cardstock.
Cut the flowers from lavender and reassemble on the green die.

Mat the panel with cardstock and adhere to a white card.
Stamp 3 Condo Dwellers around the die.


Using liquid pearls to fill in the windows and lights.
Add stickles to the flower centers.

Thanks for stopping by.

Steph

4/9/23

Fairy Hugs - Delightful Day

Happy Easter!!!  Sharing a card using Fairy Hugs stamps available at Fairy Stamper.


Fairy Hugs stamps:  Paloma, Delightful

I recently purchased these amazing dies from Crafter's Companion and knew immediately I wanted to combine them with my Fairy Hugs stamps.

Turned out lovely, don't you think?

Thanks for stopping by.

Steph

4/8/23

Fairy Hugs Bear in the Hollow

 Sharing a mixed media project today using Fairy Hugs stamps available at Fairy Stamper.


Supplies: Fairy Hugs Stamps

Fairy Hugs Die:  Magical Hollow


Ink the metal panel with assorted colors of Distress Inks.


Die cut the Magical Hollow and add additional color to it with Distress Inks.
Using scraps of paper, create the grassy layers.
Determine the position of the Magical Hollow, then stamp assorted images.
Stamp the fence off the right side.
Stamp clouds in the upper part of the panel.


Stamp a mini bear in the center of the Magical Hollow and surround him with Bees.
Stamp Woodland Florals along the bottom edge, adding liquid pearls randoml.


Thanks for stopping by.

Steph

4/6/23

Graphic 45 Beach Banner

I have had this Graphic 45 collection for quite some time.  I've been holding it for "just the right" project.  When I came across chipboard banner pieces, I knew these papers would be perfect.


Supplies:
Pattern paper:  Graphic 45
Cardstock:  Bazzill
Dies:  TLC Designs, Quickutz


Using the chipboard panels as a template, cut the checkered pattern paper to fit each piece.
Use a different pattern for the top layer of each banner.
Since the entire collection works so well together, it was easy to mix and match.
Add a cardstock layer between the panels.  


Die cut the TLC Seas Die and add each along the right side of each banner.
Using assorted papers, decorate each panel.


Finish the banners by adding dies cut, clips and letters spelling beach.


Use large brads to assemble the panels, adding twine to both ends.

Thanks for stopping by.

Steph

4/5/23

Fairy Hugs - Smallest Things

   Sharing a card using Fairy Hugs stamps and stencils available at Fairy Stamper.


Fairy Hugs Stamp:  Smallest Things
Fairy Hugs Stencil:  Fairy Swirls


Create a panel with Brushos.
With so many colors to choose from, mix and match till you get the results you desire.
Once the panel dried, I placed the stencil on top and inked with several colors of ink.


Mat the panel with black cardstock and add to a card.
Die cut the phrase and add to the panel with foam adhesives for dimension.


Add rhinestones and pearls to the card panel

Thanks for stopping by.

Steph

4/3/23

BPM - Girlfriends Naturally Styled

  Hi everyone, I'm using some amazing stamps from Blank Page Muse and I Brake for Stamps.


Stamp image and color with Copic Markers.
Die cut the image with Tutti Designs Dies.


Mat image with a larger die.
Assemble the card.


Thanks for stopping by.

Steph


Looking for more Inspiration? Click the links below!
The Blank Page Muse Shop https://blankpagemuse.com/

Save 15% of your Blank Page Muse orders with discount code:  BPMSteph

4/1/23

Fairy Hugs - Wander Storyteller

  Sharing a card using Fairy Hugs stamps available at Fairy Stamper.


Supplies:
Fairy Hugs Stamps: Storyteller, Starla
Fairy Hugs Stencil:  Swirling Snow
Fairy Hugs Paper Pad: Tumbleshine


Selecting a design, stamp the ship in the center.
Using the Swirling Snow stencil, add color around the edges of the design.

Stamp and fussy cut Starla.
Place her on the card with foam adhesives for dimension as if she is dropping good luck to the ship as it wanders on it's way.

Thanks for stopping by.

Steph

Scor-Pal - Friendship Gift Card with Surprise

 Hi everyone, it's a new month and the challenge on the Scor-Pal blog is to create anything you want, just be sure it includes more than one score.


I've created a card with a concealed gift bag inside!


Start by cutting cardstock 4" x 10 1/2".
Place the longer length across the top and score as follows:
1/2", 1", 5, 5 1/2", 6", 10"
Rotate and score at 1/2", 3 1/4"


Fold along the score line.
Trim as shown.


Punch holes for the ribbon handles at the 3/4" edge.
Use Scor-tape to hold the ribbon and fold the flaps.
Add Scor-tape to the bottom edges.
Add Scor-tape to the side and fold the bag.


Open the card and place the edge of one side against the fold.
Remove the Scor-tape and fold the card so the bag adheres to one side.
Flip over the card, remove the Scor-tape and fold the card again.


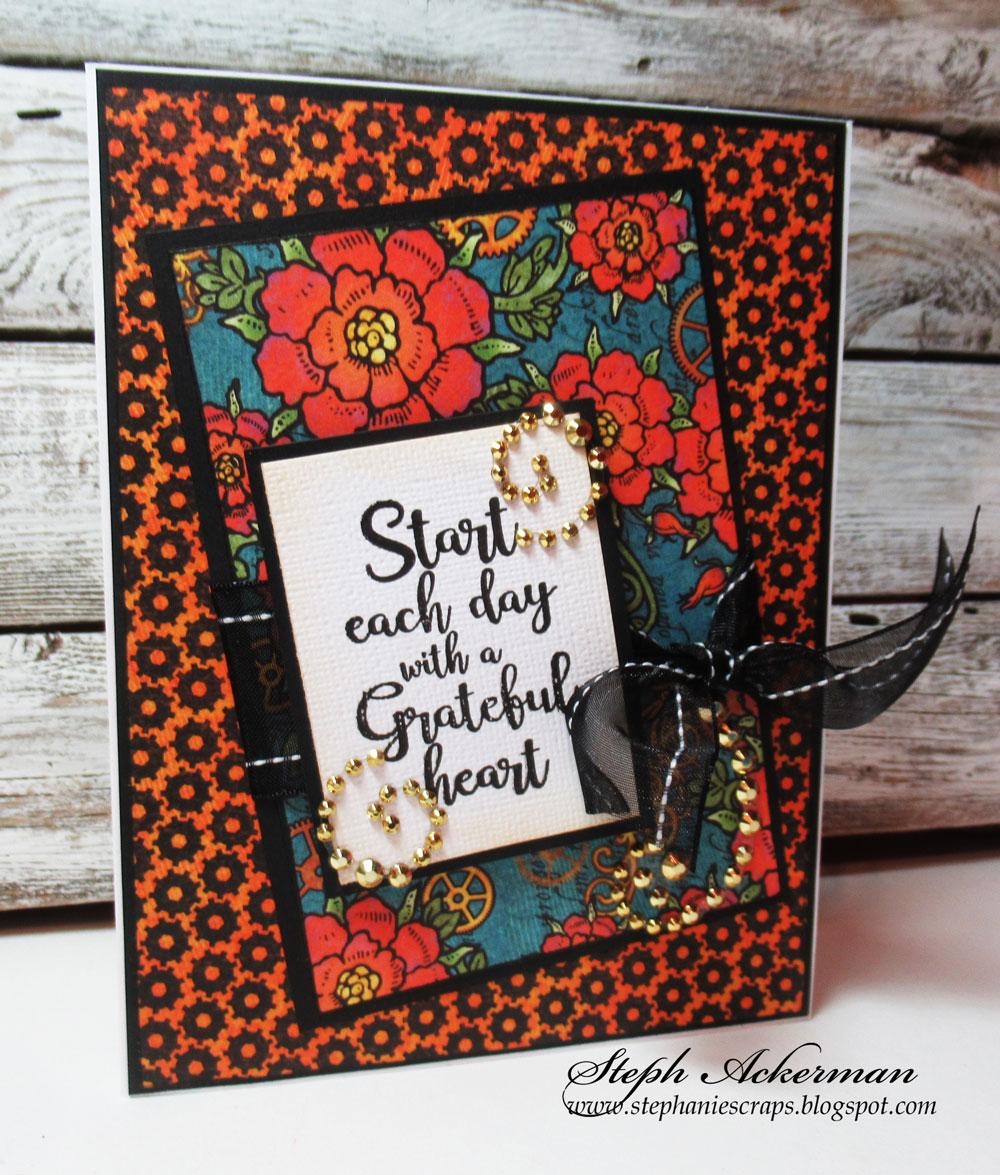
Decorate the exterior of the card with papers from Graphic 45.
Cut a smaller panel, adhere it to cardstock, then wrap with ribbon.
Adhere to the card.


Stamp Fairy Hugs Possible on a white panel and mat with cardstock.
Adhere to the base.
Add rhinestone swirls about the card.


Stamp Fairy Hugs Grateful Heart on a panel of white, mat with cardstock and add to the front of the card, holding the ribbon in place.
Finish by adding more rhinestone swirls to the front of the card.

Place a gift card in the purse and voila - a perfect gift card holder.

Thanks for stopping by.

Steph