11/29/20

Warm and Cozy Holiday Wishes

Hi everyone, I'm guest designing for Dare 2B Artzy this month and I've created another card with this new  Holiday Village stamp set.  This 10 piece stamp set has all you need to create some fun holiday cards.


When I saw this stamp set, I knew it would be perfect on a slimline card!  I stamped the image on white cardstock, then colored it with Copic Markers.


Using the Lawn Fawn Small Slimline Die, I die cut the image.  Picking up colors from the Copic colored panel, I die cut blue cardstock with the Lawn Fawn Large Slimline Die.  The panels were then added to a dark blue card. 


Using Dare 2B Artzy snowflake dies, I die cut white and blue cardstock and scattered them around the top of the card.  The phrase was stamped on white cardstock, matted with blue cardstock, then added to the top corner of the card.


This stamp looks wonderful on a slim line card.

Thanks for stopping by.

Steph


11/28/20

Peace and Happiness

Hi everyone, my newest post for the Rubber Buggy and I'm having fun with all the slimline dies that are available.


I die cut the Lawn Fawn Slimline Forest Border Die from Lawn Fawn Rainforest cardstock and  Bazzill Marshmallow cardstock.  I cut the forest off the white layer as I wanted the forest to be peaking out from snow mounds.


Next I inked the edges of the snow mound with Distress Oxide Inks in Faded Jeans and Speckled Egg using Ranger Ink Blending Tools.


Using Tutti Designs Stitched Rectangles Craft Die, I die cut Maja Design - Sunbleached cardstock, then inked it with  Distress Oxide Ink in Speckled Egg and Faded Jeans.  For definition, I inked around the edges with Distress Ink in Black Soot.


Create a card from Bazzill Marshmallow cardstock and adhere the layers together and place atop the card.


Keeping the card simple, I selected a stamp from my stash and inked it with Lawn Fawn Black Licorice Ink.  I then stamped it directly on the card.


Thanks for stopping by.

Steph

11/27/20

Clear Scraps Christmas Ornament

Hi everyone, I'm on the Clear Scraps blog working with the Bulb Medium DIY Pallet Shape.


At approximately 8" x 10", this ornament is a perfect Christmas decor piece.


Using  the Jolly Variety Foiled Pack from Rinea Foiled Papers, I selected Silver Starstruck, Ruby Starstruck and Ruby Glossy.  I traced the bulb on the foils to get the shapes I wanted.


I adhered the pieces in place and trimmed away any excess paper.


To decorate, I die cut poinsettias from Ruby/Gold Glossy and Emerald Starstruck Foiled Papers, then adhered them to the left side of the panel.  The sweet phrase was die cut from Silver Starstruck and Gold/Glossy Foiled Papers then placed among the poinsettias.


To accent the phrase, Emerald/Gold Glossy Foiled Paper was added to the leaves and Liquid Pearls were added to simulate berries.     Liquid Pearls were also to the centers of the pointsettias then added around the entire panel.


Thanks for stopping by.

Steph

11/26/20

Happy Thanksgiving Platter

 Happy Thanksgiving everyone.  Hope you are enjoying your day.

I'd like to share a decorative platter using etchall dip 'n etch liquid to etch the platter for our Thanksgiving table.

etchall dip 'n etchⓇ is a reusable etching liquid.  I placed the platter in a tin foil pan, bending the edges slightly so it fit.  Then I poured the  liquid so it covered the platter.  


I waited approximately 15 minutes, then removed the platter, rinsed and dried it.   Since dip 'n etch is reusable, I poured the liquid back in the original container to be used for other projects.  The platter took on a pretty frosted appearance.


I die cut and embossed an assortment of leaves using Rinea Foiled Papers in Emerald Starstruck, Emerald/Gold Glossy, Ruby Starstruck, Ebony Starstruck, Marigold Starstruck, Gold/Gold Glossy, Copper Starstruck, Jade/Gold Glossy and placed them on the platter.


For definition, I formed the leaves and placed a candle in  the center.


Hope you are enjoying your day.

Thanks for stopping by.

Steph


Fairy Thankful

 Hi everyone, it's Thursday and my day to share another Fairy Stamper project.


Using a Lavinia Stencil - Foliage - I created a very subtle background using Oxide Inks in Tattered Rose and Bundled Sage.


I stamped the Fairy Hive using VersaFine Clair Ink in Morning Mist.  Then I inked around the edges with Bundled Sage and VersaFine Clair Ink in Shady Lane.


After inking the edges further with Oxide Ink ink Black Soot, I matted it with green cardstock before adding to a black card.


The Fairy Chain was  also stamped with Morning Mist Ink and then embossed.  I'm thinking they are quite thankful they are able to be together today.


To finish I die cut thankful twice and added it to the card.

Thanks for stopping by.


Happy Thanksgiving Card

 Hi everyone, I'm on the Dies R Us blog today wishing you a Happy Thanksgiving and hoping you are enjoying your Thanksgiving holiday and not eating too much turkey!!!


I created an easel card in rich fall colors and placed a piece of burlap on top as I wanted to add a rustic feel to my card.  Then I wrapped the panel with some coordinating ribbon.

 Using a Tutti Designs cornucopia die, I die cut it from 2 colors of Rinea Foiled Paper.  I used Mocha/Gold Glossy Foiled Paper for the cornucopia, then used Marigold/Marigold Starstruck for the pumpkin.  If you haven't noticed, I love to do paper piecing and  I wanted to piece together the pumpkin within the cornucopia.  


Needing a base to adhere the cornucopia to (so I could do my paper piecing), I die cut 2 different sized ovals, then use the Best Glue Ever to glue the cornucopia to the ovals.  Next, I glued the various pumpkin pieces in place.


I adhered the cornucopia panel using foam adhesives for dimension and slipped a tag behind it to fill in some of the space above the dies.  


To hold the card upright, I inked stamps from Joy Clair stamps with black ink then die cut it with oval dies and placed it on the card with foam adhesives for dimension.  Thanksgiving was also stamped and placed on the tag, filling in some additional space on the card.


Happy Thanksgiving.

Stop by the Dies R Us Store to see all the amazing dies that are available.

Thanks for stopping by.

Steph

11/23/20

Happy Holidays with RInea and Crackerbox

Hi everyone, I'm on the Rinea blog today and this month we are creating with Crackerbox/Suzy Stamps.  It's time to create some holiday cards.

Silver/Gold Glossy Foiled Paper and Saphire/Saphire Starstruck were cut to size then embossed with a Christmas Cuttlebug embossing folder.  I used a piece of sandpaper to lightly sand the embossed words giving both panels a slightly distressed appearance.


Using black ink, I stamped the Christmas Birdhouse on 2 pieces of white cardstock.  One of the images was die cut with a Spellbinders oval die and one was cut into a rectangle shape.  Both images were colored with Copic Markers and then inked with oxide inks.  

Ranger Liquid Pearls were used to color the ornaments on the oval image. 


The Silver panel was matted with Emerald/Emerald Starstruck Foiled Paper then adhered to a white card.  A glittery ribbon was wrapped around the card and the oval image, which had been matted with Sapphire/Gold Glossy Foiled Paper ,was added to the card with foam adhesives for dimension.


Small snowflakes were die cut from Silver/Gold Glossy Foiled Paper and added about the card.  Nuvo Crystal Drops were used to create the snow under the tree and on the branches.


My next card uses the rectangle image which was matted with Silver Foiled Paper then adhered to the card.


Nuvo Drops were used to simulate the snow and the snowflakes about the card.


Are you ready for Christmas yet?


Thanks for stopping by.

Steph


11/22/20

Holiday Village Cards

Hi everyone, I'm very excited to be guest designing this month for Dare 2B Artzy.  I fell in love with this new  Holiday Village stamp set.  This 10 piece stamp set has all you need to create some fun holiday cards.


Using Spellbinders dies, I created an oval easel card by die cutting Bazzill cardstock, but leaving the top of the die free to create the card base.  I scored the top panel to create the easel.  Then I die cut another oval which created the top of the card and I adhered to the scored panel.  Next, I stamped the image and colored  it with Copic Markers.  Then I die cut the stamped image with the next smaller die.  So as not to cur off the banner, I fussy cut around it and slipped the die behind it.


Once the stamped panel was added to the card, I used Nuvo Drops to create dimension on sections of the snow on the houses.  Then I used Liquid Pearls to add dimension to the trees and berries.


I stamped two different phrases which were included in this set and die cut each with smaller oval dies.  Each was matted with red cardstock and one of them was adhered to the upper right section of the card.  I placed foam adhesives under the second phrase and used it as the "stopper" to hold the card upright. 


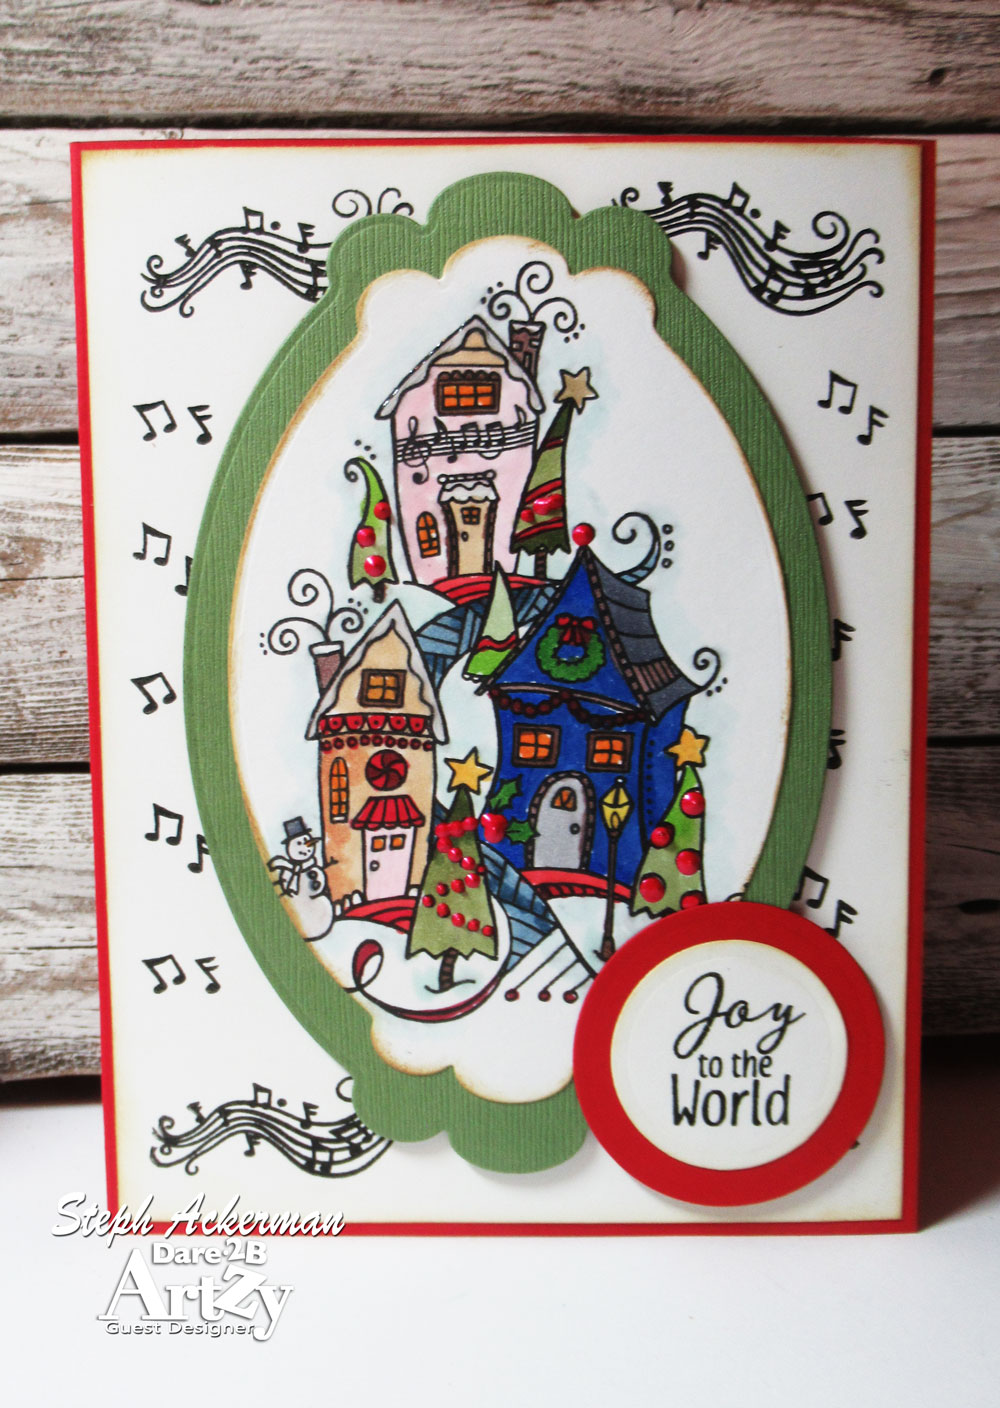
I loved the set so much I had to create a second card using the included music stamps to create the background of the card.   


I also colored the image with Copic Markers, then die cut it with a shaped die.  I used the next larger die to mat the image so it would stand out on the background.  Next, I added Nuvo Drops and Liquid Pearls about the image for dimension.  


For the card base, I stamped the included music stamps on a panel of white which was cut to fit my card.  Since I was adding the stamped village panel to the center of the card, I saw no need to add music notes in the center of the panel.


The stamped village panel was then added to the card with foam adhesives for dimension.  Joy to the World, also included with this stamp set was stamped, die cut, added to a larger red circle then added to the card in the lower right.


Thanks for stopping by.

Steph