4/27/21

Happiness with TLC Designs

Hi everyone, I've got a new post for TLC Designs and I've incorporated stamps, dies and digital papers.


Using papers from the newest collection: Simply Sweet Digital Paper Pack, I matted each layer with black cardstock to give the colors of the papers a nice pop.


Next, I stamped the girl and sentiment from the Toga's and Bubbles stamp set.  There are 18 stamps in this set and each is more adorable than the other.  After coloring the girl with Copic Markers, I selected the largest die from the Aviary Oval Die and die cut the image.  I then lightly inked the edges of he scallops with green ink.


The die cut panel was arranged on the card using foam adhesives for dimension.


Isn't she adorable?


Thanks for stopping by.

Steph

4/25/21

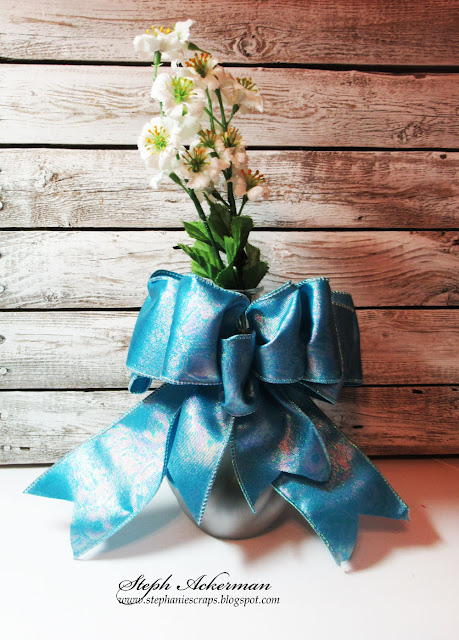
Etched Mother's Day Vase

Hi everyone, it's time to get ready for Mother's Day and nothing says Love You Mom like a vase of flowers.


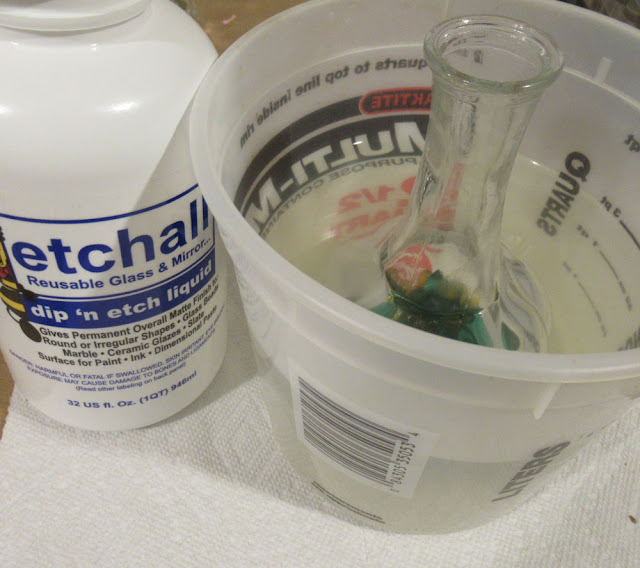
Place the vase in etchallⓇ dip 'n etch covering up to the neck of the vase.  Let it sit for approximately 15 minutes.  Remove the vase and pour the liquid back into the original container.  As dip 'n etch is reusable, it can be used for future projects. 


Rinse off the vase and pat dry.


Add a decorative bow to the vase and fill with fresh or faux flowers.


Thanks for stopping by.

Steph

Blank Page Muse Card

 Hi everyone, I'm on the Blank Page Muse Blog today with  a quick and easy card.


Supplies:
Blank Page Muse Stamps - Flower and Bird Sketches
Blank Page Muse Stencil - Pebble Path Stencil
Cardstock
Ink
Flowers


Start by placing the Pebble Stencil on a white panel.  Using Distress Oxide Inks, add the first color.  Move the stencil and add another color.  Continue moving the stencil until you have achieved the look you were seeking.


Using black ink, stamp a phrase from the Flower and Bird Sketches stamp set.


Cut the panel and ink the edges.
Mat with cardstock and add flowers about the panel.
Add to card.

Thanks for stopping by.

Steph

4/24/21

Fairy Stamper Swinging Tiana

 Hi everyone, I have another Fairy Stamper project to share. 


I had this lovely die and thought the Fairy Hugs Fairy Swing and Fairy Hugs Tiana would look lovely in  the center.


Stamping them with VersaFine Clair Nocturne Ink, I then cut the panel to fit behind the die cut panel.   Adding pink brads along the swing chain helped tie it to the base card.  Nuvo drops were added to her wings.


Flowers were added across the arch and the panel was then added to a pink card.


While the card is flat for mailing purposes, it's actually a pop up card.  A simple die cut sentiment was added to the corner.

Thanks for stopping by.


Life is Good Album

Hi everyone, I'm on the Clear Scraps blog using the Palm Trees 6x8 Wood album and the chipboard word title - Life is Good.


I know that 2020 was a crazy year and we really couldn't do a lot of things we usually do, but we are hoping that 2021 will be a much better year.  I created this album to document all the good things that will occur this year.


I love the wood grain on these panels so I decided to use Lindy's spray inks to add color to the panels.  The colors allow the wood grain to show.  I chose 2 colors for the front cover.


For the back cover and the interior panels, I selected one color.


I added some additional color along the bottom of the album,, giving it a sandy effect.


The chipboard word title was also sprayed.


I used a script stamp with VersaFine Clair Morning Mist Ink and randomly stamped it about the front cover.  I only wanted a hint of the words for a bit of dimension.


I cut white cardstock to fit the album, punched holes and added the rings.  Now my album is ready to documents the good things that will happen this year.


Thanks for stopping by.

Steph


4/23/21

Wedding Decor with Rinea Foiled Papers

 Hi everyone, I'm on the Rinea blog today with a wedding banner.


This project used papers from the Rinea Formal Foiled Variety Pack along with left over scraps of Rinea Jade Starstruck and Rinea Emerald Starstruck.  


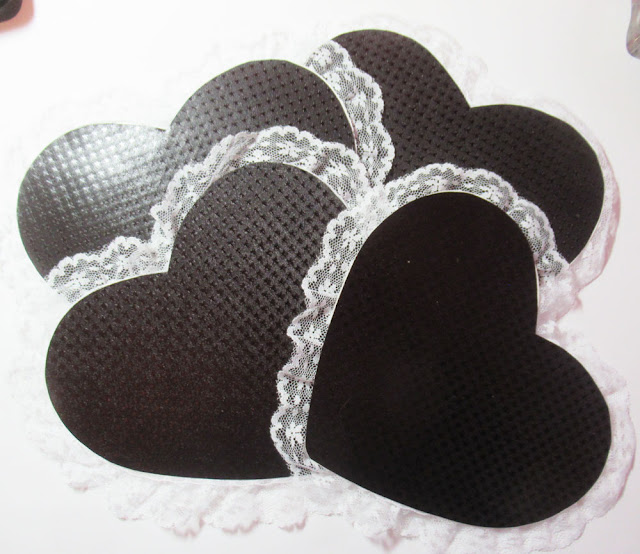
I started with chipboard bases which I cut into heart shapes. Using the hearts as templates, I cut 4 panels from Ebony/Gold Glossy.  To create some dimension, I lightly stamped Oma's Postcard Stamp with Rinea Ghost Ink on each panel.


Using Sizzix dies, I die cut an assortment of flowers and leaves in various sizes and shapes.  The letters were also die cut from Sizzix dies.


I played around with all the die cut elements determining how I wanted each panel to look as I wanted each panel to look slightly different.  Once I liked the designs, I adhered all the elements to the hearts and added brads through the flowers.


I adhered lace to the chipboard to create a feminine effect.


I cut Ebony Starstruck for the opposite side of the hearts.


Once the decorated panels were finished, I added them to the chipboard panels.


I punched holes in the top of each panel and threaded satin ribbon to be used as the hanger.  Since I wasn't sure how the bride was going to hang these panels, I left the ribbon long enough so it could be cut, if necessary


I decided to add some tiny flowers from TLC Designs as the finishing touch scattered about each heart.


I hope I have inspired you to create your own decor pieces.

Thanks for stopping by.

Steph

Sending Fairy Wishes

Hi everyone, I'm on the Dies R Us blog with some fairy wishes today.


Stop by the Dies R Us Store to see all the amazing dies that are available.

Thanks for stopping by.

Steph

4/20/21

Paddling Frog with TLC Designs

 Hi everyone, I've got a new card for TLC Designs using the new Turtle-icious stamp set.


Consisting of 8 images and 7 sentiments, your creativity can take off with this stamp set.


Use the dies from the Land and Seas Dies, I die cut 2 pieces each of white and blue cardstock.  Layering them together, I placed them on a light blue panel which was inked with blue ink before being added to the card.


I stamped the frog, the paddle and the lilies, coloring them with Copic Markers.  They were then fussy cut and placed on the card.  Clouds from the Toga's and Bubbles stamp set were stamped, fussy cut and added to the card.

Thanks for stopping by.

Steph

4/19/21

Enjoy the Journey with Clear Scraps

 Hi everyone, I'm on the Clear Scraps Blog today.

Taking apart the dragonflies, I placed them atop white cardstock and spritzed them with Lindy's Stamp Gang Shimmer Spray Inks.  The background I created was used on a previous project.


Ink the chipboard dragonflies and emboss with embossing powder.


Color one of the Wood Rectangles with a Blue Shimmer Spray.  I love that the wood grain still shows.  It gives the panel a really unique appearance.  Punch holes in the corners.


Spritz Enjoy the Journal with a pinky Shimmer Spray.


Place the phrase on the panel, then place the dragonflies around it.


Run ribbon through the holes and tie off.


Thanks for stopping by.

Steph

4/17/21

Dreaming with Melia

 Hi everyone, I'm sharing a new post for Fairy Stamper.  


I've used Fairy Hugs Melia, which is one of the larger fairy stamps, and stamped her in VersaFine Clair Nocturn Ink on a white panel.


Creating a mask of Melia, I stamped the Fairy Hugs Stone Pedestal next.


Using torn scraps of paper, I inked around Melia with Distress Oxide Inks in Speckled EggFaded Jeans, and Bundled Sage.


I added color to her wings and the pedestal with Copic Markers, then added the panel to a blue card.  Dream was die cut and added to the upper corner.

Thanks for stopping by.