8/30/17

Sunsational Halloween Blog Hop


Welcome to  Sunsational Stamps Design Team Blog Hop for August 2017. Thank you for joining  us today!  We will be showcasing one set this month for Halloween this 4x6 clear set "Trick or Treat" has 12 images including pumpkins, a ghost, bat, faces and 2 sentiments. They are too cute for words and you will be inspired by our amazing Design Team's projects. .


Here are a few simple rules we ask you to follow  to show support for each crafter and the time they have put into their work. In order to be eligible for the drawing for the blog candy and the Free digital stamp

1) you MUST visit each blog,

2) leave a comment,  

3) become a follower of each DT Members Blog and our DT blog at http://sunsationalstamps.blogspot.com/ 

We also are offering a special for this release:

You will get 10% off any order of $10.00 or more. Just use the code August17.

The code will be valid in the "Sunsational Stamps" store  

This special offer is good until  Sunday,  September 3rd at midnight  EST.   

 Grab your favorite beverage, and let's get hopping. 


I created this fun card by masking the pumpkins so the ghost appears behind them!  Such a fun technique!


If you happened to have stumbled upon this blog by chance or accident, please make sure to head to the first blog listed so you don't miss any of the Love we have to share with you. This hop runs from 9 am EST August 30th through  11:59 pm September 3rd, so you  have plenty of time to visit every blog in the list below.  

Here is the line up for the hop:

      Lisa        

LeeAnn  


Steph - You are here


So: now that we are fully inspired... how about getting creative and join us over on the Sunsational Stamps Facebook Challenge Page.

Thanks for stopping by.


Steph

8/29/17

Believe in Butterflies

I'm on the Topflight Blog today creating with stamps from Studio Light and Rubber Dance Art Studio.


I wanted the butterfly to be 3 dimensional, so I first stamped it on cardstock and colored it with Copic Markers.  I then stamped and colored a second butterfly, fussy cut it and adhered just the body in place.


I created a black card, then added a panel of purple dots to coordinate with the butterflies.    Believe was stamped on white cardstock, matted with black cardstock and added to the card.

Thanks for stopping by.

Steph

Camping Trip with Sunsational Stamps

Hi everyone, Steph Ackerman here today with another post for Sunsational Stamps.  This month we are celebrating the final days of summer and all that it entails.  Whether you like camping or fishing or anything in between, check out the store for some fun stamps.


I've used the Camp Out and Go Fishing sets.  I lightly colored all elements then fussy cut.


On the striped base, I added a panel of kraft cardstock.  The fussy cut elements where added to the card.  Then the phrase was popped onto the card.

Thanks for stopping by.

Steph


8/25/17

Spooky Etched Candy Gift

Hi everyone, with school about to start and Fall following closely behind, it's time to turn our thoughts to Halloween gifts and decorations.  The stores are completely stocked with Halloween and Thanksgiving items, so I thought I'd start creating my gifts now.
Begin by adding die cut words and/or images to a glass container.  I die cut a variety of vinyl elements using my Cricut Expression. 


Unfortunately I ran out of the black vinyl so I used a light blue vinyl which is a little hard to see on the glass.  There is no difference in etching with 2 different vinyls.  I didn't want the etching crème to etch inside the glass so I placed a masking tape barrier across the top edge.


Next I covered the glass with etchallⓇ etching crème.  I could have also used etchallⓇ dip 'n etch with similar results.  My etching crème has darkened over time, but that does not affect it's use.


I waited approximately 15 minutes then removed the etching crème.  Since the crème is reusable, put the etching crème back into the container to be used for additional projects.


Rinse the glass thoroughly and remove the vinyl to reveal the etched designs.


Add some raffia inside the dish.  Place a small bag of candy decorated with a bow created from the Bowdabra and you've got a spooky gift to give.


Thanks for stopping by today.

Steph

8/23/17

Think Big

Hi everyone, I'm on the Just For Fun Rubber Stamps blog today and I've used some great stamps from the store to create my card.


As we go through the heat of summer, I created a fun summery card.  The image I used is from the Vintage series -  Girl Fishin' and I colored her with Copic Markers.  I fussy cut her and placed her upon coordinating die cut ovals.  Then I paired her with a sentiment from the Sentiments 1 stamp set.  I can just envision her thinking of the big fish she wants to catch!


Isn't she lovely sitting on the stump thinking about what's to come?

Thanks for stopping by.

Steph


8/22/17

ATSM Challenge #256


Hi everyone.  It's a new challenge at ATSM and this week it's anything goes.  So grab your stamps and papers and create anything you'd like.


I matted this ruler paper with black cardstock and added it to a floral background before adding it to the card.


The sentiment was stamped and die cut into an oval and matted with a larger oval before adding to the card.


Thanks for stopping by.

Steph


Doodling Trees

Hi everyone.    It's Tuesday and it's my turn on the Topflight Stamp blog.  If you haven't checked out the Topflight store yet, you need to see the variety of stamps in the store.  They have some amazing stamps from all over the world.

Today I'm using a stamp from Leane Creatief - Trees.  These stamps come from the Netherlands.


I began by stamping the trees on white cardstock.  I used a water brush with several colors of green inks to paint the trees.   


Next, I doodled on the tree then used Spellbinders dies.


Using a masking technique, I stamped the tree twice and again added color with a water brush and several shades of green ink.  Then I fussy cut the trees.


Please stop by the Topflight Stamp blog for more inspiration.

Thanks for stopping by today.

Steph


8/18/17

Lighted Pumpkin

Hi everyone, I'm on the Proxxon blog today with an altered pumpkin.  I picked up this pumpkin sign last year knowing that I would be altering it this year.


I began by using the Delta Sander to create some texture on the pumpkin


I used the drill press to drill holes around the pumpkin. 


The drill press is so easy to use and I drilled holes around the edge.


Then I painted it with FolkArt Milk Paint in Tavern Ale.  Next, I dry brushed FolkArt Brushed Metal acrylic paint in Brushed Gold. 


While waiting for the pumpkin to dry, I created leaves from Makin'sⓇ clay.  After embossing texture on the leaves with Makin's Texture Sheets, I added assorted colors of  FolkArt paint, blending the colors with a baby wipe. 


Then I adhered the leaves to the pumpkin top and added some raffia. 


To finish the base, I adhered mesh along the bottom edge of the pumpkin and placed raffia on top.


Then I simply inserted the lights through the drilled holes.

This will be a great feature for Halloween.

Thanks for stopping by.

Steph


8/17/17

Mixed Media Altered Notebook

Hi everyone, my newest post on the Rinea Inspires blog is an altered notebook. 


I covered the front cover with Copper/Copper Star Struck Foiled Paper.  Then, I edged it with a strip of Sapphire/Gold Glossy Foiled Paper.


Next, I placed a stencil on top and covered it with molding paste.


Once I removed the stencil, I had this gorgeous effect.  And, the molding paste did not take long to dry!   It looks amazing!


To the corner I added assorted sizes of Petaloo flowers.


Next, I spritzed the cover with assorted colors of Tattered Angels Mists to add some touches of color to the molding paste.  They didn't take long to dry either!


Using an intricate Heatfelt Creations Decorative Oval die, I die cut Sapphire/Gold Glossy Foiled Paper.


I stamped a Prima doll stamp on white cardstock and again on Gold/Gold Glossy Foiled Paper.  I fussy cut the dress from the Gold/Gold Glossy Foiled Paper and added it to the main image which I also fussy cut.   Using Beacon Adhesives I adhered the die cut oval to the cover, then added the doll on top with foam adhesives for dimension.


What do you think?  Would you end up using this altered notebook or just hold onto it because it looks to pretty to use?

Thanks for stopping by.

Steph


Joy Clair Blog Hop - Day 2

It's Day 2 of the Joy Clair Blog Hop and we have so many different stamp sets to share.  Remember that we always have prizes for our readers and visitors that comment HERE
in our corporate blog and in ALL designers blogs.
JC_GIFTCARDS
You should have arrived here from Lori's blog.  If you get lost along the way you can always start back at the Joy Clair Blog.

Today, I'm using the Noah's Ark stamp set.


Consisting of 10 stamps, I've used an assortment of them to create bookmarks.


I cut white cardstock 2" x 7", then stamped assorted images on each.  I used black ink to stamp the clouds on the two outer bookmarks, then used gray ink to stamp the clouds and animals on the center bookmark.


Blue ink was used to stamp the assorted phrases in the center of each bookmark  as well as the water under the ark on the last bookmark.  Then brown ink was used for the arks.


To finish, I added Whiskers Twine to each.

Just leave your comments and tell us which is your favorite stamp set of each day!
 
Here is the complete list of the  Blog Hop:
 
Steph Ackerman  -  YOU ARE HERE
 
Thank you for join us and don't forget to follow us on our social media venues to be the first to hear the news, sales, promotions and giveaways!

Thank you so much for stopping by today.


Steph


8/16/17

Joy Clair Blog Hop - Day 1

It's Day 1 of the Joy Clair Blog Hop and we have so many different stamp sets to share. 
Let's start the fun with the creativity and remember that we always have prizes for our readers and visitors that comment HERE in our corporate blog and in ALL designers blog.

JC_GIFTCARDS


You should have arrived here from Lori's blog.  If you get lost along the way you can always start back at the Joy Clair Blog.

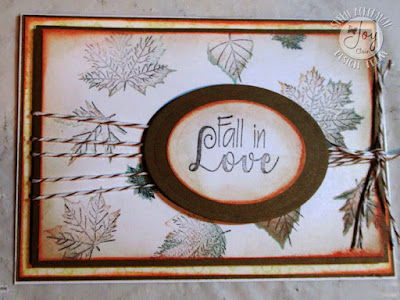
Today, I'm working with the Fall Leaves stamp set.


Since these stamps consist of 2 parts - the leaves and the veins, I found it best to use the Misti to get accurate stamping.  I placed the leaves and sentiment where I wanted them on a cardstock panel, then closed the Misti.


I inked the stamps in assorted colors of Powderpuff Ink from Quick Quotes Scrapbook Company.  Then reclosed the Misti to stamp the images.  I repeated this process to add additional colors.


Placing the second stamp layers on top of the stamped images, I reclosed the Misti to pick them up.  Inking with black ink, I then closed the Misti.  You can see how the veins are perfectly aligned with the first images. 

I matted the panel with kraft cardstock, then wrapped the panel with twine.  The panel was added to pattern paper matted with kraft cardstock then added to the card.  Fall in Love was stamped, die cut, matted with a larger die and added to the card with foam adhesives over the twine.


My next card was created in the same manner.  I wanted a vertical card, so I wrapped twine along the side of the card.  A striped panel was added to the card and the stamped panel was matted and added to the card with foam adhesives for dimension.


The sentiment was stamped in several colors of Powderpuff Ink, die cut and matted with a larger die before being added to the card with foam adhesives.


 Just leave your comments and tell us which is your favorite stamp set of each day!
Here is the complete list of the Everyday Blog Hop:
Steph Ackerman - YOU ARE HERE
Jessica Pascarella  GO HERE NEXT
Tomorrow you will see the entire Color by Faith Collection and all the New Background sets!!!


Thank you for join us and don't forget to follow us on our social media venues to be the first to hear the news, sales, promotions and giveaways!

Thank you so much for stopping by today.


Steph