3/31/15

Faries Wings

Hi everyone, have you seen So Suzy's stamps this month?

I love this Moon Fairy stamp.  To keep it simple, I just embossed her with gold embossing powder.


Layers of yellow and gold cardstock were all that was needed to keep the focus on the Moon Fairy.


The sentiment is Stardust Dancing which was also embossed with gold embossing folder.


Thanks for stopping by today.
 
Steph
 

3/30/15

Recipe Blog Hop with the Robin's Nest

'here is our blog hop button, please add to the bottom of your post for the rest of this month please...  get people excited... let them know there will be blog candy (prizes)....'


Hi everyone.

Today, it's all about recipes and the Robin's Nest design team has created some wonderful projects.  What is your favorite recipe?  Main course?  Desert?  My favorite recipes involve anything sweet and gooey. 

I printed out my favorite recipes and created a mini album to hold them.


The cover uses both sides of the Blue Daisy Stripe Cardstock.   I used Stripes on the bottom layer wrapped it with ribbon, then used the daisies  as the top layer.  A simple black dew drop was used to dot the i.


Recipes were printed out and added to tags made from Peach Glitter Cardstock.


Other products I've used include:
 
 
Who wouldn't love a sweet recipe book to call their own?
 
Leave a comment for a chance to win some Robin's Nest goodies.  And view everyone's projects here.
 
Thanks for stopping by today.
 
Steph


3/27/15

Happy Easter

Hey everyone.  Do you believe Easter is only a few days away?  We've gone from 12+ inches of snow to bare pavement in a matter of a few days.  The sun is finally shining and Spring has arrived.

So it's time to decorate for Easter and this Easter Bunny and Easter Egg were so much fun to make.  They are some older chipboard pieces from Making Memories that I "discovered" while looking for something else in my craft room. 


I've used Art Anthology paints and stencils on these pieces.  Stop by the blog for all the details.


Thanks for stopping by today.
 
Steph


3/26/15

Dreams are made of magical things

Hi everyone, have you seen So Suzy's stamps this month?

Pop on over to the store and see all that is available.   Remember for the month of March use coupon code - STEPH10 - to get 10% of your order


To create the background of this card, I sponged ink on cardstock, then lightly spritzed it with water.  After waiting about 10 seconds, I gently blended the colors with my fingers for a fun watercolor effect.


The Fancy Butterfly was stamped with clear ink and embossed with gold embossing powder.


The sentiment is one half of the Stardust Dancing sentiment which was also stamped and embossed with gold embossing powder.
 
Remember for the month of March use coupon code - STEPH10 - to get 10% of your order.

Thanks for stopping by today.

3/24/15

Happy Birthday Cards

It's a new challenge at Cornish Heritage Farms, and Frances has challenged us to create a birthday card.

I love creating birthday cards and the new I'm using the new stamps from the Birthday Greetings collection.  These stamps are lovely. 


So I decided to create 2 cards using the same Spellbinders dies to create the card base and the corresponding layers.


 This stamp set has 10 wonderful sentiments, some simple and some more elaborate, but all are wonderful for creating a wide variety of birthday cards.


Please visit everyone's blogs and thanks for stopping by today.


Steph

3/23/15

Blue Resin Necklaces

Hi everyone, Steph Ackerman here today working with some amazing products from ETI.

Jewelry making has always been a little intimidating to me, but I've been working with the wonderful products from ETI and am really enjoying creating assorted resin pieces that can be used as jewelry pieces or as embellishments in other products.

I have a project on the ETI blog today using the Easy Cast Clear Casting Epoxy.  


Resin definitely is not as intimidating as I thought and I had lots of fun playing with these products.

I hope you'll stop by the ETI blog and see how I created these pieces.

Thanks for stopping by today. 

Steph


Sunflower Thank You

Hi everyone, today I'm showing off another wonderful embossing folder you can find at CropStop.com.com.  The store carries a wide assortment of products for all your crafting needs.


Originally, I added the Sunflower to the center of the embossing folder, but felt it just wasn't quite right.  So I ended up embossing a second layer and cut out the center to create a window.


The addition of the second layer, placed on top of the first with foam adhesives was just what this card needed.  Then I added a simple sentiment in the right corner.


It's lovely don't you think?
 
Thanks for stopping by today.
 
Steph
 

3/22/15

Sea Shell Jar

Today was a lazy day.  I had lots of time in my studio playing with a variety of products and creating all kinds of things.  As I worked on one project, another came to mind and I started that, then another came to mind and I started that, so........ I have lots of projects in my studio in some stage of completion.

But this is one project I did complete because I was so excited to see how it would turn out. 


As I am sure you know, I love stamping and embossing.  I picked up this funky bottle and wanted to see how etchall dip 'n etch would work with my stamps.

Using a beach themed stamp from Rubber Dance Art Stamps, I inked it with ColorBox Twinkle Watermark Ink and stamped it directly on the bottle.


Next, I poured ColorBox Clear Embossing Powder on top and heat set.


Check out the beach scene on the bottle. 
Allow the bottle to cool completely before moving onto the next step.


Next, place the bottle in the etchall dip 'n etch and allow it to sit for 15 minutes.   Rinse the bottle and rub off the embossing powder using a baby wipe and your nails (gently).  Isn't it amazing?
 
 
I filled the jar with sea shells, added a stamped sentiment about the beach and tied it to the bottle neck.
 

I love how this turned out.  Next time, I think I'll fill it with sand because it's a little hard to see the design with the shells inside.

But what do you think?  I am having so much fun with stamping and embossing and etchall products.

Steph


3/21/15

Sunflower Canvas with ColorBox Crafters' Ink

Hi everyone, winter is finally going away!!!!! Spring is coming and Sumer won't be far behind.  I can't wait for it!!

In honor of the change in seasons, I've created this Sunflower Canvas - find how I created this canvas by stopping by the Clearsnap blog.


I've used ColorBox Crafter's Ink reinkers for Ann Butler to create the background on the canvas.  The beautiful sunflower stamps are from Stampendous - they were inked with ColorBox Crafter's Ink for Ann Butler, embossed and then fussy cut and reassembled.

Be sure to see all the details here.
 

Thanks for stopping by today.

Steph

3/20/15

Graphic 45 Design Team Audition 2015

It's that time again - Graphic 45 is having an open audition for their 2015 design team.  I have waited all year for this call and am thrilled to be submitting my work in the hopes of making the team this year.   Graphic 45 has a wide assortment of pattern papers and embellishments in a variety of styles and colors and I love creating with the collections.

Graphic 45 has asked for at least 4 of my favorite projects so here there are:

By The Sea Mini Album
This paper line was the best for creating this mini beach themed album. 
The colors and prints scream summer.
The mini album combined chipboard, felt, acrylic and more.
My students adored creating this mini album.


Live in Color Canvas
An oldie, but a goodie with Secret Garden.
This is one of my favorite canvases.  Everyone who sees it wants to recreate it.
The layers and textures are amazing.


Family Clipboard  
This paper was a fabulous pallet of color and designs.
My students absolutely loved creating this clipboard.


Cards
Using Oz and Springtime
Gatefold Card using Spellbinders dies, ScorPal


 Secret Garden paper
Penny Black stamp colored with Copic Markers


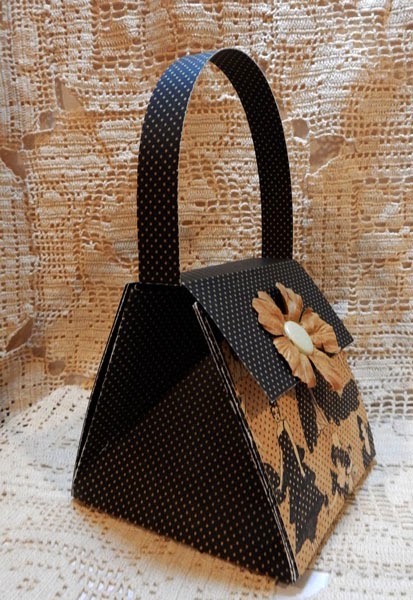
Fat Purse
Using Curtain Call with ScorPal
Who wouldn't want this beauty?


Thanks for looking.

Steph


3/18/15

Congratulations

Hi everyone.  What do you do with those left over elements? 


I die cut some stars recently for a project and had this negative panel left over so I decided to use it.  I matted the yellow panel with brown cardstock and added it to the card.  The sentiment was stamped in black on a scrap of yellow cardstock and added to the card with foam adhesives for dimension.


So, remember, don't throw out those negatives, you might find another use for them!
 
Thanks for stopping by today.
 
Steph
 

3/17/15

Friendship and Shoes

Morning everyone, I've got a post on the Robin's Nest blog today about friendship and shoes.  Hey, that's a great combination don't you think?


I've used some wonderful papers from the Robin's Nest and stamps from Stampendous and Cornish Heritage Farms.


Thanks for stopping by today.

Steph

3/14/15

Etched Joy Frame

Hi everybody, I found this little frame recently in the clearance section of my local store.  I was so excited to see that the glass was actually glass and not plastic, such a rare find.  Check out how this frame went from drab to fab in a matter of minutes.


Do you love stamping and embossing?  Check out how I've used etchall to turn this blah frame into  this little beauty.

 
Stamp and emboss your word in the center of the glass using Clearsnap Embossing Ink and Embossing Powder.  Heat set.  Once cooled, place etchall etching crème on the glass.


While waiting for the etching crème to set, paint the frame with Ann Butler Designs Iridescents by Earth Safe Finishes in Berry and Pearl.

 
After 15-20 minutes, remove the etching crème and rinse off the glass.  Use a baby wipe to rub off the embossing powder.  While the glass is now etched the word stands out because it was embossed before etching.


Paint white cardstock with Berry Iridescents to use in the frame behind the glass and add a touch of color to the flowers.  Add flowers and the Robin's Nest Dew Drops in the corner of the frame.

 
So what do you think?  Isn't it just divine?    So quick and easy to make and a pretty gift for someone special.  I see more of these little beauties in my future.
 
Thanks for stopping by today.
 
Steph
 

3/13/15

A traveling we will go

Hi everyone, I'm so excited to be a part of the CropStop team.  The store carries a wide assortment of products for all your crafting needs.


Today, I've created a card and coordinating pillow box.   Check out how easy the We R Memory Keepers Pillow Box Punch Board is to use.


Once the pillow box is formed, decorate to your heart's content.  I used some 7Gypsies papers, cutting apart elements and adding them to the pillow box.   A piece of twine was the perfect finishing touch. 


Just add some favorite candies inside!


The card was created using papers from 7Gypsies as well as a Prima doll stamps.  I simply cut off his legs to use him on this card!


Don't you think this would make a wonderful treat to give someone heading off on an adventure - whether it be to camp, or college or just traveling along Route 66?
 
Thanks for stopping by today and don't forget to stop by the store for all your crafting needs.
 
Steph