6/30/12

Scor-pal and Momenta

Today I will be sharing my project that was featured on the Scor-pal blog as part of this week's Scor-pal and Momenta blog week. Of course, if you missed this project or any of the other great projects from the Scor-pal team you'll want to hop on over there and see what's been going on this week. Be sure to leave comments on each post from this week for a chance to win some great prizes. Entry deadline in 8am Monday, July 2, so there's still time.

With a fun collection of Momenta papers and stickers to work with, it is easy to make an assortment of cards with the help of your Scor-pal.

Adorable Card
Cut blue cardstock 4 ½” x 11”.
To create the top fold, use a Scor-pal and score at 5 ½”.
To create the score lines at the bottom of the card, score at 10”, 10 ¼” and 10 ½”.
Corner round all edges.
Since these Momenta stickers are pliable, I was able to gently curve the banner stickers so they fit across the top of my card.
I then added a Momenta sentiment slightly above the first score line.


Friends Card

Cut blue cardstock 4 ½” x 11”.
To create the top fold, use a Scor-pal and score at 5 ½”.
Corner round all edges.
Cut pattern paper 4” x 5”, corner round edges and adhere to the card.
Cut pattern paper 3” x 4”.
Score 1” on both long edges.
Adhere puffy sentiment and then adhere to the card.


Graduation Easel Card

Cut blue cardstock 5 ½” x 11”.
Placing the long side on the Score-pal, score at 5 ½” and 8 ¼”.


Fold on the 5 1/2" scored line to create the card, then fold on the 8 1/4" scored line to create the tent fold.


Cut another piece of cardstock 5 1/2" x 5 1/2" and add to the tent to create the top layer the card.
Cut the striped paper 5 ¼” x 5 ¼” and adhere to the front of the card.


Cut the dotted paper 4 ½” x 4 ½”.
Score ½” around all four edges and add to card front.
Add a puffy sticker at the top scored line.
Stamp sentiment on blue cardstock in brown ink.

Ink the edges with brown ink and mat with brown cardstock.
Add to card front with foam adhesives for dimension.
Add GRAD stickers on the left side of the card.

Cut the blue print 5 ¼” x 5 ¼” and adhere to the card base.
Cut the dotted paper 2” x 5 ¼”.
Score ¼” on both long sides
Adhere to the card base.
Add a puffy sticker across the center which will be used to hold the easel upright.


Beautiful Card

Cut pink cardstock 4 ½” x 11”.
To create the top fold, use a Scor-pal and score at 5 ½”.
To create the score lines at the bottom of the card, score at 1/2", 3/4" and 1”.


Corner round all edges.
Turn card lengthwise and add the banner stickers
I then added a Momenta sentiment  along the first score line.


An embossed sticker was the perfect touch for the interior sentiment.


Supplies:
Scoring tool:  Scor-pal
Cardstock: Momenta Textured Cardstock
Pattern paper: Momenta Pyramid Pad
Stickers: Puffy Messages, Puffy Borders, Embossed Messages
Ink: Clearsnap


6/29/12

Preserving Her Memory

Check out this awesome memory globe I created for Globecraft Memories featuring an awesome photo of my Grandmother and Great Grandmother circa 1940. It has always been with my Mother and then came to me when she recently passed. I know I had to do something fabulous with this photo. Globecraft Memories to the rescue!


I used adhesive on all layers and added assorted Powders - Enchanted Aubergine, Victorian Bronze, Mermaid Tears, and Brown Stone on the Globecraft Memories Bubble Frame pieces. The little bits of white showing are from the Brown Stone Powder. If you saw this in person, you'd see that it actually looks like bits of real stone. Once I had all the layers done, I adhered them together.


I'll let you in on a secret - I placed the globe on wrong and didn't notice it till I was done. The globe should have gone under the various layers, but instead I placed it on top - oops!!! Since it was already complete, I couldn't pull it apart, so I added the globe and debated what I could do. I decided to add some rhinestones around the globe hoping they would cover my little "mistake".


I put glue around the Globecraft Memories Bubble then placed the rhinestones. To be sure they'd stay permanently in place, I added some Glastique on top of the rhinestones. It worked beautifully and I love how this Globecraft Memoreis Bubble Frame turned out.

So, next you you do something a little "off", think outside the box - you may be truly surprised at what you can accomplish!!


Supplies:
Glastique Finishing Glaze
Powders - Brown Stone, Mermaid Tears, Enchanted Aubergine, Victorian Bronze


6/27/12

Scor-Pal and Momenta blog hop


Check out today's post at Scor-pal. The designers have been posting some great projects and today it's my turn.

Post a comment on blog for a chance to win a prize package.

6/26/12

Summer's Journey

The newest challenge at Justrite Stampers is to create a project based on this color pallette.  Wow doesn't it just scream summer to you!!!!


Since I just got some awesome new Justrite Stamps in the mail, as well as some new Trinity pattern papers, I knew they'd be a perfect combination. 

Trinity's new Surf N Swim collection has the perfect color combination for creating summer themed projects.  They just scream summer.


Justrite's new stamp set - Botanical Medallions & Banners-Clear is gorgeous.  I pulled one sentiment and stamped it with Colorbox Tangerine Ink, then heat set with Top Boss Clear Embossing Powder.


I die cut the sentiment and it's mate using Spellbinders Small Oval dies, then added them to the left side of my card.


After creating my background layers, I cut the car and tree from it's backbround paper and mounted them to my card with foam adhesives.

Supplies:
Pattern paper: Trinity
Stamps: Justrite Stampers
Ink, Embossing Powder: Clearsnap
Dies: Spellbinders

6/25/12

Scor-pal & Momenta


Scor-pal and their designers are excited to announce that they are teaming up with Momenta for a fun and inspiring week on both the Scor-pal blog and the Momenta blog. The other Scor-pal designers and I have some exciting projects to share. Here's just a peek at what I have created for the event.


Be sure and check out both company blogs starting today, June 25th, and continuing throughout the week to not only find out how to make this project and many more. Don't forget to check back each day and leave comments for a chance to win some great prizes.

Congratulations


For this month's project at Scrapbookpal.com, I chose to work with  the Cricut Cartridge - 3 Birds on Parade.  It's such a cute cartridge, full of fun images centered around a bird theme.  With graduations on the horizon, this cute little guy was perfect to use in creating a card and matching gift bag.


The graduation birds were cut at 4 1/2" from black, blue and yellow cardstock.  Once assembled, they were mounted on a brown shadow.


The sentiment was cut at 1 1/2" from yellow cardstock and mounted on it's black shadow. 


The sentiment was  added to the card front with foam adhesives for a 3 dimentional look.


The tassel was cut from yellow cardstock and added to the cap.  Using the shadow bird, I cut a tag at 2 1/2" from brown cardstock and another one at 2 1/4" from yellow cardstock.  They were tied to the handle with twine.


This is a close-up of the graduation bird.  He is just so cute!!

Supplies:
Cardstock: Bazzill
Pattern Paper:  Sugartree
Die cut Machine: Cricut Expression
Cartridge: 3 Birds on Parade
Twine: The Twinery

6/21/12

Blessings

This is today's post at thepapertemptress. I used some awesome Eclipse Black Cardstock , cutting it 5 1/2" x 11". Using my Scor-pal, I scored at the 5 1/2" point and folded the card in half. This is a very sturdy cardstock and is perfect for a card base. For the top layer, I used White Crepe Ruche which I cut to a 5" square.


I then cut a piece of cardstock 1" x 5" to fit across the card front and wrapped some Twine around it before adding it to the card with foam adhesives.  The Magnolia image was stamped on Cryogen White and colored with Copic Markers. I then used my Spellbinders dies to cut the oval shapes,


I used White Crepe Ruche again on the inside of my card and my sentiment stamped perfectly on it.


Supplies:
Cardstock: Papertemptress
Ink: Clearsnap
Stamp: Magnolia
Markers: Copic Markers
Twine: The Twinery
Scoring Tool: Scor-pal


6/20/12

For the Graduate

Need a quick and easy card and gift bag for an upcoming graduation? 

Using Momenta products, I created a card and coordinating gift bag for a soon-to-be graduate.  As this paper is double sided, I used both sides of the Momenta paper to create this tone on tone set.  The stickers are 3-dimentional and look great against the backdrop of these papers.


Since I needed another set, I used the same Momenta papers, but changed the design slightly, adding a stamped sentiment to the coordinating card.


Supplies:
Cardstock: Bazzill
Pattern paper, Stickers: Momenta
Stamp: Stampendous
Ink: Clearsnap
Dies: Spellbinders


6/19/12

Reflect

Welcome to our 3rd Challenge at Cornish Heritage Farms. Our hostess for this challenge is Cindy who asks us to use pearls and lace on our creations.


I cut cardstock to fit the base of my card, then added Momenta pattern paper on top. I wrapped a ribbon around the card, then added a lace doily onto which I stamped a clock.  A pearl was added to the center of the clock.  The sentiment was stamped on white cardstock, then attached to the ribbon with a paper tagger.

Don't forget to check out what the other design team members have created for this challenge - hop on over to Cornish Heritage Farms.

Supplies:
Cardtock:  Bazzill
Pattern paper: Momenta
Stamps:  CHF
Ink:  Clearsnap
Ribbon: May Arts
Doily:  Wilton


6/17/12

Happy Father's Day/Graduation

Here is another project using Bo Bunny's Weekend Market Collection which I received from Fotobella this month.

This is such a wonderful collection and was perfect for Father's Day projects and Graduation projects. 


This gift bag and coordinating card is perfect for that #1 Dad in your life.  Using the same background papers makes creating this set quick and easy.  Just personalize for your own dad.


Check out this awesome book paper for the new graduate.  I used my Cricut Expression to cut the sentiment.  Who wouldn't love getting this card?


This is such a wonderful collection - very masculine.  But, if you check back next week, I'll show you a feminine layout I created with these same papers.


Supplies:
Cardstock: Bazzill
Pattern paper, embellishments: Bo Bunny
Die cuts: Cricut Expression

6/16/12

Happy Father's Day

Check out my post at Fotobella.com for some fun and fabulous Father's Day and Graduation projects using Bo Bunny's Weekend Market Collection.

Here's a sneak peak of one of my projects.


This collection has amazing colors, papers, stickers, and embellishments.    It also happens to be the monthly membership bundle at Fotobella. 

To create the gift bag, I cut cardstock to fit the front of the bag, then added several layers of pattern paper.  The added sentiment was matted with cardstock and stapled to the front.  I coordinated the card by using the same papers.


Supplies:
Cardstock: Bazzill
Pattern paper, Stickers, Embellishments: Bo Bunny Weekend Market
Stapler: Tim Holtz
Ink: Clearsnap
Other: Gift bag


6/14/12

Beach Joy

I was playing around with Globecraft Memories powders and I wanted to see if I could use them on stamped images/sentiments. 

I stamped the image and the sentiment with Clearsnap's Top Box Watermark Ink, then applied Mermaid Tears to the image and Enchanted Aubergine to the sentiment.  I wasn't too sure how the powders would react on small lettering, but it came out amazing. 


The powders took to the details extremely well, provided a nice raised effect and is shimmery when you flip the card.  I didn't add any additional color as I wanted the image to stand out on it's own.


After die cutting the shape, I inked the edges with Clearsnap Ink, then cut a larger scalloped mat.  These were adhered to the front of the card, with some foam adhesives under the sentiment for dimension.


Supplies:
Cardstock: Bazzill
Pattern paper:  SEI, Creative Imagination
Dies: Spellbinders
Ink: Clearsnap
Stamps: Stampin Up
Powders: Globecraft Memories


6/13/12

Royal colors

Challenge # 4 at KuretakeZig is to create a red, white and blue themed project to celebrate the Queen's Jubilee.   Since I was born in England, this challenge was right up my alley.

Blue cardstock was adhered to the front of a pre-made card.  White cardstock was cut slightly smaller and embossed with a Cuttlebug Embossing Folder.  The edges where lightly inked with ColorBox Cherry Dye Ink.


The sentiment was stamped with ColorBox Kettle Dye Ink on white cardstock.  Three words - Friends, Truly, and Caring - were colored with the brush tips of red and blue Zig Textile Markers.  Once stamped onto white cardstock, I cut them out, matted them with cardstock and added them back to the sentiment. 


I've had these Spellbinders Crown dies for quite awhile, but couldn't find a reason to use them - so this challenge was perfect.  After die cutting,  I lightly inked the embossed edges of the crowns with ColorBox Cherry Dye Ink and adhered them to the card with foam adhesives for dimension. 

Twine was wrapped around the embossed background and the sentiment was added on top with foam adhesives.

Supplies:
Cardstock: Bazzill
Ink: Clearsnap
Markers: Zig
Twine: The Twinery
Embossing: Cuttlebug

6/12/12

Happy Father's Day

There's a new challenge at Justrite Stampers and that is to create a vintage Father's Day card.

I used an oldie, but goodie stamp set - By the Sea.  I stamped the lighthouse on some beach themed pattern paper with Clearsnap Ink, then colored the lighthouse with Smooch Ink.  I cut out the lighthouse, then die cut the larger rope border.  These were then mounted on another die cut for dimension.


I created this easel shaped card using Spellbinders Grand Labels.  The pattern paper was wet, crumpled and, when dry, inked to give it a more vintage/aged look.  Before mounting my image, I added some twine around the smaller paper so that it would overlap the image.


Grandpa was stamped on pattern paper using You are the Best Stamp set as was Happy Father's Day. Each was then die cut and added to the card.

    
Supplies:
Cardstock: Bazzill
Pattern paper:  Creative Imaginations
Stamps: Justrite
Ink: Clearsnap
Dies: Spellbinders

Altered Letter J

This project appeared on the Globecraft Memories blog last month.  I love working with Globecraft Memories products because you can create such a variety of projects. I had this wooden letter in my studio and thought I'd play around and see what I could create.


I began by first covering the letter with Piccolo Adhesive and then adding Mermaid Tears.


After heat seeting, I pounced some Piccolo Adhesive around the letter and added some Enchanted Aubergine. When the powders melt, they blend together nicely.

Because the Picollo Adhesive could not fit in the smaller areas, I put the adhesive on a foam brush and then used the foam brush to apply the adhesive to the smaller areas so I was able to add more Enchanted Aubergine. Worked like a charm! The powders held fast and look great. I carefully added adhesive around the edges of the letter and then applied Vintage Silver.

Once finished, I added a flower with Glue Dots to the top of the letter. Then I added clear rhinestones around the letter. Because they didn't show up too well, I "painted" the rhinestones with Clearsnap Gold Lame Smooch and added 24K on top. Once heat set, the rhinestones really took on a life of their own.

Globecraft Memories Supplies:
Piccolo Enamel Adhesive
Powders: 24K
Enchanted Aubergine
Vintage Silver
Mermaid Tears

Other Supplies:
Letter: Making Memories
Clearsnap Smooch Ink - Gold Lame
Want2Scrap Rhinestones
Prima Flower
Glue Dots


6/10/12

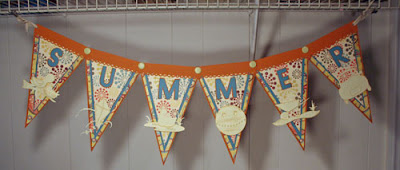
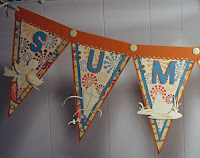
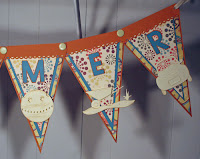
Summer Banner


Here's a really fun banner that uses the Sports Mania Cricut Cartridge and Nate's ABCs Cricut Cartridge.  If you don't have the Sports Mania Cartridge, no worries - there are many cartridges that have a flag/banner cut which could be substituted, so you have a lot of possibilities.  While you may not want to hang a paper banner outdoors, how fun would this be to hang in a hallway or across a mantle!!


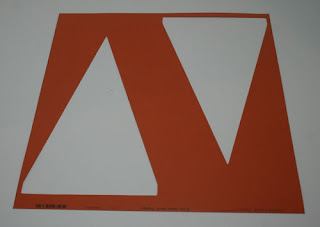
Layer 1
Using Sports Mania Cartridge, cut the Flag 6 times at 5 3/4" from Navel Cardstock using shadow + blackout features. As only one Flag will cut, flip the mat around to cut a second Flag.


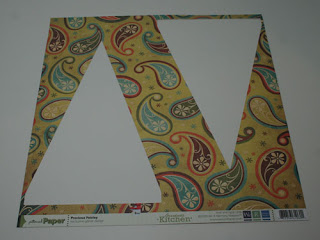
Layer 2
Using Sports Mania Cartridge, cut the Flag 6 times at 5 3/4" from Precious Paisley pattern paper using the black out feature. As only one Flag will cut, flip the mat around to cut a second Flag.


Layer 3
Using Sports Mania Cartridge, cut the Flag 6 times from Rain Cardstock at 5" using the black out feature.  Two Flags will cut.  To cut two more Flags, flip the mat around.


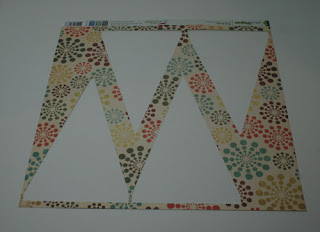
Layer 4
Using Sports Mania Cartridge, cut the Flag 6 times from Busy Bursts at 4 3/4" using the black out feature.  To cut two more Flags, flip the mat around.


Die cut SUMMER from Nate's ABCs at 2" using Font Shadow Feature and Navel Cardstock.   Die cut SUMMER again at 2" using the Font Feature and Rain Cardstock.  Emboss the top layer with the Cuttlebug Swiss Dots Embossing Folder.  Adhere the letters together. 


Die cut the following elements from Nate's ABCs at 3" :
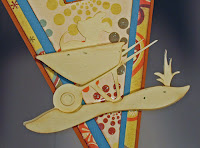
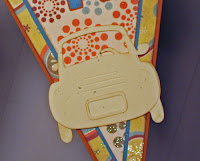
Ball, Birdnest, Car#1, Duck, Kite, and Wheelbarrow.

Using the layer features, cut the elements of your choice to fit.  Since I wanted the focus to be on the banner, I chose to cut just a few elements.  I used cream cardstock for the elements and brown ink for definition.


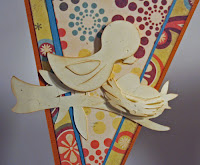
Bird:  I wanted the bird to stand out, so I die cut the top layer using shift + bird.  To cut the nest, I used shift + bird + layer 2.
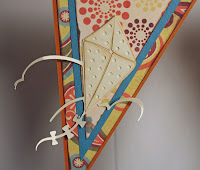
Kite:  Cut kite + layer 1 and shift + kite + layer 1 for the kite elements.


Ball:   Using shift + ball, I cut the top layer and adhered it with foam adhesives.
Duck:  Using shift + duck, I cut the water, then added the duck (shift + layer 1) so it appears the duck is floating on the water.


Wheelbarrow:  Cut the bucket using shift + wheelbarrow.  Cut the dirt patch using wheelbarrow + layer 1.  Cut the grass patch using wheelbarrow + shift + layer 1.  Cut the wheel using wheelbarrow + layer 2.
Car:  Cut car using shift + car1.  Cut the license plate using car1 + layer 2.

To assemble:

Ink all banner layers (except Layer 1) with brown ink.
Adhere the four banner layers together.
Cut a 2" wide strip of Navel Cardstock. 
Using the Fiskars punch, punch along one edge, then add the strip to the top of each banner, cutting to fit.
Using the Crop-a-dile, punch holes in the edges of each banner and insert large brads.  Not only do the brads anchor the banner pieces, they also add a nice decorative touch.
Add ribbons to the outer edges so the banner can be hung up anywhere.

Thanks for stopping by today.

Supplies:

Die cut Machine: Cricut Expression
Cricut Cartridges: Sports Mania, Nate's ABCs
Embossing: Cuttlebug Swiss Dots Embossing Folder
Punch: Fiskars Threading Water Punch; WERMemories Crop-a-dile
Ink: Clearsnap Chestnut Roan Ink
Cardstock: Bazzil - Rain, Navel; Stampin Up - Cream
Ribbon: Stampin Up
Brads: American Crafts
Pattern paper: WERMemories Pattern paper - Grandma's Kitchen
Adhesive: Scotch ATG; Scor-Tape; Glue Pen