1/29/21

Valentine's Day Tags

Hi everyone, I'm on the Clear Scraps blog creating with a set of tags for Valentine's Day using 2 tags from the Chipboard Tag Album.


I inked the tags with Brilliance Rocket Red Ink

Using the tags as stencils, I cut Rinea Gold/Gold Glossy Foiled Paper to fit.  I cut a second layer from Ruby/Gold Glossy Foiled Paper and embossed with an embossing folder.


I cut another tag from Rinea Blush/Gold Glossy Foiled Paper and embossed with a different embossing folder. 


Aren't they pretty?


I die cut several additional layers for the tags, then added flowers and sentiments.


Finally I stamped Prima dolls and colored them with Copic Markers before fussy cutting them and adding to each tag.  I finished by adding ribbon to the tags.


Thanks for stopping by .

Steph

1/28/21

Etched Valentine's Day Treat Containers

Hi everyone, Valentine's Day is just around the corner and I've etched some Valentine's Day treat containers.


Need to share some sweet treats this Valentine's Day?  

Using self adhesive vinyl, I die cut a variety of hearts and placed them on the jars.  Since I only wanted the centers of each jar etched, I placed a die cut circle around the hearts. 


Using EtchallⓇ etching creme, I used a spoon and placed the etching creme atop the hearts.  Then I let the jars sit for about 15 minutes.


Since the etching creme is reusable, I scraped it back into the original container before rinsing off the jars.


Now it's time to fill with candies for that special someone this Valentine's Day.  I added conversation hearts and some chocolate balls.


Finish off with pretty bows.

Thanks for stopping by.

Steph

Lavinia World Challenge #45

Hi everyone, it's time for the next challenge at Lavinia World Challenges.  Please check it out and join in the fun.


I just received some new slim line dies and knew I wanted to create a slim line card, but I wasn't actually sure of the final size I wanted.  So I cut a white panel the size of the largest die.


I began by creating snow mounds using torn strips of cardstock with Distress Oxide Ink in Speckled Egg.  I stamped a tree in the center of the panel using the Fairy Fire Tree 2.  Because I wanted a subtle effect, I stamped it with VersaFine Clair ink in Morning Mist, along with a touch of VersaFine Clair ink in Pinecone on the trunk.  Placing cardstock over the snow mounds, I re-stamped the top portion of the tree to the left of the full tree.  I sponged VersaFine Clair Ink in Twilight around the edge of the panel.


Placing an acrylic circle over the trees, I lightly sponged Speckled Egg, then I stamped the  Forest Spruce around the upper half of the panel with Staz On Pigment Ink in Snowflake and heat set. it   I re-stamped the Forest Spruce with VersaFine Clare in Morning Mist and also heat set it. 


I used Tutti Designs Slimline Dotted Rectangle dies to die cut the panel.  The bunnies are from the Midnight Meanderings stamp and they were stamped individually in VersaFine Clair Ink in Nocturne.  Several smaller trees from the  Tree Scene stamp set were inked with Snowflake Ink and also embossed.


The die cut panel was matted with black cardstock, then realigned atop the die cut frame.  It makes the image stand out.


The stamped panel was then added to a slimline card.


Finally, I die cut "blessed" and adhered it along the bottom edge of the card.

Would love to see what you create for Challenge #45.  The winner of the challenge will receive a
$15 gift certificate to Lavinia World to shop for more goodies.   Remember there is a new challenge every other Thursday. 


Thanks for stopping by.


Like us on Facebook
Follow us on Instagram: LaviniaWorldStore
Join our NEW Anything Lavinia Facebook Group here
 Don't forget to include #laviniaworldstore on your projects and tag us at @laviniaworldstore so we can be sure to see and comment on your Lavinia projects!
Sign up to receive our Lavinia World Challenges and all the amazing inspiration from our Designers sent directly to your emails.

Please note that although we carry the full Lavinia range, we are not part of any other entity or Facebook group that carries Lavinia stamps. ONLY the cards posted to Lavinia World Challenges will be entered into the drawing for the Lavinia World prize.  Also note that the gift certificates are ONLY valid at the Lavinia World website.

Can't wait to see what you create.


Beautiful Birthday Wishes

 Hi everyone, I'm on the Dies R Us blog today sending you some Sunflower Birthday Wishes.


At this time of year, a bright cheery card is needed so I created a card from tan cardstock.
Die cut the top orange layer using the diagonal die. Mat this panel with green cardstock for contrast, then assemble the card.


Stamp Lawn Fawn Sunflowers, leaves and pots with black ink, then color with Copic Markers, or another marker of choice.  Colored pencils would also work well.


Use the coordinating dies to die cut all the pieces..


Stamp a birthday sentiment on white cardstock and die cut with an oval die.  Mat with a larger die using green cardstock and add to the card using foam adhesives for dimension.  


Arrange the sunflowers in a pleasing manner on the card, layering the sizes for dimension.  At this point, I decided I did not want to use the flower pots so I put them aside for another project.


Add stickles to the center of the flowers.


Stop by the Dies R Us Store to see all the amazing dies that are available.


Thanks for stopping by.

Steph

1/24/21

Happy Valentine's Day with Rinea Foiled Papers

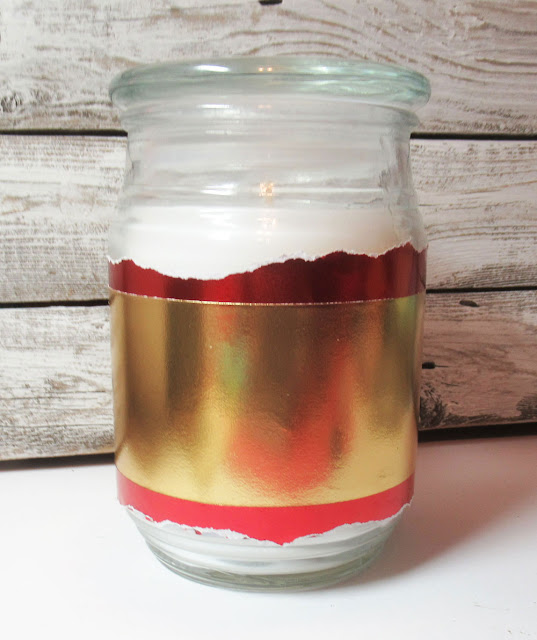
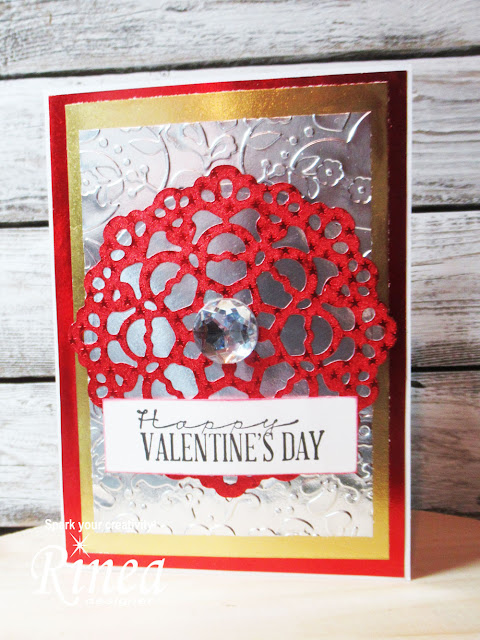
 Hi everyone, I'm on the Rinea blog with  this sweet Valentine's Day candle and matching card.


I love candle jars but find them boring.  So I took some of the beautiful colors of Rinea Foiled Papers and decorated this jar with a Valentine's Day theme.

Start by tearing both edges of a strip of Ruby/Gold Glossy Foiled Paper and glue it around the jar.  Cut Gold/Gold Glossy Foiled Paper slightly smaller and also wrap it around the jar.  I didn't tear the edges of the gold layer because I wanted the contrast.


Next cut a layer of Silver/Gold Glossy Foiled Paper and wrap it around the jar.  Again, don't tear the edges.


I die cut a row of hearts from Ruby Starstruck then glued the hearts around the candle.  The 10" long die means it wraps around the jar perfectly.


For the top I die cut a doily from Ruby/Gold Glossy and adhered it to a Silver/Gold Glossy circle.  Then I adhered it to the top.


Since you can't give a gift without a card, I also created a Valentine's Day card with the same elements.


The Silver/Gold Foiled panel was embossed with a heart embossing folder.


The card was created with layers of Ruby/Gold Glossy, Gold/Gold Glossy and the Silver/Gold Glossy embossed panel.  Another doily was created from Ruby Starstruck and added to the card.


Happy Valentine's Day was stamped and added across the card.


To finish I added large silver baubles.


Thanks for stopping by.

Steph


1/23/21

Thank You Sewing Card

 Hi everyone, Steph Ackerman here today with a sweet thank you card for someone who is an avid sewer.


Supplies:

Blank Page Muse Stamp:  Vintage Sewing Art Rubber Stamps
White, Black and Tan Cardstock
Die: Spellbinders
Thread: Whiskers Graphics


Cut cardstock to fit card front.
Repeatedly stamp the buttons and pins stamps across the panel using blank ink.


I kept the images together, but you could easily cut them apart and use them separately.

Ink with several colors of distress inks in yellow and orange to create a vintage effect.


Ink the edges with brown ink.


Mat the panel with black ink.
Punch holes and thread several buttons with twine and tie off.
Add a wood "thanks" to a die cut oval and adhere to the card.


Finish by adding the panel to a tan card.


Thanks for stopping by.

Steph

1/22/21

Bowdabra Decorative Wine Bottle

Hi everyone, I'm on the Bowdabra blog with a decorative wine bottle.


Place ribbon in the Bowdabra leaving a 5" tail.


Pass the ribbon through the Bowdabra creating large loops.


Create 5 loops on each side of the Bowdabra, making the top loops a little smaller.


Pull up on the bow wire and tie off.


Wrap the bottle with tissue paper and use the bow wire to tie the ribbon to the bottle. 


Since I used wired ribbon, it's easy to form the loops once the bow has been tied to the bottle.


Thanks for stopping by.

Steph