2/29/20

Wedding Box

Hi everyone, I'm on the Bowdabra blog with a wedding gift box, but it would also be perfect for a birthday gift of perhaps even Mother's Day, don't you think?


Simply change up your papers and create a gift box for any occasion.


Stop by the blog for details.

Thanks for stopping by.

Steph


2/27/20

Lavinia World Challenge #21

Hi everyone, it's time for the next challenge at Lavinia World Challenges.  Please check it out and join in the fun.


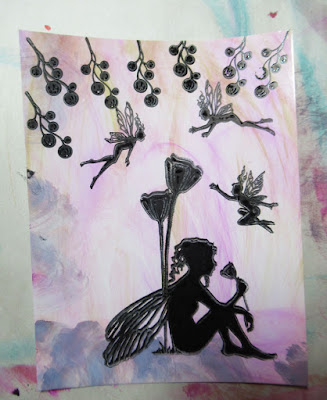
I created a background with alcohol inks and a baby wipe, then used VersaFine Clair in Nocturne to stamp   Moments Like These in the lower corner.


Next I stamped Three Dancing Fairies, and Mini Berries around the main image.


Next, I stamped See a Fairy Make a Wish around the images using VersaFine Clair in Purple Delight.


I added Nuvo drops to the fairy wings for added sparkle.


Lastly, the panel was  matted with pink cardstock and added to a black card.  Dream from Once Upon a Dream was then stamped on a scrap of the background, die cut and added to the card.


Would love to see what you create for Challenge #21.  The winner of the challenge will receive a
$15 gift certificate to Lavinia World to shop for more goodies.   Remember there is a new challenge every other Thursday.  Can't wait to see what you create.

Thanks for stopping by.


2/24/20

Pawprints Frame

Hi everyone, I'm on the Clear Scraps blog using new products that will soon be available.


Using the heart and paw print, paint the heart red and the paw print brown.


Paint a frame with gray paint and adhere the heart/paw in the corner.


Add texture to the frame using modeling paste with the 6" x 6" Shattered Glass Stencil.


Add stickles to the heart and pawprints to make them shine.


Using black ink, stamp paw prints randomly across the top of the frame.  Spritz inks on the stenciled portions.  Print up "Leaving paw prints on your heart", adding them around the frame.


Thanks for stopping by.

Steph


2/23/20

Thank You Card with Rinea Foiled Papers

Hi everyone, Steph here with a new card using Rinea Foiled Papers.


Emboss a panel of Silver/Gold Glossy Foiled Paper with an embossing folder.  Use Copic Markers to color in parts of the embossed panel.


Die cut 2 sets of Fuchsia/Gold Glossy Foiled Papers to create the 2 pieces.  Assemble the 2 pieces together.


Adhere the die cut panels to the embossed panel.


Create a card from white cardstock, forming an easel card.  Adhere the embossed panel to the easel.  Add a panel of Fuchsia/Gold Glossy to the card base.


Stamp a sentiment on a scrap of Gold/Gold Glossy using Piano Black StazOn Ink.


Add to easel card base using foam adhesives so the phrase is slightly raised and holds the card upright.


The card is just as pretty when folded to fit in the envelope.

Thanks for stopping by.

Steph


2/19/20

How to Create Art

Hi everyone, time to create art.  Art has so many different meanings for everyone.


Select a left over panel of wood that fits your stencil, then cut it with the Band Saw.


Use the Disc Sander to sand the panel.


Place a stencil on the panel and add color so the pattern is visible.  Use the Power Carver to carve  out the scroll pattern.  I've not used the Power Carve much so this was a learning process and I would rate this a beginner project.  With the variety of carving blades available, you can carve an assortment of details and with more practice, the possibilities are endless. 


Now that the design has been carved into the panel, gesso the entire panel.


Reposition the stencil and add different colors to the word and the scrolls.  Finish by spritzing a shimmery craft spray.


The final touch was adding brown ink around the panel as a contrast.


Thanks for stopping by.

Steph


2/17/20

Clear Scraps camera

Hi everyone, I've got a new project on the Clear Scraps blog using the new Camera Shaker.


The camera comes with 3 chipboard elements and one acrylic sheet to create the shaker effect.  I painted the outer pieces with blue paint.  Then I rubbed distress ink over them giving them an aged effect.


I die cut a panel of flip flops to fit the center window and glued it in place.


I placed the acrylic panel next then added beads in the cavities.  Once I had the number of beads in each cavity, I glued the back panel in place and placed a stack of books on top to ensure the pieces were fully glued together.  I threaded a strip of ribbon through the slot, tying it in place.  Finally, I used Nuvo Drops to add decorative elements around the camera face.


Isn't it sweet?

Thanks for stopping by.

Steph


2/15/20

Wedding Favors

Hi everyone, I'm on the Bowdabra Blog with Wedding Favors.


Please stop by the blog for more information.

Thanks for stopping by.

Steph


2/13/20

Valentine's Day Candy Jars

Hi everyone and Happy Valentine's Day.  I've got a sweet set of Valentine's Day candy jars available to share.


Using etchallⓇ resist gel, free hand draw hearts around the jars.  The gel provides a protective barrier when using other etchallⓇ products.  Allow the gel to dry.  Once dry, the resist gel turns clear.


Once the resist gel dries, place the jars in etchallⓇ dip 'n etch liquid and allow them to sit for 15 minutes.


Dry the jars, then peel away the resist gel.  You can see that the gel hearts peel away easily from the jars.  I'm thinking they'll be used in my next mixed media project!


The jars are now etched, and, because of the resist gel, you can see the hearts I drew.


Decorate each jar as desired.  I added flowers to the tops of each jar.  Then simply fill each jar with assorted candies.


Thanks for stopping by.

Steph


Lavinia World Challenge #20

Hi everyone, it's time for the next challenge at Lavinia World Challenges.  Please check it out and join in the fun.


This was a fun card to make using glossy cardstock.  I created the background with alcohol inks.


Using VersaFine Clair inks, I stamped the Fairy Steps with Pinecone Ink.  The background added just the right amount of color to the steps.  Next, I stamped the Fairy Couple with Nocturne Ink.   I felt another fairy was needed, so I also one of fairies from Three Dancing Fairies with Nocturne Ink.


Using Purple Delight, I stamped the Secrets Are Hidden stamp around the images.  Next, I matted the panel with pink cardstock before adding it to a blue card.


Would love to see what you create for Challenge #20.  The winner of the challenge will receive a
$15 gift certificate to Lavinia World to shop for more goodies.   Remember there is a new challenge every other Thursday.  Can't wait to see what you create.

Thanks for stopping by.


2/12/20

Mini Purses with Rinea Foiled Paper

Hi everyone, Steph here today with several mini purses using Rinea Foiled Papers.


Who wouldn't love these purses?  They are the perfect size for small candies and even gift cards.


Using mat board as a base, I adhered a sheet of Lavender Starstruck to one piece of matboard and Silver Starstruck to another piece of mat board.  Allowing them to dry, I die cut each with a large Sizzix die.  During the die cutting process, the piece was also scored.


Folding along the score lines, I placed Scor-Tape along the side edges then folded to create the purse.


Using StazOn Pigment Ink in Piano Black, I stamped several leaves on Jade Starstruck and the flowers on Lavender/Gold Glossy and Fuchsia/Gold Glossy Foiled Papers.  Each was then die cut.


Using a stylus, I formed the flowers and leaves to give them shape.


Velcro dots were used as a closure on each purse.  The flowers and leaves were then adhered on top.


I added a torn strip of Jade Starstruck across the top, then adhered the leaves and flowers.  To the center of each flower, I added die cut stamen and adhered them in place.

Thanks for stopping by.

Steph