8/27/20

Lavinia World Challenge #34

Hi everyone, it's time for the next challenge at Lavinia World Challenges.  Please check it out and join in the fun.


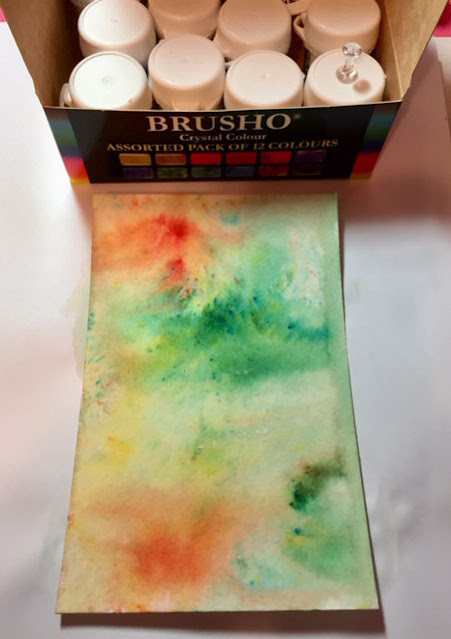
Using assorted colors of Brusho Inks, mix with water on watercolor paper to achieve striking effects.


Allow to dry naturally, then cut to size.  Use VersaFine Clair Fallen Leaves Ink to stamp Aria on the panel.  Then tamp the Slender Mushrooms and Flutterbies on the right side, also with Fallen Leaves Ink.


Stamp Luna Lights with VersaFine Clair Green Oasis in different lengths across the top of the card.  Using a water brush with Fallen Leaves Ink, add color to create layers of dirt under Aria and the mushrooms to anchor them to the card.


Ink around the edges of the panel with Fallen Leaves Ink, then mat with cardstock.  Add Stickles to Aria's wings as well as the Luna Lights.


Adhere the panel to a card with foam adhesives for dimension.  Die cut thankful from Rinea  Mocha/Gold Glossy Foiled Paper and add to the lower corner of the card.


Would love to see what you create for Challenge #34.  The winner of the challenge will receive a
$15 gift certificate to Lavinia World to shop for more goodies.   Remember there is a new challenge every other Thursday.  


Like us on Facebook
Follow us on Instagram: LaviniaWorldStore
Join our NEW Anything Lavinia Facebook Group here
 Don't forget to include #laviniaworldstore on your projects and tag us at @laviniaworldstore so we can be sure to see and comment on your Lavinia projects!
Sign up to receive our Lavinia World Challenges and all the amazing inspiration from our Designers sent directly to your emails.

Please note that although we carry the full Lavinia range, we are not part of any other entity or Facebook group that carries Lavinia stamps. ONLY the cards posted to Lavinia World Challenges will be entered into the drawing for the Lavinia World prize.  Also note that the gift certificates are ONLY valid at the Lavinia World website.

Can't wait to see what you create.


8/26/20

Embrace Your Dreams Slim Line Card

 Hi everyone, I've got a new slim line card to share today.


I've created a video of my process which I hope you'll check out: 


I've used an assortment of Lavinia Stamps - Creeping Vine and Embrace Your Dreams along with Oliver, a Fairy Hugs stamp.  


Starting with white cardstock, I inked it with Distress Inks in Lemonade, Dried Marigold and Tattered Rose blending the colors.  Next, I repeatedly stamped the Creeping Vine along the top of the card using Versa Fine Clair Ink in Morning Mist.  


Around the edges of the card I inked Black Soot, then went over the edges again with Dusty Concord Ink.  Placing an acrylic circle in the right corner, I inked a moon with Dusty Concord.  Placing a line of glue around the moon, I poured on Fairy Hugs Iris Glitter.

Using Versa Fine Clair in Nocturne Ink, I stamped the phrase in the left corner.  Oliver was also inked with Nocturne Ink, fussy cut, then added on the moon with Glue Dots for dimension.

The panel was then adhered to a navy card but I could have used a green card, a gray card or even a purple card.  

Would love to know what you think.

Thanks for stopping by.

Steph


8/25/20

Summer Flip Flops

 Hi everyone, I've got a new post on the Proxxon blog showing you how to create a set of decorative flip flops to  remind you that summer is still ongoing even if we are summering in place this year.


I drew the shapes on a sheet of plywood, then used the Scroll Saw to cut them out.  I found it easiest to cut the plywood panel first so I could work with a smaller panel.


The Scroll Saw makes easy work of cutting the flip fops.


Next, I sanded the edges with the Delta Sander.  This is my go to sander.  With it's shaped sanding surface, I can get into the smallest of areas.


The Bench Drill Press easily cut the holes in each flip flop.


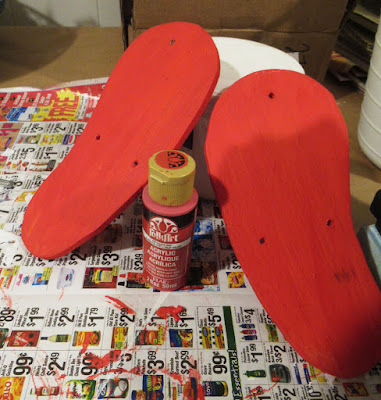
I used Plaid's Folk Art Paint to paint the flip flops.  Once dry, I used a stencil with Plaid Folk Art Paint to create the design on the flip flops.


To finish, I inserted ribbons in the holes and added a flower.  Now, I just need to hang these on my wall to remember that summer comes every year.


Thanks for stopping by.

Steph


8/24/20

Christmas Snow Globe

Hi everyone, I'm on the Clear Scraps blog with a Christmas card today.  I saw this Snow Globe chipboard embellishment and thought it would make a beautiful  Christmas card.


I began by coloring the snow globe with ink then embossing it to give it a shine.  
Christmas Greetings was die cut from Rinea Silver/Gold Glossy Foiled Paper, then I finished the snow globe with  Rinea Sapphire/Gold Glossy Foiled Paper.


I added  more color by die cutting some additional leaves from Rinea Emerald/Gold Glossy Foiled Paper.  Liquid Pearls were used to create the berries as well as the dots. above the words.


A 4 layer card was crated from pattern paper and cardstock.  The top layer was wrapped with ribbon before adding it to the card.


The snow globe was added to the card with foam adhesives for dimension.


Isn't it pretty?  Are you creating your Christmas cards yet?


Thanks for stopping by.

Steph


Today is the Day!!!

Hi everyone, who wouldn't love a card in a gift box, especially if it also contained a gift?


I die cut a jar and wrapped twine around the top before adding it to the card, tying a sweet sentiment to the edge.  Leaving the top ajar, I slipped in some fabric roses.  Since they are on wire, I was able to adjust how they were arranged in the jar.


I purposely made the card to fit the box because not only is the card bulky because of the flowers, but I wanted to add something special inside for the recipient.


What you would include in the box?  I'm thinking a gift card to a favorite store, some candles, or perhaps a candy bar or 2.

Thanks for stopping by.

Steph

8/23/20

Thanks Cards with Rinea Foiled Papers

Hi everyone, I'm on the Rinea blog with a set of simple, yet intricate looking thank you cards today.


For my first card, I used an Elizabeth Craft's die to die cut Blush/Gold Glossy Foiled Paper.  Even though the die is very delicate, the foiled paper die cut easily and in one pass.


Cutting white cardstock to 5" x 5", I placed  it on the die cut panel and folded the die cut piece on the score lines.  Adhesive was placed along the score lines and then adhered to the white panel.  The white panel was then inked with Tattered Rose Distress Oxide Ink.   Thanks was  also die cut from  Blush/Gold Glossy using a Lawn Fawn die then adhered across the card.


The panel was then matted with light blue cardstock and placed atop a darker blue card with foam adhesives for dimension.


My second card was created from pink cardstock.  A panel of pink was then embossed, die cut and matted with blue cardstock before being added to the card with foam adhesives for dimension.


A doily was die cut from Sapphire Starstruck Foiled Paper. and a smaller doily was die cut from  Arctic/Gold Glossy Foiled Paper .  The 2 doilies were adhered together and placed atop the embossed panel.  


Thanks was die cut from Blush/Gold Glossy Foiled paper using a Memory Box die and the birds were die cut from Sapphire/Gold Glossy Foiled Paper.


Thanks for stopping by.

Steph


8/18/20

Every dream begins with a wish

Hi everyone, I've created a sweet card using Lavinia Stamps with Spellbinders/APG dies.


I started by creating a background using Distress Oxide inks.  Then I used a Lavinia Stamp - Star Gazing - stamping them with VersaFine Clair Nocturne Ink.


I used the Spellbinders Grand Snow Globe die to create the shape of my card.  This 2 piece die can create 3D cards, however, I chose to die cut my stamped panel in the shape of the card.


The layering die was used to create the shaped card.


Another Lavinia Stamp - Meadow Grass - was stamped on both sides of the fairies.  Fairy Hugs Silver Lightening Glitter was added to the fairy wings and to outline the setting sun.


To finish, the sentiment - Lavinia Stamp -  Every Dream - was stamped in black ink, matted with black cardstock and added to the card with foam adhesives for dimension.

Thanks for stopping by.

Steph


8/17/20

Clear Scraps Candy Corn Shaker

Hi everyone, I'm on the Clear Scraps blog today with one of their new shakers - the Mini Shaker Candy Corn.


The shaker comes with 4 chipboard pieces and an acrylic panel.


I painted the base chipboard piece with the colors of candy corn - white, yellow and orange.  The 3 cut out pieces were painted white.   Once dry, I then assembled the 3 base pieces then placed clear mini beads in each section.


To seal the shaker, I glued the acrylic panel and the top panel in place.


Isn't it adorable?

Thanks for stopping by.

Steph


8/16/20

Merry Christmas Cards

Hi everyone, I know it's still August, but it's never to early to start making Christmas cards is it?


I used lots of  left over scraps to create these cards.


Tape the pattern paper strips to a cardstock panel, alternating how you apply them.


Die cut with a Lawn Fawn rectangle die for the perfect focal point.


The poinsettias finished the cards nicely, don't you think?

\
Thanks for stopping by.

Steph

8/13/20

Lavinia World Challenge #33

Hi everyone, it's time for the next challenge at Lavinia World Challenges.  Please check it out and join in the fun.


Using watercolor paper, I added a wash with Prima acrylic paints.  Using torn paper as a mask, I created a grassy area  with VersaFine Clair Green Oasis Ink.  Pulling out Lavinia Stamps, I stamped Dragonfly Whispers in the center with VersaFine Clair Nocturne Ink.  


Flowers Miniature were stamped in the grass using VersaFine Clair in Paradise, Tulip Red, Summertime, and Monarch Inks.  Then I inked around the edges of the panel with Paradise Ink.


Slender Mushrooms and Berry Wreath were stamped with VersaFine Clair Acorn Ink.  Mini Dots were stamped around Dragonfly Whispers with Monarch Ink.  The Berry Wreath with Mini Berries was stamped along the top of the card with Acorn Ink.  


The panel was matted with cardstock and then added to the card.  Ranger Liquid Pearls in BlushRuby Red and Platinum were added to the wings, berries and mini flowers for dimension.


Finally, I stamped the Silver Lining phrase with Nocturne Ink on a white panel and added it inside the card.  


Would love to see what you create for Challenge #33.  The winner of the challenge will receive a
$15 gift certificate to Lavinia World to shop for more goodies.   Remember there is a new challenge every other Thursday.  


Like us on Facebook
Follow us on Instagram: LaviniaWorldStore
Join our NEW Anything Lavinia Facebook Group here
 Don't forget to include #laviniaworldstore on your projects and tag us at @laviniaworldstore so we can be sure to see and comment on your Lavinia projects!
Sign up to receive our Lavinia World Challenges and all the amazing inspiration from our Designers sent directly to your emails.

Please note that although we carry the full Lavinia range, we are not part of any other entity or Facebook group that carries Lavinia stamps. ONLY the cards posted to Lavinia World Challenges will be entered into the drawing for the Lavinia World prize.  Also note that the gift certificates are ONLY valid at the Lavinia World website.

Can't wait to see what you create.