Showing posts with label liquid pearls. Show all posts

8/23/23

Fairy Hugs Marina the Mermaid

Sharing a card using Fairy Hugs stamps available at Fairy Stamper.


Fairy Hugs Stamps:  Marina, Fish School
Fairy Hugs Paper: Blue Brilliance
Tutti Designs Die: Seashell Frame


Die cut the frame from cream cardstock.
To emphasize the design, add blue around the edges.
Place the die cut on the background panel
Stamp the Fish School in the background.
Assemble the card.


Stamp and emboss Marina.
Fussy cut her and add her to the card.
Finish by adding some liquid pearls for dimension.

Thanks for stopping by.

Steph

4/15/23

Fairy Hugs Cottage Garden

   Sharing a card using Fairy Hugs stamps available at Fairy Stamper.


Fairy Hugs Supplies:


Place tape along the right side of the card, about 1" from the edge.
Ink the Fairy Dictionary and stamp along the right side.


Carefully remove the tape to reveal a straight edge.


Stamp the Mini Stone Path (masking off the top of the path) so it lines up with the die.
Then stamp grass along the bottom edge.


Die cut the Cottage Garde from green cardstock and lavender cardstock.
Cut the flowers from lavender and reassemble on the green die.

Mat the panel with cardstock and adhere to a white card.
Stamp 3 Condo Dwellers around the die.


Using liquid pearls to fill in the windows and lights.
Add stickles to the flower centers.

Thanks for stopping by.

Steph

4/8/23

Fairy Hugs Bear in the Hollow

 Sharing a mixed media project today using Fairy Hugs stamps available at Fairy Stamper.


Supplies: Fairy Hugs Stamps

Fairy Hugs Die:  Magical Hollow


Ink the metal panel with assorted colors of Distress Inks.


Die cut the Magical Hollow and add additional color to it with Distress Inks.
Using scraps of paper, create the grassy layers.
Determine the position of the Magical Hollow, then stamp assorted images.
Stamp the fence off the right side.
Stamp clouds in the upper part of the panel.


Stamp a mini bear in the center of the Magical Hollow and surround him with Bees.
Stamp Woodland Florals along the bottom edge, adding liquid pearls randoml.


Thanks for stopping by.

Steph

6/8/22

PPCF - Lili of the Valley Designs


Hi everyone, Lili of the Valley is a sponsor of the Passionate Paper Creations& Friends  FB Group this weekend.  I've used the delightful Watering Can image.


I chose to size this delightful image approximately 3"x5" so I could use several colors of cardstock.


I colored with Copic Markers, then die cut the image.


Adding Liquid Pearls to the flower centers finished them off quite well before adding a die cut Hello from TLC Designs.

Thanks for stopping by.
Steph


8/6/21

Scene Building with TLC Designs

Hi everyone, I've got a sweet card using assorted TLC Designs products.


Using 2 stamps from the Turtle-icious stamp set, I stamped them on X-Press It Blending Cardstock, colored with Copic Markers, then fussy cut.


Wanting to create a scene, I die cut paper from the Perfectly Precious Digital Paper Pack using the Land and Seas Dies.  Adding them to the card, I placed the turtle  in the grass, then surrounded it with clouds and flowers from the Toga's and Bubbles stamp set.  I also added elements from the Scalloped Rectangle Garden Dies and Aviary Oval Dies.

Thanks for stopping by.

Steph


4/5/21

Happy Easter

 Hi everyone and Happy Easter.


I had this sweet Stamping Bella stamp I wanted to use, so I stamped her then colored her with Copic Markers. Next, I die the stamped image and all the layers needed for the card.


Assemble the card and add dimension with Liquid pearls and Nuvo Drops.


Thanks for stopping by.

Steph

3/10/21

Time to Travel

Hi everyone, it's been a long time since we've been able to travel, so let's remember that we will be traveling soon.


The tricycle image is an older rub-on.  Using Lawn Fawn dies, I die cut the image.


I die cut the words from coordinating cardstock.


Using the Taperunner, I adhered the layers together.


Finally I added dimensional pearls to the corners of the card.


Thanks for stopping by.

Steph

1/20/21

Hearts For You

Hi everyone, Valentine's Day is coming and it's time to get those cards ready.


Create a card from black cardstock and cut pattern paper to fit.
Stamp the image and color with Copic Markers.
Die cut the colored image and mat with black cardstock.


Assemble all layers using Tape Runner.
Use Liquid Pearls and Nuvo Drops to add dimension to the hearts and flowers.


This card went together quickly and easily courtesy of  Tape Runner.  
If you have a number of cards to make this year, consider setting them up assembly line style.
You'll be done in no time!!


Thanks for stopping by.

Steph

1/12/21

4 U Birthday Card

Hi everyone, I've got a fun birthday card to share using some fun dies from TLC Designs.


Cut kraft cardstock to fit card front.
Cut the striped panel slightly smaller and use the hillside die from the Land and Seas Die set  to die cut the bottom edge for a fun effect.
Also die cut white cardstock with the same die and adhere to the striped panel.


Using the Cherry on Top Die, die cut kraft, white and red cardstock.
Also die cut corrugated cardstock for the cupcake wrapper.
Ink the edges of all elements and assemble to the base.
Place 4 U on the cupcake wrapper

 Adhere the cupcake to the card and place the candles on top.
Add liquid pearls to the candles to simulate the flames.


Thanks for stopping by.

Steph


1/11/21

Unicorn Wishes for 2021

 Hi everyone I'm on the Blank Page Muse blog sending you unicorn wishes for 2021.


Supplies:

Blank Page Muse Stamp:  Unicorn Wishes
Blank Page Muse Stencil: Pebbled Path
White and Pink cardstock
Coloring Medium:  Copics, Liquid Pearls


Cut white cardstock to fit card front.
Using the stencil, create the background using Distress Oxide Ink in Tattered Rose.


Create a second layer using  Speckled Egg, moving the stencil around the panel.


Stamp the unicorn in black ink on the stenciled panel.
Color with Copic Markers.
Ink around the panel, then mat with cardstock.
Stamp the coordinating phrase, ink the panel and also mat with cardstock.


Adhere the panel to a card.
Use Liquid Pearls to add dimension about the unicorn as well as dotting the "i"s in the phrase.


Thanks for stopping by.

Steph


1/6/21

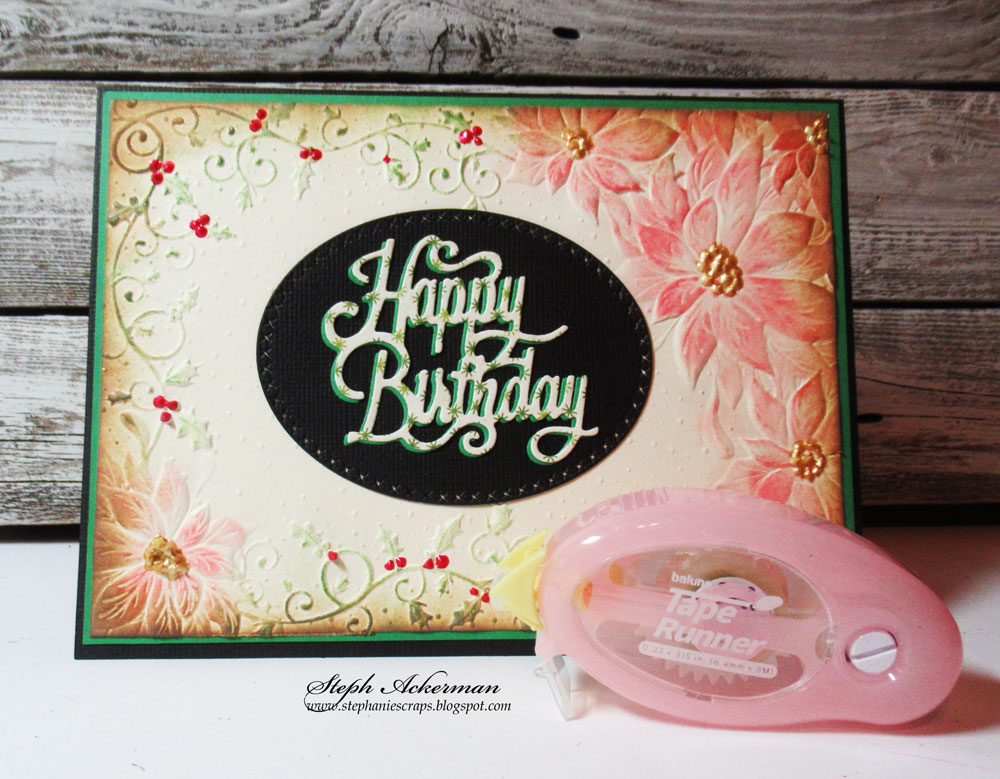
Holiday Birthday Card

Hi everyone, do you know someone who celebrates a birthday during the holiday season?  Why not combine both into a pretty card.


Start by embossing cardstock with a Christmas embossing folder.  Inked over the embossed portions with red and green inks.

Mat the panel with green cardstock using Taperunner.  Then use liquid pearls in red and gold to decorate the panel.


Adhere the embossed panel to a dark green card.  Die cut a black oval for the center o f the card.  Also die cut Happy Birthday from green and ivory cardstocks.  Add the ivory layer slightly off center so the green background shows.  


Thanks for stopping by.

Steph


12/23/20

Quick and Easy Christmas Projects Day 9

Hi everyone.  Christmas will be here before we know it.  The last six years I've blogged about last minute Christmas ideas you could make in under 60 minutes.  Well, it's that time again and I've got some new projects to share.

I'm on the Rinea blog today with some last minute quick and easy Christmas cards.


All you need is some beautiful colors of Rinea Foiled Papers, a  Spellbinders full card background die plus some stamps and coordinating dies.  Aren't they pretty?


Since the panel is the same size as a card, I then adhered the panel to the card front.


I added the Silver die cut panel to Ruby/Gold Glossy Foiled Paper, then adhered it to a card.


For the green panel, ornaments were stamped with red ink, then die cut.  Touches of color was added using liquid pearls.  A stamped and die cut phrase was added to the card.  Robin's Nest dew drops were then added about the card.


For the red card, ornaments were stamped with green ink, then die cut.  Touches of color was added using liquid pearls.  A stamped and die cut phrase was added to the card.  Robin's Nest dew drops were then added about the card.


Thanks for stopping by today and don't forget to stop by daily as I show you more quick and easy Christmas projects.

If you missed my previous posts, you can find them here:

Thanks for stopping by.

Steph