Showing posts with label fancy pants. Show all posts

2/15/15

Etched Candy Jar

Hi everyone, I've been working with a fun etchall product today.  It's called   etchall dip'n etch liquid and this product allows you to created frosted glass!

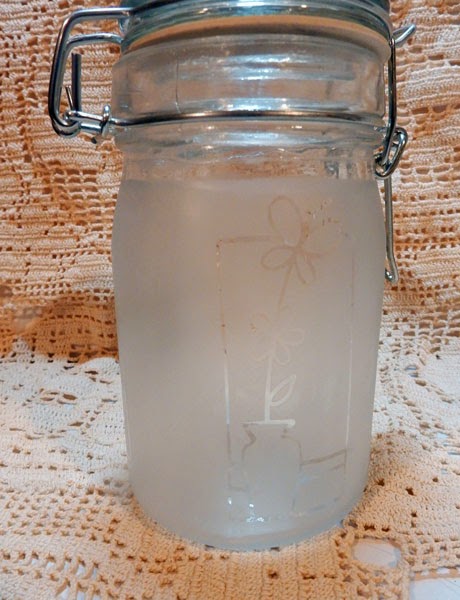
It is so easy to create frosted glass using etchall Dip 'N Etch liquid.  I wanted to etch a mason jar, so I first removed the top and then placed Stampendous Class A Peel stickers around the jar. 


After measuring the required amount of dip 'n etch in a small container, I placed the mason jar in the container and allowed it to sit for approximately 15 minutes.
 
 
After 15 minutes, I removed the mason jar.  Then, after removing the stickers, I rinsed and dried the jar and these lovely images showed.
 
 
I added some ribbon around the top of the jar and around the lid and then placed candy inside. 


A simple coordinating flower finished off the jar.


I'm thinking these would be lovely as a party favor, don't you?

What will you etch today?

Thanks for stopping by today.

Steph


9/19/14

Clearsnap and Walnut Hollow Blog Hop

WH+Clearsnap-Blog-Hop-FB

Welcome to the Clearsnap and Walnut Hollow blog hop.  I am so excited you are here.  Please visit everyone's blog and see what they've created.


I received this awesome Roomy Box to work with  from Walnut Hollow.  Walnut Hollow has tons of amazing products to work with including boxes, plaques, clocks and more.


I began by painting the box with ColorBox Crafter's Ink in Stone.  Placing the ink on a craft sheet, I spritzed it with water so I could use it with a paint brush.  Then I used ColorBox Crafter's for Ann Butler in Berry to stamp a pattern across the top with EZ-De's Stamps - Checkered Woven Hearts.  I was going for a slightly aged look, so I was not concerned with the "missing" spots you can see about the top.


Earlier this week, we blogged with Fancy Pants Designs.  Still having some papers from the Burlap and Bouquets collection on my table, I used a sheet of corrugated paper and spritzed it with ColorBox Spritzers in Putty for an aged appearance.


The corrugated papers were inked with Stone Crafter's Ink and adhered to the box top and bottom.  Then I selected assorted papers from the Burlap and Bouquets collection to decorate the interior, cutting them to fit and inking with Stone Crafter's Ink before adhering.  I cut several doilies from the paper collection and added them under a piece of torn paper.


To finish, I stamped the same pattern around the bottom of the box.  Along the top edge, I used Ann Butler's flower stamp strip from EZ-De's Stamps - 1" Rail Fence Set A, also in Berry Ink.  Stone Crafter's Ink was used along the edges using the inkpad directly on the wood.  It provided a nice darker finish to the edges.


Now my dilemma was finishing off the top.  I knew I wanted some dimension, but wasn't too sure how to proceed.  I pulled out Ann Butler's 2" Flourish Stamps from EZ-De's Stamps and stamped my initial in Berry Ink on white cardstock.  I then mounted it on a piece of corrugated paper.


My initial was just the right embellishment I needed to finish my box and mounting it atop a Spellbinders die cut just completed the box.
 
Thanks for stopping by today.  Please stop by all the designers and see what they've created today.
 
 
Steph
 

9/16/14

Paulie's Shadowbox - Blog Hop with Fancy Pants and Clearsnap


Hi everyone! For the next few days Fancy Pants and Clearsnap are having a BLOG HOP!   There are lots of amazing projects to be seen!

Check the CLEARSNAP BLOG and the FANCY PANTS BLOG for previews and links to the blogs of participating designers…


I was thrilled to receive Fancy Pants' Burlap and Bouquets collection.  The colors and patterns lent themselves perfectly for an outdoor project.

I found this shadow box and knew it would be fun to create with.  I first painted the frame with a layer of gesso.  Once dry, I spritzed it  with ColorBox Spritzers in Lemon Drop and Putty.  The gesso allowed the colors to show rather than be absorbed by the wood.


Since the spray inks dry very quickly, I was able to then do a secondary spritz with Grasshopper almost immediately. 


In deciding the papers I wanted to use, I found the corrugated paper in this collection would be the perfect backdrop for my photo.  And I thought the burlap paper would add some nice dimension around the frame.  I inked each piece with ColorBox Mix'd Media Leather Inx before adhering to the shadowbox.  A tag was also inked with Mix'd Media Leather Inx and Paulie 2014 was added on top using the included stickers.  The edges of the shadowbox were also inked with Leather Inx to add more depth.  I cut apart the doily paper in this collection to use as an element in the corner of my shadowbox.


Assorted papers were cut, inked with Leather Mix'd Media Inx and added to the shadow box with a variety of foam adhesives for different levels of dimension


Several buttons were added around the photo and assorted stickers were added to the tag attached to the photo.


These Fancy Pants papers were perfect to showcase our furry family member.

Please visit both the Clearsnap blog and the Fancy Pants blog to see all the wonderful projects from both design teams.  And there is a giveaway on the Clearsnap blog so be sure to stop by.

Thanks for stopping by today.

Steph

2/1/13

Triangle Explosion Book


This is a project  using my Scor-pal, 3 pieces of cardstock and assorted pattern papers from Fancy Pants Designs.

To begin, prepare your cardstock as follows:

1 piece of cardstock is 12" x 12" - score at 4" and 8", turning the paper and scoring again 4" and 8", creating 9 equal sized squares.
Cut 1 piece of cardstock 10 1/4" x 10 1/4"  and score at 3 1/2" and 6 1/2", turning the paper and scoring again at 3 1/2" and 6 1/2", creating 9 equal sized squares.
Cut 1 piece of cardstock 8 1/2" x 8 1/2" and score at 2 3/4" and 5 3/4", turning the paper and scoring again at 2 3/4" and 5 3/4, creating 9 equal sized squares.

Cut along the score lines and remove the corner pieces.  Your three pieces of cardstock should look like a "t"


Fold each piece along the scored lines.


To form the triangle, cut each piece on the diagonal.  Find the center of each edge and cut to the score lines.

Add Scor-Tape to the center of each piece and assemble together to form one unit.


Using assorted papers from Fancy Pants Designs - The Good Life Collection - cut pattern paper to fit each triangle.


Layer 1 - cut 8 pieces, each 3 3/4" x 3 3/4".


Layer 2 - cut 8 pieces, each 3 1/4" x 3 1/4".


Layer 3 - cut 8 pieces, each 2 3/4" x 2 3/4".

To finish the inside, add a 2 3/4" x 2 3/4" square to the base.

Decorate as desired.  I added stamps around my box.

Punch holes in the tops of each point and thread ribbon through the holes. 


Fill the box with candy or other little treats and pull the ribbon together to close.


This is the perfect item to put in the Christmas tree since it doesn't weigh very much, or even use as a place setting on the dining room table.


Supplies:
Cardstock: Bazzill
Pattern paper: Fancy Pants
Scoring Tool:  Scor-pal
Adhesive: Scor-Tape
Stamps: Cornish Heritage Farms
Ink: Memento


Thanks for stopping by today.

Steph