Showing posts with label clearsnap. Show all posts

12/24/17

Quick and Easy Gift Ideas - Day 10

Hi everyone.  Christmas will be here before we know it.  The last three years I've blogged about last minute Christmas ideas you could make in under 60 minutes.  Well, it's that time again and I've got some new projects to share.

It's Christmas Eve and today it's all about tags. Every special package needs a tag so why not create some personalized tags.


Using Makin's Clay, I created mittens, bells and snowflakes. 


I created a pointsettia and added it to a tag.  Then I used Whisker Graphics twine so I could tie the tags to the packages.


I hope you've enjoyed my 10 days of quick and easy gift ideas.

If you missed my previous posts, you can find them here: 

Day 1
Day 2
Day 3
Day 4
Day 5
Day 6
Day 7
Day 8
Day 9

12/23/17

Quick and Easy Gift Ideas - Day 9

Hi everyone.  Christmas will be here before we know it.  The last three years I've blogged about last minute Christmas ideas you could make in under 60 minutes.  Well, it's that time again and I've got some new projects to share.


I used a water pen with Colorbox Crafter's Inks to paint the snowflakes, his hat and scarf.


Inking a Unity Stamp, I added some texture to the scarf.


Fill it with some small gifts and candy and you've got a sweet gift for someone special.

If you missed my previous posts, you can find them here: 

Day 1
Day 2
Day 3
Day 4
Day 5
Day 6
Day7
Day 8

12/18/17

Quick and Easy Gift Ideas - Day 4

Hi everyone.  Christmas will be here before we know it.  The last three years I've blogged about last minute Christmas ideas you could make in under 60 minutes.  Well, it's that time again and I've got some new projects to share.

This winter panel starts with a metal panel which I covered with Gesso.  Once dry, I sprayed Jade Tint It over upper half.  Along the bottom, I painted molding paste to simulate snow and added some gauze.


All the elements were die cut with my Cricut and then adhered to the panel.


If you missed my previous posts, you can find them here: 

Day 1
Day 2
Day 3

Thanks for stopping by.

Steph

11/28/17

Lovely Gift Bag

Hi everyone, this week the Ann Butler Design Team is sharing projects created with products from Ann Butler Designs, Rita Barakat and Lisa Jimenez. 


Supplies:

Ann Butler's Crafter's Ink by Clearsnap  - Berry and Canyon
Rita Barakat's Art Foamies - Hot Air Balloon
Lisa Jimenez Colorique Ink by Clearsnap - Honey Bee and Wisteria


I began by inking the Hot Air Balloon with both Berry and Canyon Inks.  This is a large stamp that I knew would be perfect for a gift bag.  Once stamped, I then fussy cut both pieces.


I placed several drops of Honey Bee and Wisteria Colorique on a gift bag, then used a paint brush to create the streaky background.  Colorique Ink is blendable so where the colors overlap, a third color came to life.


Colorique works on a variety of surfaces so I selected a metal charm and painted it with Honey Bee.  Before it dried, I rubbed off the color as I wanted the color to soak into the letter spaces.  Finally I painted Wisteria on the charm and heat set it.


Next, I inked some ribbon with Berry Ink.


Then I used my Bowdabra to create a ribbon.


To finish,  I matted the hot air balloon with cardstock and adhered to the bag.   I tied the ribbon to the handles and added the charm.  I also used Berry Ink around the edges of the gift bag.


I hope you enjoyed my project and will try these lovely supplies.
 
Thanks for stopping by today.
 
Steph

 

10/19/17

Joy Clair New Releases

I'm on the Joy Clair blog today using 2 of the newest stamp sets.

Shine-joyclair-2-steph-ackerman

I used Faith Quotes and Be Brave for my first card.  Using the MISTI I stamped the feather from the Be Brave stamp set in several colors of ink.  The MISTI makes it easy to stamp several colors and keep the feather aligned at all times.

Feather-joyclair-1-steph-ackerman
I matted the feather panel with black cardstock, then wrapped Whisker Graphics twine around the panel.  The panel was then added to a green card with foam adhesives for dimension.  I added a phrase from Faith Quotes   which I stamped in black ink and matted with black cardstock before adding to the card with foam adhesives.

Shine Bright is from the  Salt and the Light stamp set.

Shine-joyclair-steph-ackerman

I began by cutting strips of cardstock on an angle, then placed them on a cardstock panel so they radiated from one corner.  Each strip was inked before adhering to the panel.  Once adhered, I added embossing powder and heat set.

Shine-joyclair-3-steph-ackerman

Using foam adhesives, I added the panel to a black card.  Shine Bright was stamped and die cut, then added to yellow and black die cut circles.  It was also added to the corner of the card with foam adhesives.

Shine-joyclair-steph-ackerman

Thanks for stopping by.


Steph


10/17/17

Dream.......

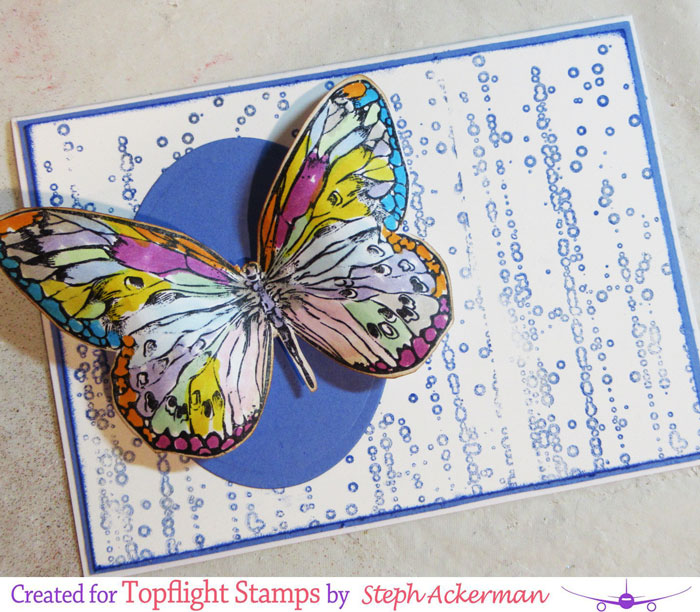
I'm on the Topflight Blog today creating with stamps from Studio Light, Rubber Dance Art Studio and IndigoBlu.


I stamped the  Studio Light butterfly  and colored with assorted colors of Copic Markers before fussy cutting it.


The Rain Droplets background  was stamped in blue ink on white cardstock and then matted with blue cardstock.


A die cut oval was added to the card and the butterfly was added on top.


The Rubber Dance Affirmations stamp set phrase was tucked in just under the butterfly.


Thanks for stopping by.

Steph


10/10/17

Baby Cards

Hi everyone, I have some fun cards on the Topflight blog today.  I used Craft Emotions - Lovely Baby, Vintage Toys.  I thought these would make great new baby cards.


I began by die cutting white circles and placing them in the MISTI.  Using the MISTI allowed me to add several colors of inks for definition on each buggy.


 Finally I added black ink for the wheels and stamped with the MISTI.


Using papers from my stash I created the cards.  A scalloped circle was added behind the image on the pink card.  Celebrate is from the Studio Light - Butterflies stamp set which I slipped behind the image.


A simple circle was added behind the image on the blue card.   Celebrate is from the Studio Light - Butterflies stamp set which I slipped behind the image.


Thanks for stopping by.

Steph


10/7/17

Fall in Love Collaboration

Hi everyone, welcome to World Card Making Day.  Please stop by the Joy Clair blog for challenges throughout the day on the Joy Clair blog.    In addition, the design team has gotten together and created with a variety of Joy Clair stamps which we then cut apart into inchies and sent them to the rest of the design team.  Follow along as we show you what we've done.


After receiving my inchies, I cut white cardstock 3 3/4" x 3 3/4", then scored each at 1 1/4" and 2 1/2" so I could accommodate the 9 inchies.


I inked each inchie with brown ink, then added them to my panel between the scored lines.  I then added the panel to 3 layers of cardstock.


The card was created from green cardstock and Whisker Graphics twine was wrapped around the card.  The panel was added on top with foam adhesives for dimension.


The phrase from the Fall Leaves stamp set was stamped on white cardstock then die cut.  It was matted with the same cardstock as the panel and added to the card with foam adhesives for dimension.


As mentioned, we have a fantastic line-up and three Special Guest Designers joining us today, all of them had been winners of our Challenges!!!. Check out the Hop order below: 
Steph Ackerman  You are HERE
Helen Gullet  Go here NEXT

>>>HOP ALONG FOR THE CHANCE TO WIN PRIZES<<<

We're giving away three Stamp sets from Joy Clair Store! Just leave a comment on every destination along the Hop for a chance to win!
 
WCMD 2017
 
Comments close at 23:59 EST on 7th October 2017.

Don't forget that we have a lot more going on throughout today on Joy Clair blog too! We hope to see you back here for the rest of the events - there will be lots of opportunities to be inspired and to get crafty with us!
 
Happy hopping!
 
Thanks for stopping by.

Steph

Pumpkin Pouch

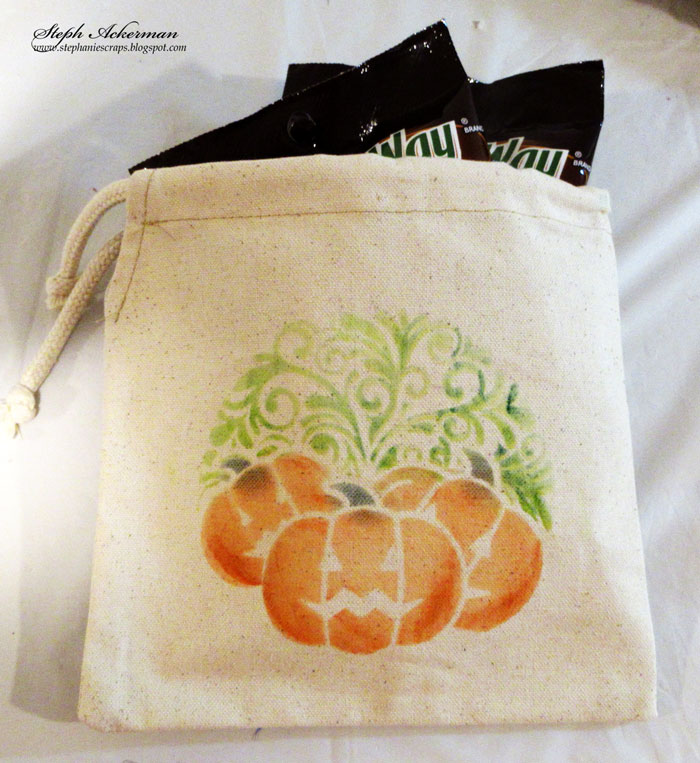
Hi everyone, the Clear Scraps October kit includes a 6" x 6" Swirl Pumpkin stencil and a canvas bag from Canvas Corp. 


Using stencil spray, I was able to adhere the stencil to the canvas pouch so it stayed in place while I added color.  Using an art dauber, I colored the pumpkin with several shades of orange ink, then colored the swirls with assorted colors of green ink.


Removing the stencil, I had this wonderful design.


This is a perfect Halloween pouch - simply fill it with candies and give as a gift for a special someone or let someone take it trick or treating for their own goodies!


Thanks for stopping by.

Steph


World Card Making Day with Topflight Stamps

Hi everyone, it's World Card Making Day and I have a wonderful card for you today using stamps from the  Topflight store.  Did you know they have lots of amazing stamps from around the world? 


I love this butterfly stamp from Studio Light.  I wanted her bright and beautiful so I colored her with assorted Copic Markers before fussy cutting her.

 
I used a tag sheet and added molding paste for a little dimension.

 
Once dry, I inked the panel and added it to cardstock.  Next, I wrapped Whisker Graphics twine around the panel before adding it to the card.


Adhesive was added to the body of the butterfly, allowing the wings to fly free.

Remember to stop by the Topflight store and check out all their amazing stamps. Also stop by the Topflight blog for lots of inspiration.

Thanks for stopping by.

Steph


10/3/17

Thinking of You with Bowdabra

Hi everyone, I've got a new post on the Bowdabra blog today.  As October is Breast Cancer Awareness Month, I created a gift bag.


I used a Clearsnap Rollagraph Wheel with Berry Ink to create the pattern on the gift bag.  Thinking of You from Joy Clair stamps was stamped on a die cut circle what was added to a larger set of circles.

I used the Bowdabra to create the bow using lots of scraps of ribbon.  Start with a grosgrain ribbon.


Add in some sheer ribbon.


Finish with 1/4" wide strips of ribbon.


Tie off and fluff out the bow.  Isn't it pretty?


Tie some strips of ribbon to the handle.  Use the remaining bow wire to tie the ribbon to the handles.


Thanks for stopping by.

Steph

10/1/17

Joy Clair's October Challenge

Hi everyone, this month's challenge at Joy Clair is to use this photo as inspiration.


I created a Halloween card using the Spooky Greetings clear stamp set.


I stamped the hat and phrase using the MISTI.  I wanted the hat to fit just above the phrase and I wanted to use 2 colors of ink on the phrase. 


Using the MISTI, I stamped the first color then reinked the stamp in the 2nd color and stamped it again.  Works wonderfully every time.  I stamped the hat in black ink just to be sure my die cut hat would fit on the card.


I created a top folding card from black cardstock and added a striped background.  The next layer was torn then matted with black cardstock and added to the card.  Whisker Graphics twine was wrapped around the card and the stamped panel was add on top with foam adhesives for dimension.  The witches had was stamped and die cut, then matted with a larger black circle and fit perfectly in the allotted space.


Thanks for stopping by today.

Steph