6/14/21

Sympathy Card

Hi everyone, I have a sympathy card to share.


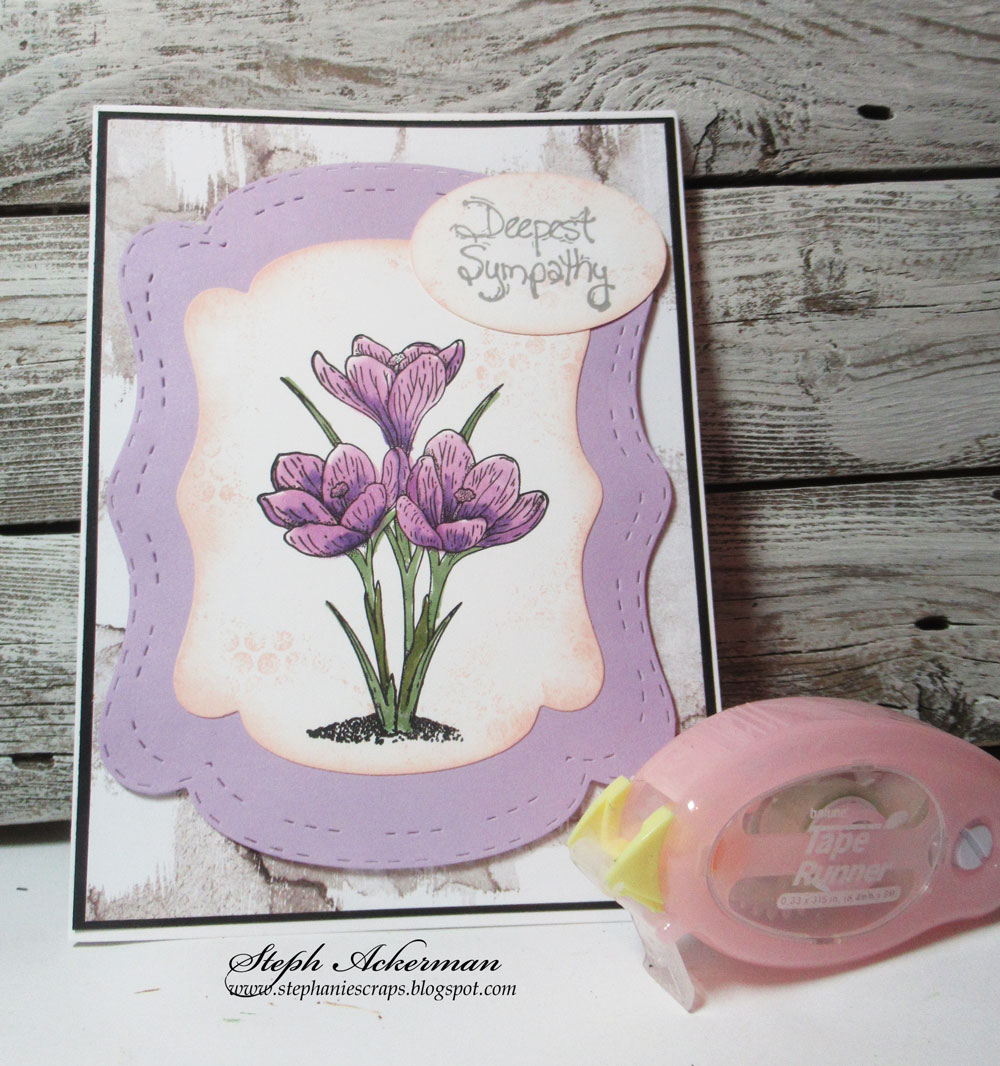
Using Blank Page Muse Stamps, I stamped and colored the flowers with Copic Markers. Then I lightly stamped a bubble wrap stamp around the flowers with pink ink.


Die cut the image with TLC Designs See You in The Center Dies and die cut a larger frame.


Add the stamped image to a card and place a sentiment in the upper corner.


Thanks for stopping by.

Steph

6/12/21

An evening flight

  Hi everyone, I have another Fairy Stamper project to share.  


Have you seen the Fairy Hugs Wishing Well?  It's such an amazing stamp - it's so detailed.


I used the Fairy Scapes Slimline Background - Grayscale Sky - as I wanted to create a night scene, and it was perfect.  I stamped the Wishing Well, Fairy Hugs Flying Owls and Fairy Hugs Hanging Vines in black ink.


The stamped panel was die cut with Tutti Designs Slimline Dotted Rectangles and matted on black cardstock.   The card was also created from black cardstock .


What do you think?


Happy Father's Day with Rinea Foiled Papers

Hi everyone, I'm on the Rinea blog with a set of slim line cards for Fathers Day, but they would also work for birthday cards.


Using Tutti Designs Slimline Stars Background die, I die cut  Ebony/Gold Glossy Foiled Paper.


 I also die cut Arctic/Gold Glossy Foiled Paper.  The foils cut beautifully.


I saved all the die cut hearts because I wanted to mix the designs.


I adhered each die cut panel to Sapphire/Gold Glossy Foiled Paper.  Then I added different colored stars to each panel.


The panels were then added to cards.


Happy Father's Day was stamped on white cardstock and die cut.  It was then matted with a die cut  Ebony/Gold Foiled Paper panel.


A different die was used for the sentiment on the second card.


What dad wouldn't love getting one of these cards for Father's Day?

Thanks for stopping by.

Steph

6/11/21

Big Hugs with TLC Designs

 Hi everyone, sending Big Hugs today with this fun stamp set from TLC Designs.


Using the largest die from the Apple a Day Die, I created a card.  Since I wanted the full effect, I folded cardstock and die cut off the edge to keep the card in tact.  Then I die cut another layer and adhered on top for the full die effect.


After stamping and coloring the images from the Troll Cricket Fun stamp set, I colored them with colored pencils and gamsol, I die cut the panel with the next sized down die.


Wanting the kids to be running in the grass, I die cut grass and mushroom layers from the Land and Seas Dies.  Once layered I used the same die to cut the grass again so it fit perfectly on the card.


I also die cut different colored mushroom toppers.  How cute is that?
What a fun card to create!  After inking with brown ink, the panel was added to the card with foam adhesives for dimension.


Thanks for stopping by.

Steph

6/9/21

Clear Scraps Acrylic Phone Stand

Hi everyone, I'm on the Clear Scraps blog with some amazing  products.


I've used the Acrylic Phone Stand, opting to decorate it with potted flower arrangement created with a Tutti Designs Die and Rinea Foiled Papers.


I die cut the potted flower arrangement from 3 different colors of Rinea Foiled Papers - Silver/Gold Glossy Foiled Paper for the flower pot; Marigold/Glossy Foiled Paper for the flowers and Jade Starstruck for the leaves.


Now the fun part was cutting apart the potted flowers and reassembling in the appropriate colors.


Using a clear adhesive, I adhered the potted flowers to the acrylic base.


It's a perfect size for my phone, and even looks pretty sitting on the counter.


Thanks for stopping by.

Steph

6/8/21

Embossed Floral Hi

 Hi everyone, I've got a new floral card to share.

Create a card from pink cardstock.
Cut yellow cardstock slightly smaller and emboss.
Ink over the embossed panel with brown ink. 


Stamp the flowers from the Blank Page Muse Flower & Bird Sketches stamp set.
Color with Copic Markers.

Die cut the image with TLC Designs Aviary Oval Dies creating an eyelet effect on the panel.
Die cut a larger corresponding mat with the same dies.

Adhere the elements to the card using Taperunner.


Finish by die cutting HI from the TLC Designs Apple A Day Dies and adding to the corner.

Thanks for stopping by.

Steph


6/6/21

Happy Father's Day Cards

Hi everyone, it's a new month and the challenge on the Scor-Pal blog is to create anything you want, just be sure it includes more than one score.


I've used a variety of colors of Rinea Foiled Papers; but you can also use double sided cardstock for a different effect.


Cut paper to 6" x11".
With the short edge at the top, score at 1 1/2" and 4 1/2".
Rotate and score at 1", 2" and 6 1/2".\
Create the triangular shapes by scoring from the 6 1/2" line to the vertical lines (this creates the shirt sleeves).


Fold along the long edges.
Fold along 1" and 2" scored line.
Fold along the 6 1/2" scored line and fold upward to create the shirt.
Score well, then unfold the panel and fold along the triangular lines to create the sleeves.
Again, score well.

To create the collar, cut approximately 3/4" along the 2"  score line.
Take the top edge and fold down on an angle so the points meet in the center.


Use the Scor-Pal Pocket Pen Pals die to create the interior panel onto which you can stamp a sentiment.  Place inside each shirt with Scor-Tape.


Create a tie and pocket for each shirt. Adhere to the shirts.  
Fold upward and slip the panel under the edges of the collar.
This holds the card together.


Would love to see what you create this month.  Please share.

Rinea Foiled Papers:


Thanks for stopping by.

Steph

6/5/21

Dancing Fairies Interactive Card

Hi everyone, I have another Fairy Stamper project to share.  


I used the TLC See You in the Center Interactive Die to create my card.


The package comes with complete directions on the back.  


Take your time, as the first card can be a little intimidating.  Once you've created one ore two cards, the next ones gets easier.


Color the bottom half of the card with green ink and the top half with blue ink.  Stamp the Fairy Hugs Hanging Vines in VersaFine Clair Morning Mist Ink around the top of the card.


Stamp the Fairy Hugs Mini Dancing Mushrooms repeatedly along the bottom edge with VersaFine Clair Shady Lane Ink.


Add a few Fairy Hugs Pine Branches above the mushrooms using VersaFine Clair Pinecone Ink.


Add the mini tabs to the card with brads being sure they line up with the large tab on the back.


Fold black cardstock and place the base die over the fold to keep the card intact.  Die cut another black panel to complete the full effect of the card design and add to the card base.


Add the stamped panel to the card with foam adhesives being sure to leave room for the tab to move.  Add stickles randomly around the card. 
Stamp Fairy Hugs Lila and Robin in different colors.  Fussy cut them.  Line them up so they interact with each other as the tab is moved from side to side.


Add the fairies to the little tabs with dimensional adhesives.

Thanks for stopping by.


6/4/21

Swinging by to say HI

 Hi everyone, just swinging by to say Hi with lots of fun products from TLC Designs.


I've used stamps from the Toga's and Bubbles stamp set, the Turtle-icious stamp set and the Dreamer the Dragon stamp set.  They all work so well together.


Using the Daisy Frame Die set, I created the shaped card, placing the die over the fold.  To complete the card, I die cut another panel and adhered them together to create the card with the full design of the die.


To create the scene, I stamped the snail and house.  Using a masking technique, I stamped the bushes in varying heights around the focal images. 


I then colored the images using Copic Markers.  To finish I also added color to the ground and sky.  Finally, I die cut the image using a smaller Daisy Frame so it fits the card front.


Assemble the card, then stamp the phrase.  Cut the phrase apart so HI can stand by itself on the card.  Mat with cardstock and add to the card.

Thanks for stopping by.

Steph