5/15/13

Wilderness Survival Box

Here's a  really fun project I created for Scor-pal using products from Simple Stories Take a Hike Collection.

This collection with it's earth tone colors and it's assorted array of patterns and elements made this  the perfect collection to create this Wilderness Survival Box.   Fill it with cards, mementos and little goodies from home so your little camper won't be lonely.


Cut cardstock to 12" x 7", then score at 4 1/2" and 7 1/2".  Fold on the scored lines.


Cut pattern paper 4 1/4" x 6 3/4" to cover both the front and back of the box.
Cut additional cardstock and pattern paper as decorative elements for the front of the box.


To create the sides of the box, cut 2 pieces of cardstock 6" x 2 1/2" and score every 1/2" across. 


Once folded, adhere the two end pieces to the larger cardstock panel to create the box.


Inside the box, add cardstock strips to create separate compartments by cutting 4 pieces of cardstock 7" x 2 1/2".  Score 1/4" on both ends, and adhere to the side panels created above.


Cut elements from the pattern paper collection and include inside the box.  And also add some goodies from home.


To create the top of the box, I used Spellbinders dies, cutting the bottom layer from cardstock and the top layer from pattern paper.


Fitting the cardstock to the box, create the back flap by scoring  at 1 1/2".
To create the front flap, score at  2".    
Cut the pattern paper into 3 sections to fit between the scored lines and then adhere each section.

Add assorted tickets and elements to the back of the box, inking the edges of each piece and matting each piece with cardstock before overlaying and adhering to the box. 


Add assorted elements and stickers to finish the top and front of the box.

Side view of the completed box:


To close the box, add a Velcro dot in the center of the front.


Supplies: Scoring Tool:  Scor-pal
Adhesive: Score-tape
Cardstock: Bazzill
Pattern paper:  Simple Stories
Ink: Ranger Distress Ink
 
Thanks for stopping by today.
 
Steph

5/14/13

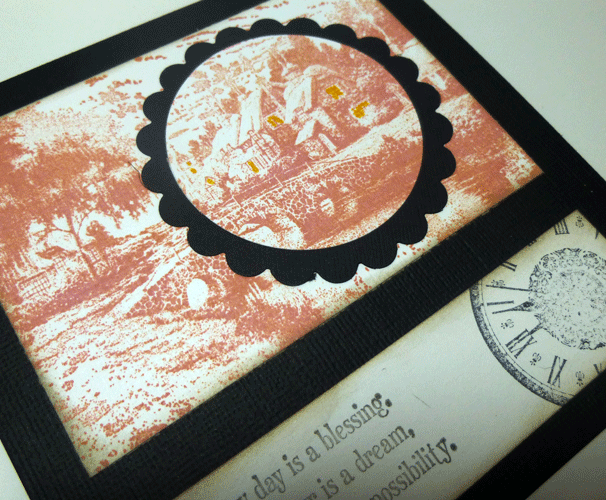
Every day is a blessing

It's time to showcase another Thomas Kinkade stamp from Cornish Heritage Farms and I am using  Cobblestone Bridge.

I first stamped the image with Clearsnap's Guacomole Chalk Ink on white cardstock.  Chalk Ink is the best ink to use to get the details of the Thomas Kinkade stamps to really stand out. 

I die cut the center of the village and placed it back on a scalloped circle for emphasis.  A little Smooch Ink in the windows added some life to the homes.

 
Using A Time to Stamp stamp set, I stamped a clock and sentiment on the lower section of the card.
 
Thanks for stopping by today.
 
Steph
 

5/13/13

Find Inspiration

Happy Monday everyone.  It's time for another reveal from Prickley Pear Rubber Stamps..   

Today, I'm using the new CLR025A - Gears2 acrylic stamp set, creating my background with the stamps.  A simple brad in each gear adds a nice touch.  The sentiment is from the Gears2 set and I mounted that on D033 - Flourished Oval die.


For the interior card, I used GG0043 - Wishing you Success.


Thanks for stopping by today.

Steph


5/10/13

Wishing You Well

Morning everyone.   I have been having so much fun with my stamps and Zig Markers.  Who knew they'd be so much fun to work with!!

This is a snippet of a post that is on Zig Blog the today.


Please click here for the finished project.

Thanks for stopping by today.

Steph

5/8/13

It's a huge blog hop today!!!!

Today  Paper Temptress's  Design Team is blog hopping with Heartfelt Creation's  Design Team members combining products from both Heartfelt Creation and Paper Temptress.
 
Paper Temptress  is donating a $25.00 gift certificate and Heartfelt Creations is giving away  the whole new (and fabulous) Sun Kissed Fleur Collection so make sure you leave a comment on each of the PaperTemptress’s DT’s blog and a message on Heartfelt Creations blog to enter to win.  These are fabulous prizes so make sure you follow directions carefully! You could be one of the two winners.  Winners will be selected on May14th so be sure to check back to see if you won!

 Hope you enjoy what both teams have designed for you.

Today I'm using one of the stamps from the Heartfelt Creations' Scenic Vista
  collection.  This is a beautiful set with three very different stamps, and I have used an assortment of Papertemptress' papers. 

I started with a sheet of Butternut Treasures   cardstock which I used as the base of my card, cutting it to 5 1/2" x 11".  The next two layers were selected to coordinate with the colors of the stamped scene.  I used Hambly's Mod Circles and Little Circles,   opting to use the alternate, solid color side, with just a touch of the Little Circles  showing.


Selecting this garden stamp, I stamped it on Cryogen White  cardstock, my cardstock of choice when using Copic Markers.  Then I colored the set with Copic Markers and die cut it into a circle.  I then used  Grass Treasures  cardstock as the matting.


The ornate swirls behind my image is actually one of the coordinating Decorative Chateau Gate Die which was cut from Cryogen White cardstock.  A small stamp was used as the sentiment directly on the Hambly papers and added to the card with foam adhesives.


Thanks for stopping by today. Now onto the next blog which is Kristie Taylor
If you get lost along the way, here's the full Blog hop list:


Thank you for visiting and hope you had fun with the hop. Don't forget to leave a comment on each of the each Design Team members blog.

 Steph

5/7/13

Welcome Home

It's a new challenge at Cornish Heritage Farms and Frances has asked us to use a digital image.   If you check out the Store you will find some awesome images to work with.

I chose to work with  Mushroom Lane #6  and colored it with Copic Markers.  Once colored, I cut it out and added the image to this awesome pattern paper I found in my stash.  It was the perfect backdrop for the colored image.


The sentiment is a sticker I also found in my stash.

Head on over to see what everyone has created.

Cornish Heritage Farms Blog


Thanks for stopping by today.

Steph


5/6/13

Wishing you success

Happy Monday everyone.  It's time for another reveal from Prickley Pear Rubber Stamps..    This new summer release is awesome and has lots of possibilities.

Today, I'm using a new sentiment - GG0043 - Wishing you success.  With graduation approaching, it's time to get those cards ready.  I also used the new clear set - CLR025A - Gears 2 - to create the background of my card. 


Thanks for stopping by today.
 
Steph
 

5/5/13

Happy Mother's Day

Hi all, it's almost Mother's Day and I miss my Mom terribly.   I can't believe it's almost a year since her passing.  I know that she would have loved this card.

I'm in love with this new paper collection from Simple Stories.  It's called Vintage Bliss and it's packed with 24 double sided sheets of amazing patterns, designs and colors.  Not only is it perfect for vintage cards and Mother's Day cards, but I can also see some Father's Day and Graduation cards with this paper pad.

Today, I selected a woodgrain pattern from this collection.  After inking it with brown ink, I mounted it on a piece of Reich Shine Champagne  which I cut to fit my card base. 


I used the reverse side of the woodgrain paper to hold the Mother's Day sentiment which is a rub on from My Sentiments Exactly, placing it across the card.  After inking it with brown ink, I found this lovely Ivory Cotton Teardrop Trim which was perfect for adding just the right amount of femininity I was looking for.


The poppy stamp is from Justrite Stampers Poppies Labels Twenty-Nine.  I colored them with Copic Markers, then used Spellbinders Grand Big Scalloped Ovals to die cut the image. After inking with brown ink, I die cut a larger oval from Wausau Index Green Cardstock.  For a little bling, I used a Gelly Roll Stardust Clear Pen in the center of the flowers.


The image was then mounted to the card with Joy Foam Adhesives  giving it a little dimension.

Thanks for stopping by today.

Steph


5/4/13

I'm back.......

It's official!!!!!!


I am back as a member of the Clearsnap Creative Team and I couldn't be more thrilled.  I love Clearsnap's products and use them almost exclusively!!!

Be sure to check out the Clearsnap website for all kinds of wonderful products.

Thanks for stopping by today.

Steph


5/1/13

Scor-Pal and SEI Blog Hop

Hi everyone, this week Scor-pal and SEI are having a cross promotion.

Make sure to hop over to the Scor-pal blog  and SEI blog to see what you need to do to enter to win an awesome prize package. 

Today, I'm going to show you how to create this lovely envelope card.  This is definitely a card that the recipient will hold onto!!!  Knowing that I wanted to use the large rose on this beautiful SEI Lover's Rendezvous  paper, I created my project around it.  All the beautiful papers I've used are from SEI's Mia Bella paper pad, a beautiful collection of 12" x 12" papers in assorted prints and colors.


Cut pattern paper to 11" x 11" and use a Scor-pal   to score on the diagonal.


Place the fold at the top of the Scor-pal and score at 3 1/4" and 5 1/2".  Since the paper extends beyond the Scor-pal, flip it and score again at 3 1/4" and 5 1/2".  Rotate your paper so that the fold now sits along the left side of the Scor-pal and score the length at 4".


Cut out the triangles that were created when you scored at the 4" mark.


Fold on all score lines.


To create the diamond shape on both ends, place your finger inside and gently fold the paper from the bottom point, aligning with the bottom layers.


Add Scor-tape to the top sections  as shown.  Do NOT add tape to the left side diamond created in the previous step.  This must remain free to be used as the closure.


Adhere together and fold.  A little trimming may be necessary so that the top flap lays flat.


Insert the flap into the diamond to complete your project.


Now let's decorate!

Cut SEI's Lover's Rendezvous  paper to fit the interior sections of the card. 
Ink the edges with coordinating ink before assembling.


Add a sticker from the SEI Lexington Card Maker paper pad to the left side flap.
Stamp a sentiment on the right side flap.
Using Spellbinders circle dies, die cut cardstock and papers from SEI's Lexington Card Maker Paper pad for the center flap.  Tear a strip of cardstock to span the circle. 
Die cut foliage using SEI's Lexington Cardmaker Paper Pad and adhere with foam adhesives.
Stamp and color the focal image with Copic Markers and add to the center with foam adhesives for dimension.


Once completed, be sure all edges are inked, then refold allowing the rose to take center stage.


Just think of all the possibilities you can create with this envelope card. 

Thanks for stopping by today.

Supplies:
Scoring Tool, Adhesive: Scor-Pal
Cardstock: Bazzill
Pattern paper, sticker:  SEI
Dies: Spellbinders, Memory Box
Stamps: Justrite Stampers, Magnolia
Ink: Memento, Clearsnap
Markers: Copic Markers


4/30/13

Happy Mother's Day

Hey friends, with Mother's Day coming, it's not too early to begin creating a wonderful card or two for that special woman in your life.  And this is posted on the  Zig  blog today.


Today I stamped this cute pup from Stampavie on Cryogen White Cardstock.  Then I used Zig Brushables to color her.  The Zig Brushables are awesome markers because they come as dual colors.  One end is the full color and the other end is 50% lighter. 


Create a 5 1/2" square card from pink cardstock.
Use your Scor-Pal or Scor-Buddy to score at 5 1/2" and fold to create the card base.


Stamp the image and color with the following markers:
Cool Cucumber
Pale Yellow
Baby Pink
Platinum (not shown)


Using the Brushables makes it very easy to create dimension in your projects by creating gradient colors.


Cut black cardstock 5" x 5" and adhere to the card base.
Cut green cardstock 4 1/2" x 4 1/2" and adhere to the card.
Place a rub-on sentiment on a strip of green cardstock and mat with black cardstock.
Add across the center of the card.
Die cut a large oval from black cardstock and adhere over the sentiment with foam adhesives.
Add the image with foam adhesives for dimension.


There you have a sweet card for Mom.
Supplies:
Cardstock: ThePapertemptress.com
Stamp: Stampavie
Dies: Spellbinders
Markers: Zig Brushable Markers
Rub-on: My Sentiments Exactly

Thanks for stopping by today.
Steph


Beautiful Butterfly

Good morning everyone. I am loving the digital images available at Cornish Heritage Farms.

Today I'm using the Butterfly 2  digital image as the focal point on this card.  I printed it large enough to fit on a 4" square panel of white cardstock, then colored the image with assorted Copic Markers.  I wanted it bright and colorful so I chose lots of summery colors.  I then picked out some corresponding cardstock to emphasize the colors.


The sentiment is from Ornamental Beauty.

Don't forget to stop by everyone's blog for more inspiration.

Kristine


Thanks for stopping by today.


Steph

4/29/13

Daddy

It's another reveal at Prickley Pear Rubber Stamps.

I've used the following stamps:

New Summer Supplement and D033 Flourished Oval Die.


I love the smaller silhouette image and the impression of a father helping his son reel in the catch so I selected some older papers I had with a father theme and cut "daddy" to use as the sentiment.  Under the image I used the Flourished Die for more dimension.

Thanks for stopping by and don't forget to check out the new stamps available here.

Steph

4/26/13

Have a Fabulous Day

Hi friends.  This week I have a post on the Classy Cards n Such blog.  

Beverly has a wonderful assortment of products in the store and this fabulous Stampavie Stamp  called Blossom Birds just caught my eye. I prefer creating 5" x 6 1/2" cards and this larger stamp is perfect for me. 

I used the new Memory Box die -  Twirling Vine Frame  which  is an intricate die that can be used with most die cutting systems.  I had an issue cutting the frames at first and was about to discard my black piece until I realized it would be great as a mat for the green cardstock  frame, so I adhered them together. Love it!


A close up of the stamped image fitting perfectly inside the frame.  This frame has tremendous possibilities!!!  The sentiment is from Justrite Stamper's Topsy Turvy Cakes.


Supplies:
 
Cardstock:  Wausau
Pattern paper: Trimcraft
Stamps: Stampavie, Justrite Stampers
Ink: Memento
Markers: Copic Markers
 
 
Thanks for stopping by today.  Don't forget to see what's available in the store.
 
Steph


4/24/13

Just Because

Hey everyone, have you checked out the newest goodies in the Rubber Buggy store?  Kellie  has tons of wonderful new products and even some of those hard to find stamps you've been looking for.  Check out the store here.

Today's I've used some fun Bildmalarna Stamps.  It's so much fun to build your image when combining stamps!


I used So Sweet  and perched her on Stone.    I colored each image with Copic markers found in the following collections which can also be found in the store.
Perfect Primaries
Pale Pastels
Floral Favorites


I selected paper from Prima's Londonerry paper pad.  To focus on the image, I used Spellbinders circle dies and perched her on top.  The sentiment is from Justrite Stampers.


Supplies:
Cardstock: Bazzill
Pattern paper: Prima
Stamps: Bildmalarna, Justrite Stampers
Ink: Clearsnap, Memento
Markers: Copic Markers


Thanks for stopping by today. 
Steph