8/30/23

Fairy Hugs Peacock

   Sharing a card using Fairy Hugs stamps available at Fairy Stamper.


Fairy Hugs Stamps: Peacock


I created the paper using assorted watercolors.
Once dry, I stamped and embossed the peacock.
Next, I die cut the panel and cardstock using the dies.
Adhering to a black card, I stamped, punched and adhered the sentiment.

Thanks for stopping by.

Steph

8/26/23

Fairy Hugs Dreams Are Forever

   Sharing a card using Fairy Hugs stamps available at Fairy Stamper.


Fairy Hugs Stamps: Dancing Duo
Fairy Hugs Stencil:  Fairy Love


Die cut a circle from scrap paper.
Placing the scrap paper on a cardstock panel, use several colors of oxide inks, blending each.


Place the stencil next and ink under the dancers with gray ink.


Stamp the Laughter stamp about the panel.
Using the vine stamp, stamp it around the circle.


Mat the panel with 2 layers of cardstock before adding to a black card.


Add a few sequins about the panel.

Thanks for stopping by.

Steph

8/24/23

Etchall - Eat Drink and be Thankful

   Hi everyone, I've used EtchallⓇ etching creme to decorate a glass mug.


Using a stencil, adhere it to the glass.
To ensure the etching creme does not cover any parts of the glass, place painter's tape around the edges of the stencil.  Burnish well.


Put the etching creme on the stencil.
Be careful not to get etching creme on the glass.


Allow the etching creme to sit for approximately 15 minutes.


Remove the etching creme and put it back in the original container.
Since etchall is reusable, it can be used on additional projects.
Rinse the glass and pat dry.


Who wouldn't enjoy this mug during the holidays!

Thanks for stopping by.

Steph

8/23/23

Fairy Hugs Marina the Mermaid

Sharing a card using Fairy Hugs stamps available at Fairy Stamper.


Fairy Hugs Stamps:  Marina, Fish School
Fairy Hugs Paper: Blue Brilliance
Tutti Designs Die: Seashell Frame


Die cut the frame from cream cardstock.
To emphasize the design, add blue around the edges.
Place the die cut on the background panel
Stamp the Fish School in the background.
Assemble the card.


Stamp and emboss Marina.
Fussy cut her and add her to the card.
Finish by adding some liquid pearls for dimension.

Thanks for stopping by.

Steph

8/22/23

BPM - Happy Birthday Pixie

Hi everyone, I'm using some amazing products from Blank Page Muse and I Brake for Stamps to create a Birthday Pixie Card.  Isn't she adorable!


Blanke Page Muse Stamps: Pixie Dust
Fairy Short Hair Standing
I Brake for Stamps:  Happy Birthday Text Background


Create a 6" x 6" card, add pattern paper.
Stamp the large birthday stamp on white cardstock and mat with 2 layers of cardstock.
Wrap the panel with ribbon and adhere to card.


Stamp and emboss the pixie and color her with Copic Markers.
Die cut her and mat with black cardstock.


Add the pixie to the card with foam adhesives for dimension.
Stamp Pixie Dust, punch and add to the image.


Thanks for stopping by.

Steph


Looking for more Inspiration? Click the links below!
The Blank Page Muse Shop https://blankpagemuse.com/

Save 15% of your Blank Page Muse orders with discount code:  BPMSteph

8/19/23

Fairy Hugs Songs of Love

  Sharing a project using Fairy Hugs stamps available at Fairy Stamper.


Fairy Hugs Stamp: Songs of Love

Wanting something fairly simple, I used a ceramic panel and stamped the Songs of Love in black ink.
Then I added some blue ink around the edges of the panel.

Thanks for stopping by.

Steph

8/16/23

Fairy Hugs Alaina

   Sharing a card using Fairy Hugs stamps available at Fairy Stamper.


Fairy Hugs Stamps:  Alaina's Peruvian Lilly


Using assorted dies, die cut the card and panel.
Die cut a white oval.
Stamp Alaina in blue ink and off stamp her to create a mask.
Fussy cut the mask and stamp the Lilly.


Stamp the phrase inside the card.


Add the Panel to the card with foam adhesives for dimensions.
Used stickles to give some sparkle to her wings and the bees.

Thanks for stopping by.

Steph

8/12/23

Fairy Hugs Magic

  Sharing a card using Fairy Hugs stamps available at Fairy Stamper.


Fairy Hugs Stamps:


Create a 4 1/4" x 5 1/2" card and die cut the center from the front panel.
Using the Starry Walkway, repeatedly stamp it across the front panel.


Cut pattern paper to fit inside the card and stamp the dancers in the center of the oval.
Stamp the Starry Walkway below them.


Stamp the phrase on coordinating paper, mat with cardstock.
Add to the card with foam adhesives for dimension.


Thanks for stopping by.

Steph

8/9/23

Fairy Hugs Merry Christmas

 Sharing a card using Fairy Hugs stamps available at Fairy Stamper.


Fairy Hugs Stamps:  Santa's Sleigh


Cut cardstock 7" x 12".
For scoring and cutting details see this post.


Fold into a box and adhere.
Fold into the card holder and adhere.


Stamp and emboss the phrase on white cardstock.
Die cut with an oval die and stamp Santa in gray ink.
Adhere to the front panel.


For the card, cut cardstock 2 3/4" x 9 3/4" and score in half.
Die cut on oval to fit the front panel.
Stamp Merry Christmas in the center and stamp leaves and twigs around it.


Inside the card, cut cardstock to fit and stamp the Festive Branch and several ornaments in different colors of ink.
Stamp Be Merry.


Insert the card into the pocket.
Add some little treats in the box.

Thanks for stopping by.

Steph

8/6/23

Altered Jars with Tissue Paper

 Hi everyone, I'm sharing a mixed media project today.


Begin by scrunching tissue paper.
Then use Mod Podge to adhere tissue paper to the jars.
Be sure to allow lots of creases and to show.


Allow the tissue paper to dry complete before proceeding further.
Trim away the excess tissue paper.


Once the jars are dry, the tissue paper has hardened and then use paints to add an amazing affect.
Using assorted paints, dab the paint on rather than painting the jars.


If you don't like any color you used, or want to change a color, dab on some Gesso.
You can also use Gesso to add a subtle effect on the jars.


Wrap and glue some twine around the top of the jars.


Fill with flowers and use as a centerpiece or place in the window.

Thanks for stopping by.

Steph

8/5/23

Fairy Hugs Sandy

  Sharing a card using Fairy Hugs stamps available at Fairy Stamper.


Fairy Hugs Stamps:  SandyTreasure
Fairy Hugs Stencil: Magical Dots


Using left over card elements, I stamped Sandy on the white panel using 3colors of ink.
Ink around the panel.


Using the 2nd layer, ink the stencil with blue ink.


Assemble the card.

Thanks for stopping by.

Steph

8/3/23

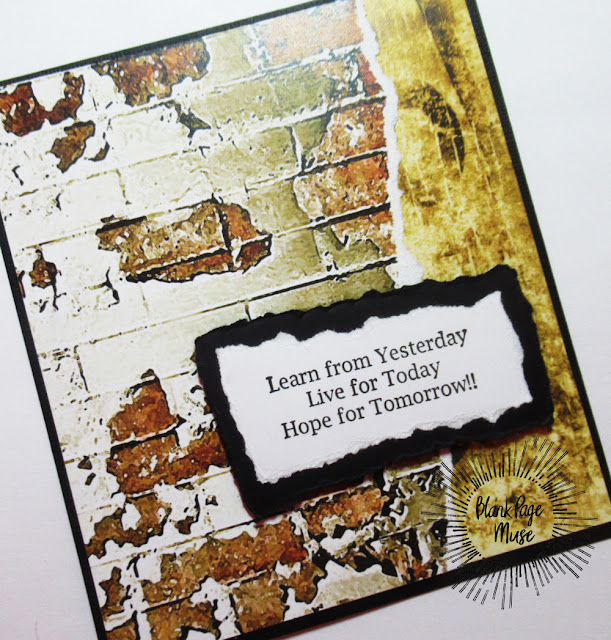
BPM - Learn from Yesterday

 Hi everyone, I'm using some amazing stamps and papers from Blank Page Muse to create a masculine card.


Blank Page Muse Stamps: Learn from Yesterday 
Blank Page Muse Paper:  Tattered & Worn 6"x6" Paper Pad

This quick and simple card is easy to make.
Create a card from black cardstock
Tear the brick paper and add it to another paper then adhere to the card.


Stamp the phrase, tear it and mat with torn cardstock.
Add to the card with foam adhesives for dimension.


Thanks for stopping by.

Steph


Looking for more Inspiration? Click the links below!
The Blank Page Muse Shop https://blankpagemuse.com/

Save 15% of your Blank Page Muse orders with discount code:  BPMSteph