Showing posts with label Valentine's Day. Show all posts

2/13/26

BPM - Happy Valentine's Day

   Hi everyone, I'm using some amazing products from Blank Page Muse.


Blank Page Muse Stamps:  Happy Valentine's Day, Special Day


For complete details stop by the blog.

Thanks for stopping by.

Steph

Looking for more Inspiration? Click the links below!
The Blank Page Muse Shop https://blankpagemuse.com/

Save 15% of your Blank Page Muse orders with discount code:  BPMSteph

2/6/26

BPM Love Cupid

  Hi everyone, I'm using some amazing products from Blank Page Muse.


Blank Page Muse Stamps:  Cupid Cammy, Love Word Art
Blank Page Muse Stencil: Hearts Stencil


For complete details stop by the blog.

Thanks for stopping by.

Steph

Looking for more Inspiration? Click the links below!
The Blank Page Muse Shop https://blankpagemuse.com/

Save 15% of your Blank Page Muse orders with discount code:  BPMSteph

2/11/24

Etchall Hanging Sign

 Hi everyone, time to get creative for the month of Love!


Using etchallⓇ etching creme, I created this love sign.


Take apart the frames and remove the glass.
Die cut the letters and place each on the glass panels.


Cover each panel of glass with etching creme.
Allow to sit for 15 minutes.


After 15 minutes, remove the etching creme.
Since it is reusable, place it back in the original container.
Rinse each panel and dry off.


Place the glass panels back in their frames.
Add pink cardstock behind each letter.
Decorate the frames with stones.


Adhere each frame along a strip of ribbon.


Create a bow using the Bowdabra and tie to the ribbon creating a loop at the top.

Thanks for stopping by.

Steph

2/3/24

BPM - Hello Friend

 Hi everyone, I'm using some amazing stamps and papers from I Brake for Stamps.


Supplies:  I Brake for Stamps:  Kisses Cammy
Hello Friend


I colored her with Copic Markers as I wanted to create a Valentine's Day themed card.


Creating a pink card, I added the doodled paper next.
Circles were added and then a strip of hearts down the side were added to define the card.


Kisses Cammy was fussy cut and added to the card with foam adhesives for dimension.

Rhinestones were added randomly about the card and the sentiment was added.

Thanks for stopping by.

Steph


Looking for more Inspiration? Click the links below!
The Blank Page Muse Shop https://blankpagemuse.com/

Save 15% of your Blank Page Muse orders with discount code:  BPMSteph

2/2/24

Happy Valentine's Day

Hi everyone, if you love chocolate, then this card is for you.


I've used an older Stamping Bella stamp and fussy cut her.
She was added to a heart base with foam adhesives before being added to a striped card.

The sentiment was stamped and inked, then added to the card.

Thanks for stopping by.

Steph

2/1/24

Scor-Pal - Heart Gift Boxes

Happy February.  Valentine's Day will be here shortly and what better way to show the love than by creating these sweet gift boxes.


Supplies:  Scor-Buddy
Spellbinders Dies
Lawn Fawn Dies
Ribbon


To create the box shape, cut cardstock 3 1/2" x 7".
With the 7" length at the top, score at 3 1/2".


Rotate the paper and score at 1" and 2 1/2".


Fold along the scored lines.
At the center line, cut as shown for ease of assembly.


Place Scor-Tape along the edges.


Pulling up the Scor-Tape, fold into shape.
Leave the remaining tape in place while preparing the hearts.


Die cut 2 large scalloped hearts from white cardstock to be used as the base.
Die cut 2 smaller hearts from pattern paper and adhere to each base.
Remove the Scor-Tape and adhere the hearts to each side of the box.
Add die cut hearts inside the box.


Punch holes and thread ribbon through the holes.
Place Scor-Tape on the ends of the ribbon and adhere to the inside of the box.


Die cut phrases or words and adhere to each box.

Thanks for stopping by.
Steph

1/26/24

Happy Valentine's Day with Etchall

 Hi everyone.  With Valentine's Day approaching, it's time for some fun with etchallⓇ.


Glass bottle
Ribbons


Place the bottle in the dip 'n etch liquid up to the top of the decorative edge.
Allow the bottle to sit for 15 minutes.


Remove the bottle, rinse and dry off.
Pour the liquid back into its original container so it can be reused for other projects.


Using a glue gun, adhere the red and gold ribbon along the top and bottom edges of the glass.
Finish by adding the pom pom ribbon next.


Add rhinestones to the jar.


Fill with fresh or artificial flowers.

Thanks for stopping by.

Steph

2/10/23

Etchall - Valentine's Day Candle Holders

 Hi everyone, sharing some sweet Valentine's day Candle Holders created with EtchallⓇ.


Placing the candle holders in etchall dip 'n etch allows you to easily paint them as the etching solution gives the candle holders "teeth".


Don't they look pretty?  I first used a sheer red paint, then added a heavier layer of paint on top.


Once dried, I added assorted stickers.

Thanks for stopping by.

Steph

2/4/23

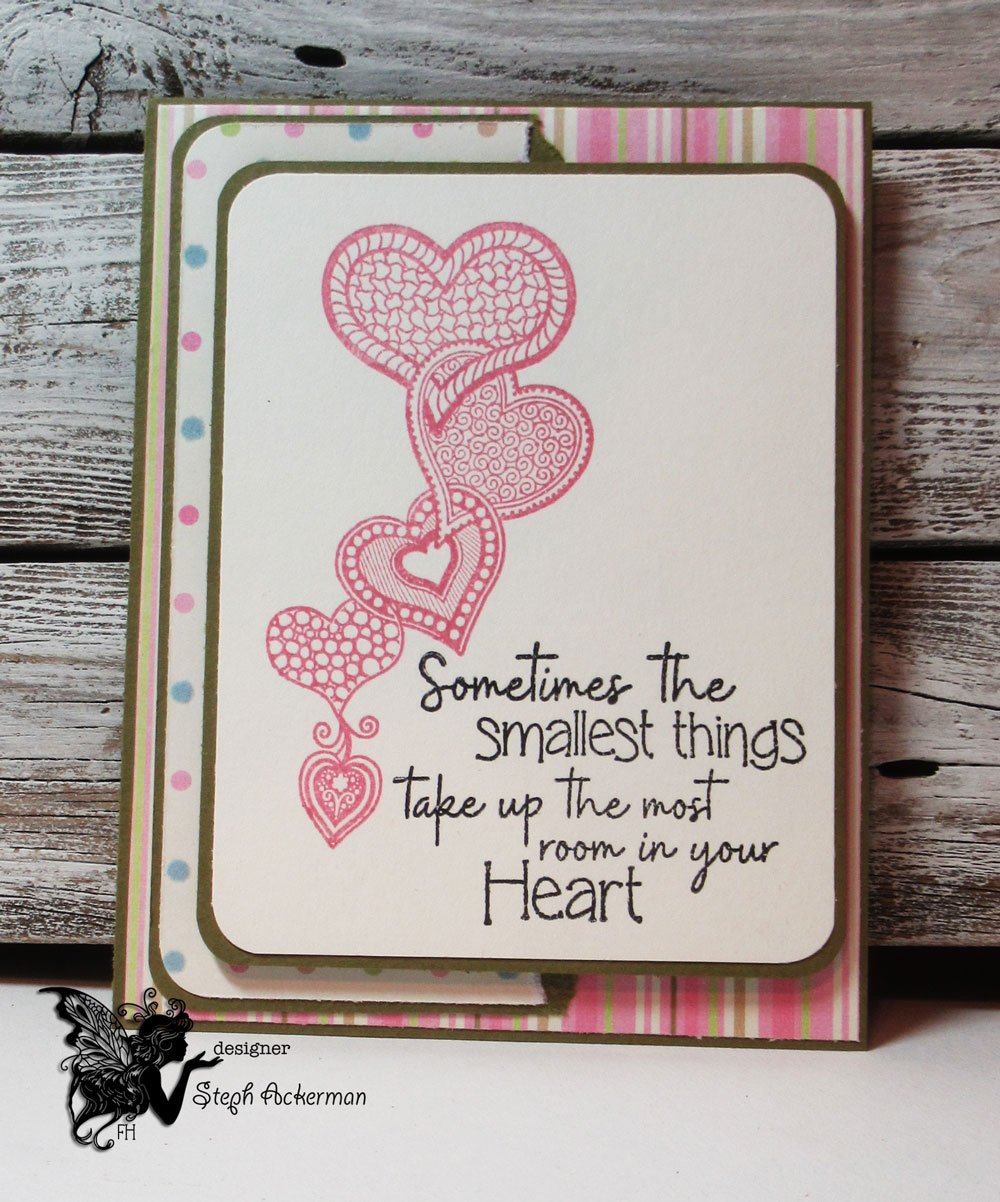
Fairy Hugs Smallest Things

Sharing a new card with Fairy Hugs stamps available at Fairy Stamper.


Create a card from green cardstock.
Add striped paper for the base.
Cut and tear a dotted panel, matting it with green cardstock.


Stampe the hearts on a white panel with pink ink.
Stamp the sentiment in black ink.
Corner round the edges and mat the panel with green cardstock.


Add the panel to the card with foam adhesives for dimension.

Thanks for stopping by.

Steph

2/11/22

Valentine's Day Gift Bag with TLC Designs

Hi everyone, I'm on the TLC Designs blog sharing a Valentine's Day Gift Bag.


The Gift of Love stamp set can be used for many occasions, so I colored her in pink to coordinate with the Perfectly Precious digital papers.


The angel was die cut with the Happy Dragonfly Circle and she was placed atop the scalloped circle.


The phrase is from Tiptoe Fairy Dance and is perfect for a Valentine's Day sentiment don't you think?

Thanks for stopping by.

Steph

2/13/21

Happy Valentine's Day

  Hi everyone.  Happy Valentine's Day.  


I embossed a panel of Rinea Ruby Starstruck Foiled Paper with a Cuttlebug embossing folder.  The stamp from La La Land was colored with Copic Markers and fussy cut.


The layers were adhered with Tape Runner.


The image was placed atop an oval die cut from Rinea Ebony/Gold Glossy Foiled Paper.  Liquid Pearls were added to the hearts and her hair bows, plus the buttons on her dress.


The phrase was added atop a scrap of Ebony/Gold Foiled Paper and added to the corner of the card.


Thanks for stopping by.

Steph

2/9/21

Valentine's Day Treat Bags with TLC Designs

Hi everyone, I've got a quick and easy Valentine's Day project to share using some fun stamps and dies from TLC Designs.

It's almost Valentine's Day and that means it's time for little treats for the "kids" in your life, no matter how old they are!


I used the
Apple A Day Die which consists of 14 dies that can be used in so many different ways.  I selected the 2 frame dies in this set, using the largest die with cardstock and the next die with pattern papers from the Soft Blush Digital Paper Pack,  Krafty & Sweet Digital Paper Pack, and the Perfectly Precious Digital Slimline Paper Pack.


Scoring the cardstock and pattern papers in half, I adhered them together to create treat toppers.


 I filled treat bags with Conversation Heart candies then, punching holes in the toppers and the treat bags, I tied them together with ribbon.  They definitely are pretty as is, but I wanted to go a little further.


Using left over cardstock, I die cut the included scalloped die which I was going to use as a base for my phrases.


Using stamps from Sweetie The Dragon stamp set, I stamped the phrases on the scalloped die cuts.  I also used a phrase from the Happy Bouquet Digital Flower Stamp.

  The phrases were then placed atop the treat topper with foam adhesives for dimension.


Who will you be giving Valentine's Day treat to this year?

Thanks for stopping by.

Steph