Showing posts with label blog hop. Show all posts

10/27/22

Cat Lovers Hop - Fairy Hugs - Ed and Nala


Fairy Hugs is sponsoring 2022 Cat Lovers Hop - Oct. 24- 29
Fairy Hugs special day is Oct. 27
Fairy Hugs Prize is the two cat stamps Ed and Nala.
Fairy Hugs is offering a special 15% off discount during this hop. www.fairyhugs.com
Code CATHOP - it's valid on Oct. 27 ends Nov. 6.
Join the Cat Lovers Hop and win prizes!
Link to the blog and instructions: Cat Lovers Hop


Pumpkin Stack, Stacked Mushrooms, Spiders and Web, Pumpkin House, Ed
Fairy Hugs Die:  Magical Hollow


Die cut a large circle and stamp Ed in black ink.
Mask Ed and stamp the Pumpkin Stack in orange ink so Ed appears to be sitting on the pumpkins.


Stamp the Stacked Mushrooms and offset around the panel.
Ink the leaves on the Pumpkin House and stamp in the open areas.


Stamp several spiders around the panel.
Color in the images in fall colors.


Create the card and add the Magical Hollow die next.
Add the stamped panel to the card with foam adhesives for dimension.

Thanks for stopping by.

Steph

9/3/21

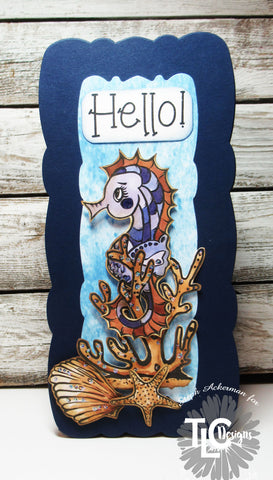
Hello Seahorse with TLC Designs

 Hi everyone, DT-Steph Ackerman here to share a sweet card using assorted TLC Designs products.

I've used the Zinnia Slimline die along with the Watercolor Naturals Slimline Paper Pack.


 A number of elements from the Seahorse Samm Digital Stamp Set were colored with Copic Markers and then fussy cut.  Drops of liquid pearls added some accents to each piece.


To create the card, I placed the largest die over folded cardstock and taped it in place while running it through my die cut machine.  Since the card would have a flat edge, I also die cut another panel and added it to the card to complete the die.


All the elements were added to the card with foam adhesives for dimension and Hello, from the Celebrate Sentiments stamp set was added above the grouping.

Thanks for stopping by.

Steph

8/12/21

Ann Butler and DCC Blog Hop

Hi everyone,  I'm participating in the Designer Crafts Connection blog hop, and this month we are partnering with Ann Butler Designs.


I received the  Black and White Toner Sampler Package and several colors of Deco Foil. Using the rose pattern with blue foil, I created several cards.  


The Toner sheets easily pass through a foiling machine and the color easily embeds itself in the Toner sheet.  Remember to save the foil and use it for another project.


I cut the panel in half, I using one panel as it was foiled and the other I added color with Copic Markers.  Both have a wonderful effect.  


 Sentiments are perfect for using your foil scraps.


Add a foiled sentiment to the cards with foam adhesives for dimension.


I also created another card using the leaf panel and green foil.  After foiling, I die cut the panel and then wrapped it with ribbon before adding it to a card.


Please stop by the Designer Crafts Connection blog to see what the designers have created this month with Ann Butler Designs.


Thanks for stopping by.


7/15/21

TLC Designs New Product Blog Hop


Hello and welcome to the TLC Design's new release blog hop!!  Some of the design team is hopping with loads of inspiration featuring the amazingly adorable designs released in the TLC shop today.  There are a total of 3 new beautiful digital paper sets, 4 new adorable digital stamp sets, and 1 new whimsical photopolymer stamp set all available starting TODAY!

Be sure to visit and comment on all of the blog posts today for a chance to win a digital stamp AND digital paper set of YOUR choice from the new release!  A winner will be announced on the TLC Designs Blog on 7/22/21.


The Koala Kindness Digital Stamp set  is one of the newest digital stamp sets available and I thought he would be cute to use for a birthday card.


I colored the Koala and balloons with Copic Markers, fussy cut them, then inked the edges with brown ink.  I cut the Koala's paw so he'd be able to hold the balloons.


I used paper from the Sweet As Cake Digi Papers.  Just make a wish is from the Celebrate Sentiments Stamp set  which I die cut it with  one of the dies from the Cherry On Top Die and matted it with a die form the Apple A Day Die set.


Also, Tammy Louise, the owner and magic behind TLC Designs, will be going LIVE on YouTube and Facebook tonight, July 15th, at 8pm EST.  Be sure to turn in to see her finish part 2 of here adorable project featuring items from the new release.


Thanks for stopping by.

Steph

4/1/19

Birthday Blog Hop with Craftyscrappers

HELLO CRAFTY TOURISTS
 
WELCOME TO TOWN CRAFTYSCRAPPERS
 
We are proud citizens of town Craftyscrappers. Our crafty town is being run by Mayor.Konica Das and Deputy Mayor.Jesse Zedek.
 
This month we are celebrating 6th birthday of our town and we would like to invite you to visit my crafty castle. Every year, we have crafty tourists visiting our town and joining us in celebration.
We invite everyone to join us on this occasion and hop on & off our crafty bus.


Our blog bus runs from April 2 until April 16 and we have prizes for a lucky visitor on May 5, who will receive lovely gifts from us.

I welcome you to see one of my unique crafty creations made for this special occasion.
 

Using the  Fabulous Months stamp set, I've created a simple card around the words.  This stamp set has each month plus plenty of words to use as accents.


Thank you for visiting my place. Hop on and get off at the next stop SUBHASHINI & CHANDINI and enjoy a marvelous masterpiece created for you.


Here is the complete blog hop list.  If you get lost along the way, just start at the beginning with the   Craftyscrappers blog.


15. STEPH ACKERMAN  -  You are here


Thanks for stopping by.

Steph

9/28/18

Fall Blog Hop with Canvas Corp.

It's time for a Fall Blog Hop with Canvas Corp.


Supplies:
Canvas Corp Halloween Pin Dots
Canvas Corp. - Black on Kraft cardstock
Tattered Angels Baseboard Mist -  Lava
Tattered Angels Chalkboard Mist - Alaskan Salmon
High Impact Paint - Light Gold
Hemp Cord - Black
Just For Fun Rubber Stamps - Pumpkins


I created cute little Halloween treat bags using the Halloween Pin Dots cardstock.  This is a heavy cardstock that I easily cut and scored to create 6" x 3" treat bags to give to the trick or treaters this year.


I stamped pumpkins with black ink then painted them with Alaskan Salmon and Lava.  To add the gradient color, I added additional Alaskan Salmon to parts of the pumpkins.


A touch of High Impact Paint in Light Gold was used to highlight the edges of the pumpkins. 


I fussy cut the pumpkins and popped them on the front of each bag.  Since the bags had no tops, I punched holes in the tops, threaded black hemp through the holes and tied them closed.

Aren't they sweet?


Please check out everyone's projects and leave comments along the way.

Marie Nicole Designs (Marie Heiderscheit) https://marienicoledesigns.wordpress.com/…/farmhouse-autumn…


Thanks for stopping by.

Steph


9/26/18

CCB Harvest Boo-nanza


It's day 3 of the CCB Harvest Boo-nanza. 

If you missed the beginning, please start here for day one of the hop.


Supplies:
Canvas Corp Halloween Pin Dots
Canvas Corp. - Black on Kraft cardstock
Canvas Corp. - Burlap
Tattered Angels Baseboard Mist - Sandy Beach, Lava
Tattered Angels Chalkboard Mist - Alaskan Salmon
Glimmer Glaze Paint - Kelly
Spellbinders Dies


I created two sweet Halloween cards using amazing papers and burlap from Canvas Corp.  Then paired them with a sweet stamp set from Creative Vision Stamps - Pet Monsters.


Tattered Angels Baseboard and Chalkboard Mists and Glimmer Glaze were used as paints to add color to the images.  

Sweet aren't they?

Thanks for stopping by.

Steph

6/21/18

Happy Graduation with Tape Technologies


Hi everyone, I am participating in the Designer Crafts Connection blog hop.  This month we are working with  Styletech Craft/Tape Technologies.

With graduations on the horizon, I created a gift jar and coordinating gift bag using the colors of the graduating class - Silver and Rust vinyl.


I began by selecting a jar and with 4 squared areas.  I die cut GRAD from the Rust vinyl using my Cricut.  The vinyl die cut really well and it easily removed from its backing.


Once the letters were adhered to the jar, I began working on the top.  I used Spellbinders circle dies to die cut a Rust vinyl circle to fit the cap.  Next I die cut a smaller Silver layer.  Using My Favorite Things dies, I die cut the graduation cap in both colors.  These were adhered to the cap and a 1/2" strip of Rust vinyl was wrapped around the edge.


Finally, I thought it needed a little dressing up, so I adhered some lace trim from  Expo International,  around the edge of the cap.


Doesn't it look wonderful.  As I was giving this as a gift, I needed a gift bag so I cut  Silver vinyl to fit the front of a gift bag.


Then I die cut a large "G" from Rust vinyl using my Cricut.


I carefully applied the letter to the bag, peeling off the backing a bit at a time so I could get the letter straight.


Then I used the squeegee to smooth out the vinyl to remove any bubbles.  I also added some additional trim across the top of the gift bag so it coordinated with the jar.


Next, I die cut "rad" from Rust vinyl and adhered along the right edge.  Congratulations was cut from Rust vinyl using another metal die.  The backing pulled away easily even from those tiny letters and I was able to adhere it across the top of the bag.


 I put some money in the jar.  After all, what is a graduation gift without some cash!!


You can find links for all the designers creations at the Designer Crafts Connection blog.

Thanks for stopping by.

Steph