5/17/12

Rodeo Girl

One of my posts at ScrappinStuff last month.

Love the Creative Imaginations papers.

I used my Cricut and Wild Card to create the round card and Paper Dolls to create the girl.


Wild Card Cartridge has a lot of great card shapes, but this has always been my favorite.  When using double sided paper such as this Creatives Imaginations paper, you get 2 great effects in one cut.  Just flip over the outer ring - no extra cutting involved. 


Die cut Rodeo Girl using Cricut Expression and Paper Dolls cartridge.  Her boots and shirts were cut from Creative Imaginations paper and her hair, skirt and lasso from Bo Bunny Double Dots paper.

She was added to the front with foam adhesives for dimension.

Supplies:
Die cut equipment: Cricut Expression
Cartridges:  Paper Dolls, Wild Card
Cardstock: Bazzill, Bo Bunny
Pattern paper: Creative Imaginations
Ink: Clearsnap


5/15/12

Many Thanks

Clearsnap's line of My First Colorbox Stamps and Inks are perfect for little hands to play with. But they are also perfect for anyone who loves to create. The stamps are foam based and create great impressions.


For my card, I used the Many Thanks Stamp set which includes 4 different dotted background stamps plus the sentiment.


Using my Scor-Pal, I created a top fold card from brown cardstock, then added 2 layers of pink cardstock on top.    To create the flowers, I stamped assorted dots with brown and yellow ink, then die cut the shapes.  Once die cut, I spritzed each piece with Vanilla Smooch Spritz for a little sparkle then added them to the card with a brad.    It's a little hard to see, but I added some Pink Fizz Smooch Glitz on top of the brad.


The sentiment was stamped and embossed with Clear Embossing Powder, cut out and then inked before adding it to the card front with foam adhesives.


Supplies:
Cardstock: Bazzill
Stamps, Ink, Smooch Spritz, Embossing Powder:  Clearsnap
Dies: Spellbinders
Scoring Tool:  Scor-Pal


5/13/12

Happy Mother's Day

Happy Mother's Day to everyone.  This card uses nothing but left over scraps and is not only fun, but easy to make.


Using my left-over negative Clearsnap Designer Foils, I machine stitched them to a piece of brown cardstock which was cut slightly smaller than the card base.  The large oval die cut was added on top and then machine stiched in place.  Instead of ribbon, I wrapped some tulle around the card, then adhered it to the base. 

 
The image was stamped and embossed and then cut out and added to the card with foam adhesives.  The sentiment was stamped and cut out and added to the card with some Twine.


Supplies:
Cardstock: Bazzill
Stamps:  Hero Arts
Ink, Embossing Powders: Clearsnap
Dies: Spellbinders
Twine: The Twinery

5/11/12

Star

My newest post at Scrappin Stuff uses some awesome papers from the store.
The Moxxie paper, along with a sticker from Best Creations, is perfect for creating a card to give to your little dancing star. Directions: Using the pink side of the Toe Tapping paper, cut to fit card front. Using the reverse side, cut it slightly smaller to fit the pink card and adhere. Ink the edges of both pieces before adhering to the card. Die cut 2 ovals from black cardstock and one from the Toe Tapping paper and adhere together, then place on the card. Select a ballerina from the Best Creations sticker sheet and adhere to the oval with foam adhesives for dimension. Cut out “star” from the Toe Tapping paper, mat with black cardstock and adhere to the card with foam adhesives for dimension. Supplies: Cardstock: Bazzill Pattern paper: Moxxie Ink: Clearsnap Stickers: Best Creations Dies: Spellbinders

5/10/12

My Friend

This is my latest post at thepapertemptress.com. This cardstock is asolutely amazing - it's strong enough to create a card and also use as embellishments on the card.


After creating the card from Pink Lemonade, I used Poison Ivory as one of my frame layers and for my sentiment. The Kraft paper was a perfect backdrop for the card.
Supplies:
Cardstock: thePapertemptress.com
Stamps, dies: Hero Arts
Ink, Embossing Powder: Clearsnap
Embossing folder: Cuttlebug

Take Time....

Today's post is up on the Scrapbookpal.com blog.

The Art Nouveau Cartridge is a really fun cartridge full of lots of intricate images and corresponding layers. This is such a fun cartridge to work with. Selecting the Daffodil to work with, I decided to create a friendship card. All cuts were made based on a 6" Daffodil.


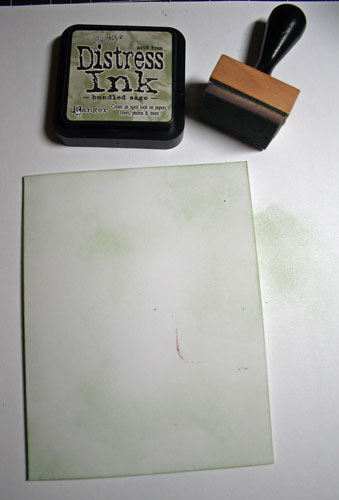
1. Begin by first inking the edges of a white card with Tim Holtz Distress Ink in Bundled Sage. With an ink blending tool, ink the foam and then ink the card. Starting at the outside edges, gently work the ink towards the center of the card, adding more ink as needed until your white card is now a light green.


2. Nest, move to Tim Holtz Distress Ink in Crushed Olive. Working as noted above, just ink the outer edges with Crushed Olive to create a little contrast.


3. Starting with brown cardstock, cut the Daffodil shadow at 6".
4. Next, cut the main daffodil from dark green cardstock at 6".
5. The next layer was cut from light green cardstock using shift+daffodil2.
6. Lightly ink the light green stems with green ink, and gently fold the layer for dimension.
7. Adhere on top of the dark green stems with foam dimensionals.
8. Cut the flowers from yellow cardstock twice using shift+layer1+daffodil2.
9. Gently fold two flowers and ink with yellow ink.
10. Ink the other two flowers and adhere them to the stems.
11. Adhere the first two flowers on top with dimensional adhesives.
12. Cut the flower centers from white cardstock using layer2+daffodil2.
13. Ink with yellow ink and adhere in place.


14. Stamp the sentiment in brown ink.
15. Add brown embossing powder and heat set.
16. Cut to fit the card front, corner rounding the edges.
17. Mat with brown cardstock and adhere to the card front.


18. Once the card has been assembled, add Ranger Icicle Stickles to both yellow flowers. Allow to dry thoroughly before moving.


Supplies:
Cardstock: Bazzill, The Paper Company
Ink: Clearsnap Cat's Eye Inks; Ranger Distress Ink
Cricut Cartridge: Art Nouveau




5/7/12

Mother's Day

The newest challenge at Kuretakezig is called Spring Blooms and I found the perfect stamps to use.


Since Mother's Day is next Sunday, I created a Mother's Day Card using Hero Arts and Inkadinkadoo stamps as well as Zig Scroll & Brush Markers and Zig Textile Markers.


Using the brush tips of each marker, I first colored the rose with Zig's Scroll & Brush Markers in Pure Red. To add a little more texture, I added a touch of Zig's Scroll & Brush in Summer Sun  to the edges of the rose.  A Green Textile Marker was used on the stems and a Scroll & Brush in Spring Green was added on top.  I inked the sentiment with Summer Sun, then die cut it with Spellbinders dies.


To achieve the water color effect, I lightly spritzed the stamps before placing them on cardstock.  This definitely softened the colors.  After die cutting my image, I used the scroll tip of Summer Sun to edge my die cuts, providing just a hint of color before mounting to the base.  I also used the scroll tip to edge the pattern paper before adhering it to the base.


Supplies:
Cardstock: Bazzill
Pattern paper: American Crafs, K&Co.
Markers: Zig Scroll & Brush Markers; Zig Textile Markers
Stamps: Hero Arts; Inkadinkadoo
Die cuts: Spellbinders
Ribbon

5/5/12

Clearsnap and The Twinery Blog Hop

We're all tied up in twine and loving it!! Aren't the colors just so cute and festive? Our teams are sharing some amazing ideas -- be sure to check out The Twinery blog to see their team's amazing creations.

And, it's not a Hop without a fabulous prize so here's what we're giving away:


Smooch Spritz JUMBO in Gold Glow, Donna Salazar Mix'd Media Inx in Peridot, and ColorBox Archival Dye Inkpad in Pinkolicious!!! We'll choose one winner on May 8, 2012 and announce on our blog post that day.

These inks match some of The Twinery's signature colors to a tee!! Here's how to enter:

  • Comment on each blog in the Hop
  • PIN to Pinterest ALL of the Projects from the Hop = 1 entry each image pinned (leave a comment here telling us you did it)
  • Follow Clearsnap on Twitter (leave a comment here telling us you did it)
  • Post about our blog hop anywhere (leave a comment here telling us you did it)


Clearsnap - clearsnap.blogspot.com 
Steph Ackerman - http://stephaniescraps.blogspot.com  YOU ARE HERE
Charlotte Jenkins http://suepup.blogspot.com/


My Friend Card:


Using the USA stamp pad, I inked white cardstock until it was completely covered.  This tri-color ink pad is perfect for creating very unique backgrounds.  Using the Rollagraph Simple Dots Wheel and Strawberry Ink, I then inked across the background providing another design element.


Maraschino Twine was wrapped around the card and "fanned" out on the right side.  Maraschino and Denim Twine were used to tie the Twine together on the left side.  The sentiment was stamped in Stawberry Ink as was the underlying stamp.  These 2 pieces as well as cardstock were then die cut with Sizzix dies and mounted on the card front with foam adhesives.

Clearsnap supplies:
Ink: Stephanie Barnard Strawberry Ink; Colorbox Limited Edition Made in USA Pigment Ink
Rollagraph: Simple Dots

Other Supplies:
Cardstock: Bazzill
Stamps: The Stamps of Life - messages4friends
Twine: The Twinery - Denim, Maraschino

Your next stop is:   Charlotte Jenkins http://suepup.blogspot.com/

Enjoy.


5/4/12

Clearsnap and the Stamps of Life Blog Hop


Welcome to the Stamps of Life & Clearsnap Blog Hop! We're so excited to be hopping with our good friend Stephanie Barnard and her talented design team. We traded inks for stamps and wow, we love the crisp images from her amazing clear stamp line!! They work perfectly with the Stephanie Barnard ColorBox Dye Ink Pads!

And, it's not a Hop without a fabulous prize so here's what we're giving away:


An entire assortment of Stephanie Barnard ColorBox Ink Pads!!! Since this is a BIG Amazing Super Duper Awesome Prize, we're gonna ask you to do a couple things in order to enter to win. Here's how to enter:

  • Comment here on this Blog Post and each blog in the Hop = 1 entry each blog comment
  • PIN to Pinterest ALL of the Projects from the Hop = 1 entry each image pinned (leave a comment here telling us you did it)
  • Refer your friends to FOLLOW Clearsnap on Facebook = 1 entry per friend who posts your name on our Page
  • Refer your friends to FOLLOW The Stamps of Life on Facebook = 1 entry per friend who posts your name on their Page
You should have arrived here from Deb Felts' blog - http://withastampandasong.blogspot.com/search/label/The%20Stamps%20of%20Life.

I was thrilled to have the chance to work with the Stamps of Life sets this month.  These clear stamps are easy to ink and stamp well every time I use them.  Today, I am working with banners4all and flowers2build.
Hello Card
Generally, I like to add a lot of elements to my cards, but sometimes simplicity is the way to go. When you find stamps and inks that work well together, why not show them off?


I stamped the flower banners in Strawberry Ink on white cardstock.  Using the Sizzix Pennant Dies, I cut the banners to fit, then cut a larger banner from red cardstock.  The "wire" was stamped with Chocolate Ink and the banners were adhered on top with foam adhesives.  The sentiment was stamped directly on the corner of the card in Strawberry Ink.  Simple, but pretty.


Thanks Card
Using more details than my prior card, I created a totally different look.


Using the Rollagraph Crackle Wheel I inked my card base with Banana then Artichoke Ink for a fun background effect.  Using the stamps from the flowers2build stamp set and Artichoke Ink, I did an overstamp on 3 pieces of white cardstock.  This effect creates a second stamped image in a lighter color. 

I die cut all three images with Sizzix dies being sure each stamped image lined up with the next one.  After inking the edges with Artichoke, I stacked the dies with foam adhesives.  On the top layer, I added tiny flowers from this set that were stamped with Banana ink.  The corresponding outline stamp was then stamped on top with Chocolate Ink.  The flowers were cut out and adhered to the top layer.

The sentiment was stamped on white cardstock in Chocolate Ink, then matted with brown cardstock.  Another small flower was added to the corner.  Tiny pearls were added to the centers of the flowers.

Clearsnap Supplies:
Ink: Stephanie Barnard - Artichoke, Banana, Chocolate, Strawberry
Rollagraph: Crackle

Other Supplies:
Stamps: The Stamps of Life - banners4all; flowers2build
Dies: Sizzix
Pearls: Want2scrap


Thanks for stopping by today. 

Your next stop is:  Lydia Fiedler - http://www.understandblue.blogspot.com/

If you get lost along the way, start at the beginning:  http://clearsnap.blogspot.com/
The Stamps of Life http://stephaniebarnard.blogspot.com/
Sabrina Alery - http://sabrinaalery.blogspot.com
Deb Felts - http://withastampandasong.blogspot.com/search/label/The%20Stamps%20of%20Life
Steph Ackerman - http://stephaniescraps.blogspot.com   YOU ARE HERE
Lydia Fiedler - http://www.understandblue.blogspot.com/
Mary Dawn Quirindongo - http://mypinkmexico.blogspot.com/
Kim Howard - http://basementstamper.blogspot.com/
Daniela Dobson - http://danieladobson.blogspot.com/
Tami Mayberry – http://tamimayberry.blogspot.com/search/label/clearsnap
Jennifer Priest http://hydrangeahippo.com
Laura Williams – http://www.lauralooloo.blogspot.com/
Kim Pargeter – http://stampinriley.blogspot.com/
Vicki Garrett – http://summerthymestudio.blogspot.com/
Joana Studer- http://joanastamps.blogspot.com/
Emily Niehaus - http://emmielouwho.blogspot.com/
Beverly Sizemore - http://bevscreativepath.blogspot.com/


5/2/12

A Royal Call

Queen Kat Designs Stamp Co. (aka Katstamps) is having a call for Royal Stamp Members here:  http://qkd.blogspot.com/2012/04/your-chance-to-be-royalty.html.  Wouldn't it be fun to be Royalty!!!


Good Times Card uses the Ride With Me clear stampset with Clearsnap Mix'd Media Black Inx and Embossing Powders.  I stamped the background with Clearsnap Stephanie Barnard Sky Ink for a subtle background effect.


The card still looked a little plain so some twine added a little extra fun to the card.  The images were die cut with Spellbinders dies, inked with Clearsnap Strawberry Ink and adhered to the card.  A little Clearsnap Siren and Snickerdoodle Smooch added some color to the packages.


Butterfly Card - I inked this beautiful Friendship stamp with both Clearsnap Stephanie Barnard Ink in Artichoke and Tangerine.  I then stamped it again in Tangerine and cut out the upper butterflies.  A little Clearsnap Fairy Dust Glitter added a nice finish to the butterflies.


The background was embossed with a Cuttlebug Embossing Folder and then some twine was added around the card.


Thanks was stamped and then colored with Copic Markers before cutting out the flower and popping it up on a Spellbinders die cut circle. 


A ribbon was tied around the card and the sentiment was added below.


Supplies:
Cardstock: Bazzill
Pattern paper:  EKSuccess, American Crafts
Stamps: Katstamps, Inkadinkadoo
Ink:  Clearsnap, Memento
Glitter: Clearsnap
Markers: Copic Markers
Twine:  The Twinery
Embossing: Cuttlebug
Ribbon

4/30/12

Birthday Wishes

JustRite's newest challenge is to create a card based on this color scheme.


Using the Topsy Turvy Cakes stamp set (CR-02230) I created this card.  I embossed the background with a Cuttlebug Embossing folder.

The cake was stamped with Black Memento Ink and colored with Copic Markers, then placed on oval die cuts which were edged with Copic Markers.  A Clear Spica Pen added some shimmer to the edges of the cake.


Hero Arts pearls were added to the flower centers on the cake as well as placed under the image.  The sentiment was stamped with Clearsnap's Donna Salazar Leather Inx and embossed with Leather Embossing Powder.


Supplies:
Pattern Paper: GCD Studios
Stamps: JustRite Topsy Turvy Cakes
Ink: Memento, Clearsnap
Pearls: Hero Arts
Markers: Copic Markers, Spica Pens
Embossing Folder: Cuttlebug
Dies: Spellbinders Ovals

4/26/12

You're A Great Friend

This is today's post at the Papertemptress. I am in love with the papers in the store and this Poison Ivory cardstock is amazing. It's heavy enough to create a card and perfect to hold ink and embossing really well.
Supplies:
Cardstock: thepapertemptress.com
Stamps: Hero Arts
Ink, Embossing Powder: Clearsnap
Twine: The Twinery