Showing posts with label Rita Barack. Show all posts

9/17/18

Rinea September Journal Page

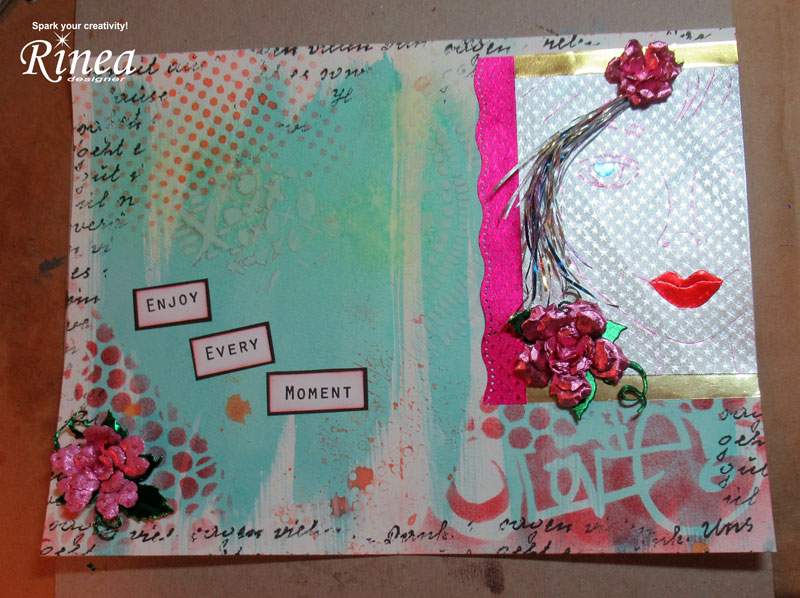
Hi everyone, I've gone a journal page to share using Rinea's Princess Foiled Paper Variety Pack  and the Sweet Sisters Flower Stencil from Rita Barakat.


I used assorted stencils, molding paste, inks and paints to create the background of my journal spread.


Using the Sweet Sisters Flower Stencil, I placed it on Silver Starstruck, drawing the lines in red ink to coordinate with the background.  Since I was using a 4" x 6" sheet, I offset the stencil. 


Placing the stenciled image on the right side, I added 2 strips from Glossy Silver/Gold foil along the top and bottom of the image, then added a punched strip of Fuchsia/Fuchsia Starstuck foil along the side to enclose her within my journal.  Using a small circle punch with Sapphire/Gold Glossy foil,  I created her eye, then cut Ruby/Gold Glossy foil for her lips using the stencil as my guide.


Using Oma's Postcard Stamp, I randomly stamped around the edges of the journal pages with Memento Tuxedo Black ink.  Then I added some words from a 49 and Market Stamp set.


Using Heartfelt Creations dies, I created a variety of flowers from Blush Pink Starstruck, adding them to my journal page atop leaf sprays die cut from Emerald/Gold Glossy foil.


I cut very thin strips of foil from all my left over scraps, wrapped them together and used them to create her flowing hair.  Another flower anchored the hair in place.


What do you think of my journal page?

Thanks for stopping by.

Steph


9/7/18

Witchy Invitations with Rinea Foils

Hi everyone, I'm on the Rinea Blog with some adorable Halloween invitations.  Using the Haunted Foiled Paper Variety Pack and  Face Girl - Zoey stamp from Rita Barakat, these invitations were fun to create and help set the tone for a fun upcoming Halloween party.


I stamped the Face Girl - Zoey on white cardstock, then colored them with Copic Markers.  The event details were stamped to the left of the image.  The stamped panels were added to panels of Marigold Orange/Gold Glossy Foiled Paper.


Next I matted each invitation on black cardstock.  Then I scored the black panels and folded the tops over to complete the invitations.


I added a layer of Marigold/Marigold Starstruck Foiled Paper on the top flaps and punched holes in the top.  "You're Invited" was then die cut and added to the invitations.  The witch hats were die cut from Ebony/Gold Glossy Foiled Paper and Gold/Gold Glossy Foiled Paper using my Cricut.  Placing them on her head makes her a nice witch!


Using Pink and Main stamps, I stamped the pumpkins with VersaFine Nocturne Ink, then die cut them.


Twine was threaded through the punched holes in the tops and tied off.  And the pumpkins were added to the bottom of the invitations.


Thanks for stopping by.

Steph

11/28/17

Lovely Gift Bag

Hi everyone, this week the Ann Butler Design Team is sharing projects created with products from Ann Butler Designs, Rita Barakat and Lisa Jimenez. 


Supplies:

Ann Butler's Crafter's Ink by Clearsnap  - Berry and Canyon
Rita Barakat's Art Foamies - Hot Air Balloon
Lisa Jimenez Colorique Ink by Clearsnap - Honey Bee and Wisteria


I began by inking the Hot Air Balloon with both Berry and Canyon Inks.  This is a large stamp that I knew would be perfect for a gift bag.  Once stamped, I then fussy cut both pieces.


I placed several drops of Honey Bee and Wisteria Colorique on a gift bag, then used a paint brush to create the streaky background.  Colorique Ink is blendable so where the colors overlap, a third color came to life.


Colorique works on a variety of surfaces so I selected a metal charm and painted it with Honey Bee.  Before it dried, I rubbed off the color as I wanted the color to soak into the letter spaces.  Finally I painted Wisteria on the charm and heat set it.


Next, I inked some ribbon with Berry Ink.


Then I used my Bowdabra to create a ribbon.


To finish,  I matted the hot air balloon with cardstock and adhered to the bag.   I tied the ribbon to the handles and added the charm.  I also used Berry Ink around the edges of the gift bag.


I hope you enjoyed my project and will try these lovely supplies.
 
Thanks for stopping by today.
 
Steph