Showing posts with label may arts. Show all posts

10/24/22

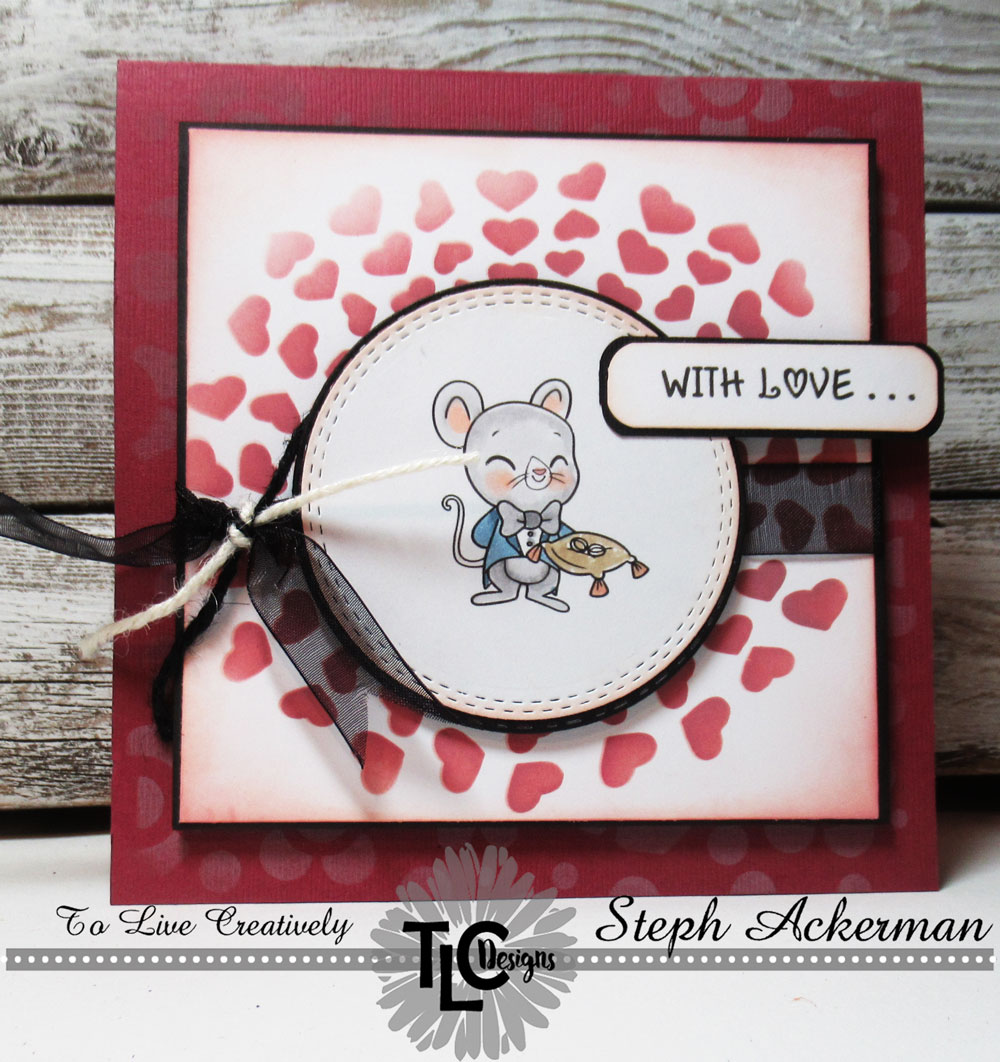
TLC Designs - With Love.....

 Hi everyone, I'm on the TLC Designs Blog today.


Supplies:
Twine


Create a tone-on-tone effect by placing the stencil on the card and inking with Distress Oxide Ink.  Move the stencil as necessary to finish the background.


The tone-on-tone effect is gorgeous.


Use the Hearts stencil on white cardstock.
Stamp the mouse on white cardstock and color with Copic Markers.
Die cut with the Happy Dragonfly Circle Die and mat with larger Aztec Circle Die.


Mat the heart panel with black cardstock.
Wrap the panel with ribbon and tie with twine.


Add a phrase to the upper corner.

Thanks for stopping by.

Steph

9/13/22

PPCF - Connie Fong Designs

 Hi everyone, I've used the amazing Connie Fong image - Tori the Dragon.


Tori is adorable and I immediately thought I'd create a birthday card.
Tori was colored with Copic Markers then fussy cut.


Using a birthday embossing folder, I embossed a left over panel of cardstock.
Matting it with cardstock, I wrapped the panel with ribbon before adding it to the card.
Placing an oval on the card, I added Tori with foam adhesives for dimension.


Thanks for stopping by.

Steph


7/3/22

BPM - Thinking about you

 Hi everyone, I'm using some amazing stamps from Blank Page Muse.


Use the daisies as the focal element.

Thanks for stopping by.

Steph


Looking for more Inspiration? Click the links below!
The Blank Page Muse Shop https://blankpagemuse.com/

Save 15% of your Blank Page Muse orders with discount code:  BPMSteph

6/1/22

Celebrate Anything

Hi everyone, it's a new month and the challenge on the Scor-Pal blog is to create anything you want, just be sure it includes more than one score.


Create texture by adding Silver Creative Medium to pattern paper.  Once dry, cut the panel to 4" x 5 1/4".   Place the panel on a Scor-Buddy and score every 1/2".  Rotate the panel and score again every 1/2" creating a grid effect.


Use Scor-Tape to adhere the scored panel to pink cardstock.  Wrap with pink ribbon and adhere the panel to a black card.


Stamp images from the Joy Clair Let's Celebrate stamp set and color with Copic Markers.  Fussy cut all elements and add to die cut ovals.  Use foam adhesives to layer all elements on the card.


Please stop by the Scor-Pal blog to see what the other designers have created this month.

Thanks for stopping by.

Steph


7/31/20

Snowflake Cards

Hi everyone, I'm on the Rubber Buggy blog using lots of products available in the store.

It may still be the middle of summer, but there is no better way to cool off than by creating winter themed cards.


I used Maja Designs Vintage Summer Basics 1916 to create both cards, die cutting the papers with PoppyStamps Craft Die - Snowflake Lattice Frame.  As this paper is double sided, I created two cards using both sides of the paper.


Use the Spellbinders Tool 'n One to remove the left over die cut pieces that remained in the die.


Mat the die cut panels with the same paper, then wrap each  panel with May Arts Sheer Light Blue Stitched ribbon.  This gives the cards a wintry feel.


The Maja paper gives each card a wintry feel.


Add the die cut panels to 4 1/4" x 5 1/2" cards created from Bazzill Marshmallow cardstock and Bazzill Icy Mint cardstock.  Use Nuvo Crystal Drops to create pearls in each of the snowflakes.  Allow to dry completely.


Die cut Tutti Designs Oval Dies from the same paper and place atop the cards with Scrapbook Adhesives 3D Foam  for dimension.  Stamp and die cut the bench and lamp post using Lawn Fawn Winter in the Park stamps and dies and Lawn Fawn Soot Dye Ink.   Place them atop the oval and add to the card with foam adhesives.


Die cut  Bazzill Marshmallow cardstock with the Lawn Fawn Let It Snow Line  Border Die.  As the die cut phrase is flexible, you can customize the die cut for your projects.   I wanted to shape them in the form of an arch on my cards.


Finally add Yellow Ice Stickles to the lanterns.

Steph


4/30/20

Happy Birthday Cards


Hello everyone.  Today I am participating in an Anniversary Blog Hop with Crackerbox and Suzy stamps.

I've used this amazing Happy Birthday stamp and created 3 different cards.


For my first card, I wanted a feminine birthday card so I started by painting watercolor paints on a sheet of watercolor paper.  Cutting the paper to size, I embossed it with a Happy Birthday embossing folder and lightly inked over the embossed words.  The birthday phrase was also stamped on this paper with black ink.


The embossed panel was matted with pink cardstock then added to a brown card.  Ribbon and white was wrapped around the card, then the phrase was die cut and matted with 2 layers beforing being added to the card with foam adhesives for dimension.  Nuvo drops were scattered around the card.


My next card is a stark contrast in orange and white.  


I started with a white card that was die cut along the bottom edge.  A panel of orange was also die cut then added atop the white card.  


Orange twine was wrapped around the card.


The birthday phrase was stamped in 3 colors of VersaFine Clair inks, die cut and then matted with brown cardstock.  Foam adhesives were added to pop the phrase.


And finally, I had some left over papers I created with Brushos so I made a third card.  


I wanted a really bright card so I used this panel and embossed it with the same Birthday embossing folder I used in card #1.  Then I lightly ran over the embossed words with a light brown ink.


The birthday phrase was stamped in black ink on white cardstock.  The black and white panels were  die cut with Lawn Fawn dies and added to the card with foam adhesives for dimension.


Inside I added this snarky statement which I think is perfect for someone special, don't you?


GIVEAWAY


To celebrate our Anniversary Blog Hop and close our month of celebrations, we have a great surprise. For the anniversary, our friend Den Nichols from Simply Charming gave us 2 amazing So Suzy Tote Bags for part of our prizes. 


Simply Charming is  dedicated to create beautiful and functional products for crafters and their supplies, that are our supplies! 


Important: Colors & Pattern can be different!


These will be our anniversary prizes:

First Prize: So Suzy Tote Bag plus a surprise package of stamps. Value over $100 dollars.

Second Prize: So Suzy Tote Bag and set of stamps. Value over $80.00 dollars

Third Prize: $50 dollars gift card valid at Crackerbox & Suzy Stamps.


In order to entered to win, you need to hop along with us and comment in each participant blog. Hoppers must comment in all stops along the way! You have until May 7, 2020

at 11:59 pm ET to leave your comment. 

Each participant will pick one winner and then we will sort the prizes between the picked names. 


What are we doing in May?
A lot of fun and more great promotions!!!


Here is our complete Line Up for this week, this time the order of our hops is according with the time that our guest and designers have been part of our Design Team.


Winners will be announced here on the blog on May 14th, 2020. 

Happy hopping!

1/17/20

Loving You Panel

Hi everyone, I've got a new post for Clear Scraps using some new products that will be available soon.


I loved the wood finish and did not want to take away from it's beauty so I simply inked the edges with red ink.


I placed an inked panel of sheet music as the next layer.


Then I proceeded by adding an assortment of elements from tags to flowers and a wood heart which I painted with red paint.  A pearl heart was added on top of the wood heart.


I used a Crop-A-Dile to punch holes in the panel and tied ribbon in place.  Additional tags were added on top of the heart.


A clay corner accent was inked and then added across from the flowers.


Thanks for stopping by.

Steph

1/16/20

Lavinia World Challenge #18

Hi everyone, it's time for the next challenge at Lavinia World Challenges.  Please check it out and join in the fun.


I'm using Josie who stands about 4" tall.


I began by created a background using alcohol inks.


Then I stamped Josie with VersaFine Clair in Pinecone.  I also stamped some of the blooms around the card.


My card was cut from brown cardstock and a panel of pink cardstock was placed on top.  This was wrapped with a glittery pink ribbon.


Josie was matted with brown cardstock and Flutterbies were stamped in the upper left with VersaFine Clair Nocturn Ink.


The panel was added to the card wiht foam adhesives for dimension and a sentiment - Every Dream - was then added.


Would love to see what you create for Challenge #18.  The winner of the challenge will receive a

$15 gift certificate to Lavinia World to shop for more goodies.   Remember there is a new challenge every other Thursday.  Can't wait to see what you create.

Thanks for stopping by.