Showing posts with label want2scrap. Show all posts

5/12/20

Friendship Card with Rinea Foiled Papers

Hi everyone, I've got a new floral card on the Rinea blog using so many fun colors of foils.

Did you know that Rinea has a new color?  It's called Arctic and is the perfect addition to the foiled family of colors.  I love it!  It comes in both Arctic Starstruck and Arctic/Gold Glossy Foiled Papers.


Start by creating a 5 1/2" square card.  Die cut Mocha/Gold Glossy Foiled Paper using a Heartfelt Creations die.


Adhere the die cut pocket to the card, leaving the center free.  Add a strip of rhinestones along the straight edges of the pocket.


Using Heartfelt Creations stamps and StazOn Pigment Ink, stamp the flowers on Blush/Gold Glossy Foiled Paper and stamp the leaves on Jade/Gold Glossy Foiled Paper.  StazOn Pigment Ink is perfect for use with these foiled papers as the ink does not smear when used on the foils.  


Use the coordinating Heartfelt Creations dies to die cut all the flowers and leaves.


 Use a stylus and pad to form the flowers and leaves, giving them shape.


Die cut Arctic Starstruck, creating a circular tag for the card.   Adhere the flowers and leaves around the top half of the tag, being sure they allow the tag to fit inside the pocket.


Staple ribbons to the top of the tag - this will allow you to pull the tag from the pocket.  Stamp a sentiment from Joy Clair's Best Buds stamp set with StazOn Pigment Ink on the center of the tag.


Slip the tag into the pocket.  Add Liquid Pearls to the center of the flowers.

Thanks for stopping by.

Steph


2/7/20

Happy Valentine's Day with Makin's Clay

Hi everyone, I have a new post for Makin's Clay.


Supplies:
Makin's ClayⓇ - Red
Makin's ProfessionalⓇ Cutting Mat
Makin'sⓇ Roller and Cutters Set
Makin's Texture Sheet - Set C
Prima Molds and Waxes
Want-2-Scrap Pearls


Using the Roller, place red clay on the Cutting Mat and roll out to the thickness of choice.  I rolled it out to about 1/4" in thickness.

 
Next, place the Eyelet Texture Sheet on the clay and use the Roller to roll over the sheet to impress the design into the clay.


Use the Cutter to cut a heart shape from the clay.

 
To add some color to the heart, rub Art Alchemy waxes over the heart.
 
 
Create a card from pattern paper and cardstock.  Use Beacon 3-in-1 Adhesive to adhere the heart panel to the card. 


Add a string of pearls around the heart.  Die cut Love from 2 layers of cardstock and adhere in the corner.
 
 
Thanks for stopping by.
 
Steph
 

1/24/20

Stand Up Love

Hi everyone, I've got a new post for Clear Scraps using one of their newest products.


This new wood product comes unassembled.  Simply paint, ink or add pattern paper to the bases, then adhere them together.  Keeping with a pink and red theme, I painted the larger base red and the smaller one pink.  Then I used Beacon 3-in-1 Adhesive to glue the bases together.


While the base dried, I painted Love with the same colors, both front and back.


Next, I placed adhesive on the tabs and placed them in the base.


Finally, I added a line of pearls to the "L" as well as around the base.  A few extra pearls were added to the point of the heart.


Then I adhered flowers around the base.  The heart moves, so just slip a photo behind the heart.


Thanks for stopping by.

Steph


1/17/20

Loving You Panel

Hi everyone, I've got a new post for Clear Scraps using some new products that will be available soon.


I loved the wood finish and did not want to take away from it's beauty so I simply inked the edges with red ink.


I placed an inked panel of sheet music as the next layer.


Then I proceeded by adding an assortment of elements from tags to flowers and a wood heart which I painted with red paint.  A pearl heart was added on top of the wood heart.


I used a Crop-A-Dile to punch holes in the panel and tied ribbon in place.  Additional tags were added on top of the heart.


A clay corner accent was inked and then added across from the flowers.


Thanks for stopping by.

Steph

1/10/20

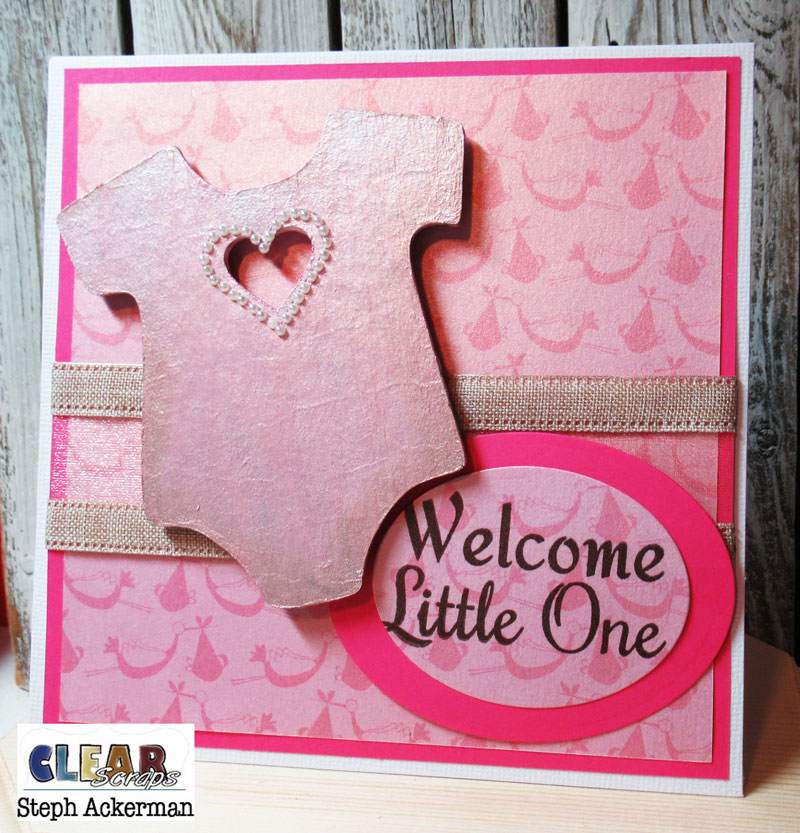
Baby Card With Clear Scraps

Hi everyone, I've got a new post for Clear Scraps using one of the new Chipboard Shape Embellishments that will be available shortly.


I painted the onesie with two layers of pink pant.  Then I inked the edges with brown ink.


While waiting for the chipboard to dry, I created my card, wrapping ribbon around the layers before adding the panel to the card.  A sweet phrase was stamped, die cut and added to the corner.


The onesie was added to the card with foam adhesives so it had some dimension on the card.


A heart shaped set of pearls was added around the opening.


Change up the colors to blue for a boy and you've got a perfect baby boy card too.

Thanks for stopping by.

Steph


10/21/15

Day of the Dead with Clearsnap Inks

From the stories articles and stories I have read, Day of the Dead is a Mexican holiday celebrated throughout Mexico, and acknowledged around the world in other cultures. The holiday focuses on family and friends who gather to remember those who have died, and help support their spiritual journey.  It's a holiday that is more festive than morbid, where families decorate the graves of loved ones with their favorite foods and sugar skulls.

In honor of Day of the Dead, I've decorated a simple paper mache skull with lots of bright fun ink colors from Clearsnap, along with assorted flowers and bling!


I began by painting gesso on the skull because I wanted the ink colors to take center stage.  After all Day of the Dead is about color!  Once the skull was dry, I used the new  Marisa Pawelko Modern Surrealist Surfacez Inks from Clearsnap to add color to my skull.  These inks come in lovely colors such as Paradise Pink, Tinky Teal, YOLO Yellow, and Charming Chartreuse which were perfect colors for my skull. 


I pounced the ink pads directly over the skull in a random manner.  I didn't want to completely cover the skull but I did want the colors to stand out as well as interact with each other.  I started with yellow, then green and then blue.  Pink was the final color I used.


To finish, I added some hot pink swirly bling about the top.  Large flowers were added to the eye sockets with smaller flowers and large brads and glued in place.  I also added one to the center of the skull.  To finish I added diamond shaped dew drops to the teeth.


What do you think?  Will you create something for this holiday?


Thanks for stopping by today.
 
Steph
 

9/28/15

Upcycling a jar with Ann Butler Iridescents

Hi everyone, I've got a new project on the Ann Butler Designs blog.

I've altered a glass jar with Iridescents from Earth Safe Finishes and I think it looks fabulous.


Check out my newest video to see how I did this. 
I'd love to know what you think.


Thanks for stopping by today.

Steph

8/13/15

Butterfly Wings

Hi everyone, I've got a post on the Paper Wings Productions Blog today.


Please stop by and check it out.

Thanks for stopping by today.

Steph

7/24/15

Lace Up Long Dress

Hi everyone.  My first post as a member of the EyeConnect Crafts Design Team is up on the EyeConnect Crafts blog.  I am so excited to be designing with these amazing chipboard products.  If you haven't done so already, please take a look around the store and check out the fun chipboard products available. 

I've used   Lace-Up Long Dress which is fabulous - check out the lace up - for the front or the back!!  And, of course, I just had to pair it with a fun stamp from KellyCraft (Set B).


Stop by the store and check out all the fun products available.

Steph


3/9/14

Graphic 45 Design Team 2014 Audition


It's that time again - Graphic 45 is having an open audition for their 2014 design team.  I have waited all year for this call and am thrilled to be submitting my work.  Graphic 45 has an assortment of paper in a variety of styles and I adore creating with them.

Graphic 45 has asked for at least 6 of my favorite projects so here there are:


11" x 14" canvas using Graphic 45 Secret Garden


Shadow Box using Graphic 45  to create the backdrop for the living room setting - shown at the Basically Bare Booth at CHA in January 2014


 Banner using chipboard houses covered with Graphic 45 Oz and Springtime collections


Easel Card using Graphic45 Ladies Diary


3 dimensional box and mini cards using Graphic 45 Secret Garden


Wood box using Graphic 45 Secret Garden


Christmas Envelope card using Graphic 45 Christmas Emporium


Gift bag using Graphic 45 Steampunk Spells


Witchy card using Graphic 45 Steampunk Spells


Party favor using Graphic 45 Steampunk Spells


Thanks for stopping by today.

Steph