Showing posts with label stampendous. Show all posts

4/20/25

BPM - Pop Up Easter Card

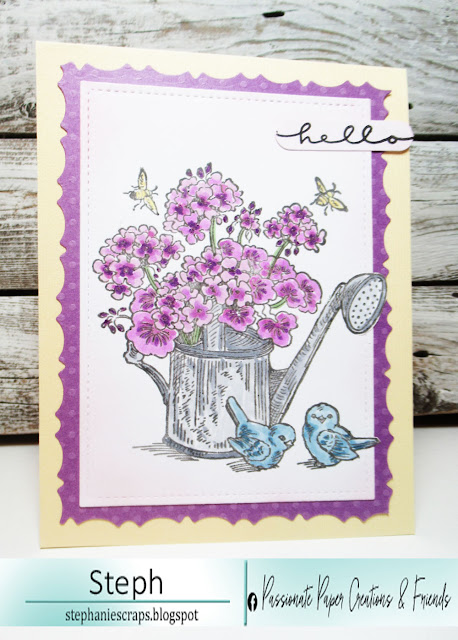
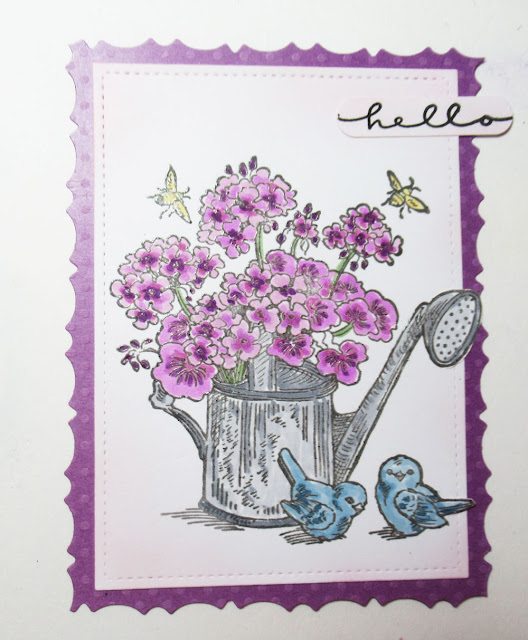
Hi everyone, Easter is around the corner, so I've created this pop up Easter card using stamps from Blank Page Muse.


Blank Page Muse Stamps: Easter Full Sheet
Hobby Lobby word
Stampendous pop up dies


The card folds flat for mailing.
And it pops up once removed from the envelope.


Full details can be found on the Blank Page Muse Blog.

Thanks for stopping by.

Steph

7/14/23

You're in my thoughts

Hi everyone, sympathy cards are difficult to create and not something I enjoy creating.  But using assorted dies and stamps, you can create a beautiful sympathy card to share.


Create a 7" x 6"card from cardstock.
Using dies from Anna Griffin, die cut pattern paper using the intricate die.
Die cut the base from navy cardstock and adhere the layers to the card.

Stamp and die cut sentiment.
Die cut again from navy cardstock and adhere to the card.
Add the sentiment on foam adhesives for dimension.


Stamp the phrase inside the card.
Stamp some leaves about the panel.
Mat with cardstock then adhere inside the card.


Thanks for stopping by.

Steph

12/15/22

Quick and Easy Christmas Projects - Day 1

Hi everyone.  Christmas will be here before we know it.  The last eight years I've blogged about last minute Christmas ideas you could make in under 60 minutes.  Well, it's that time again and I've got some new projects to share.

Today I'm sharing a quick and easy gift bag.


Mixing and matching assorted papers is always a fun way to use papers from your stash.


Use a Lawn Fawn die to die cut Christmas Tree panel.
Use a TLC Designs die, create the "road".


Stamp and die cut the truck and packages.  
Place the truck on the road and add the packages.


Place the panel on evergreen paper with a panel of Christmas words between.

Adhere the panel to the gift bag.

Alternatively, add the panel to a 6"x6" card.

Thanks for stopping by.

Steph

4/21/22

PPCF - Stampendous

Hi everyone, how about a sweet summer card?  Stampendous is a sponsor of the Passionate Paper Creations& Friends  FB Group this week.   


I used the House Mouse stamp - Rose Play and aren't they adorable!


The images were colored with Copic Markers.


I die cut the panel, then created an easel card.


Thinking of you was used to keep the card upright.

Thanks for stopping by.

Steph

PPCF - Stampendous

Hi everyone, sending a floral hello today.  Stampendous is a sponsor of the Passionate Paper Creations& Friends  FB Group this week.


I used Geranium Pitcher, coloring it with Copic Markers.


The panel was die cut then matted with a coordinating panel.


Stickles were added to the centers of the flowers and hello was added to the corner.


Thanks for stopping by.

Steph


12/21/21

Quick and Easy Christmas - Day 7

 Hi everyone.  Christmas will be here before we know it.  The last seven years I've blogged about last minute Christmas ideas you could make in under 60 minutes.  Well, it's that time again and I've got some new projects to share.

Christmas Decor with Rinea Foiled Papers


I love creating home decor projects for the holidays.  


Using assorted colors of Rinea Foiled Papers, I die cut a large oval for the center of the piece, then adhered leaves, pinecones and the bow to create a layered effect:


Merry was added to the center to finish.

Thanks for stopping by.

Steph


If you missed my previous posts, you can find them here:

Day 1:  Christmas  place cards/candy treats

Day 2:  Rustic Wreath

Day 3:  Sled

Day 4: Decorative Gift Bag

Day 5: Christmas Tree

Day 6: Foiled Gift Bag


6/2/20

Shaped Stenciled Cards

Hi everyone, I'm on the Clear Scraps blog  and we are cross promoting with TapeRunner this month.  I've created a set of shaped cards using the 6" Post/Flowers Stencil.


Having a lot of pattern papers in my stash, I decided to use assorted papers as the background for this fun stencil.


Selecting an assortment of Imagine inks, I placed the stencil on the pattern paper and inked it up using the ink pads and ink daubers.


Wanting a shaped card, I used Spellbinders dies to create an easel card.  I die cut the card with the larger die, then die cut the pattern paper with the next smaller die.  The inked panel was then added to the cards using the TapeRunner.


To keep the card upright, I die cut a strip to fit across the card base, placing it on the base with foam adhesives for dimension.  This ensured the cards would stand upright.


Stampendous Stamps were used on the sign posts as well as the center strips of the cards.


To finish, brads were added to the flower centers.


When folded the cards fit into square envelopes.

So why not pull pattern papers from your stash and create amazing designs with stencils.

Thanks for stopping by.

Steph


12/2/19

Christmas Shaker Cards

Hi everyone, I've got  a new set of Christmas Shaker cards on the Arnold Grummer Papermaking blog.


I've used left over papers from other projects.  For each card, I used the remaining die cut panels and frayed the edges.


I adhered a plastic sheet to each panel, and Using my MISTI, I stamped phrases in the lower corner with StazOn ink.  Using the MISTI ensured that if I had to restamp the phrase that it would line up correctly.


I placed foam tape around the panels and placed dew drops in the cavities before adhering the backing.


Finally I added flowers and leaves to the corners.

Thanks for stopping by.

Steph


11/4/19

Merry Christmas Cards

Hi everyone, I'm on the Arnold Grummer blog with Christmas cards.


To create the truck card, emboss a pink panel with a holly embossing folder.  Lightly ink with VersaFine green.


Stamp and die cut the tree and packages from green paper and the truck from pink.  Stamp the phrase on pink.


Die cut a larger circle from green paper and add to the center of the card.  Color the tree and packages and assemble the card with foam adhesives for dimension.


Die cut the phrase and add to the upper corner.  Create berries using enamel dots.


 For the ornament card, emboss a pink panel with a different holly embossing folder.


Ink the holly leaves with green ink.  Add red enamel dots for the berries.


Die cut and emboss ornaments.


Ink ornaments and use red enamel dots along the bottom edge.  Add the holly panel to a green card.  Add twine to the ornament and add the ornament with foam adhesives for dimension.


Thanks for stopping by.

Steph


9/14/19

Longing to See You

Hi everyone, I've got another project for Dies R Us.   


Using the main die, die cut the center of the card.


Die cut


Stamp line of trees.


Mat with larger die and ink


Die cut the tree toppers and add.  Stamp and punch sentiment, adding it to the right side.


Stamp giraffe and color with Copic Markers.  Die cut and add to card front.


Please stop by the Dies R Us Store to see all the dies that are available!

Thanks for stopping by.

Steph


9/2/19

You are so Thoughtful

Hi everyone, I'm on the Arnold Grummer blog sharing a new winged card using handmade papers.


Using some premade papers, I selected 3 different colors - pink, purple, and red.


The wings are so delicate and I die cut them from a purple paper.


The hearts were die cut from pink paper.


Using VersaFine Clair Inks and an art dauber, I added color to the images.


A purple panel was also die cut and lightly inked.  It was placed atop white cardstock, then again on lavender and white panels before being added to a purple card.


The pink center panel was also die cut then added to the card with foam adhesives for dimension.  The wings and heart were added on top.


The phrase was stamped and die cut from red paper, then added slightly under the right wing.

Thanks for stopping by.

Steph