Showing posts with label tattered angels. Show all posts

6/9/20

Hearts Phone Stand

Hi everyone, I'm on the Clear Scraps blog with this fun phone stand.  If you check out Clear Scraps store, you will find an assortment of phone stands to work with.


I chose to work the Hearts Wood Phone Stand  and decided to paint it with blue paint.  


I wanted pattern paper to show behind the hearts, so I cut  pattern paper to fit behind the hearts and then adhered in place using the Tape Runner.


For a little pizzazz spritz  the phone stand with gold spray ink.  Let dry completely.


Decorate with gem stones surrounding the hearts and place a flower in the corner.


Place your phone on the stand so you always know where it is!!!

Thanks for stopping by.

Steph


7/17/19

Beauty is All Around You Canvas

H everyone, I'm on the Clear Scraps blog with a mixed media floral panel.


Using the Mini Jar Pallet, I painted it with Prima Metallique gold paint.


Placing the 6" Shattered Glass Stencil on top, I painted it with Prima Metallique silver paint.


Using modeling paste with the 6" Shiplap Stencil and 6" Wood Grain Stencil, I created texture on the canvas panel.


Once dry, I painted the panel with white gesso because I wanted to add color to the panel.


Spritzing the panel with assorted colors of spray inks, I created my background.  I heat set each color before adding the next colors.


I adhered the Jar Pallet off-center of the panel.  Pulling assorted Prima flowers from my stash, I placed them along with leaves about the panel.

I added babies breathe amongst the flowers and tied some to the twine.


A sentiment was stamped on a tag which was inserted under the twine.  Butterflies were die cut from Rinea Foiled Papers in such wonderful colors as: Sapphire Starstruck, , Blush/Gold Glossy Foiled Paper, Fuschia/Gold Glossy Foiled Paper, and Marigold Starstruck.


The butterflies were placed amongst the flowers. as well as on the tag.


Thanks for stopping by.

Steph


4/13/19

Adventure is Calling Journal

Hi everyone, I'm sharing the last project that was posted on the Canvas Corp. blog.    Alas, Canvas Corp. as we know it, no longer exists.  That is such a sad turn of events for the crafting industry as they had so many amazing products and so many wonderful designers!!!

I've created a mixed media travel journal  to document all the trips we are now planning - starting with our upcoming trip to Italy.


This is a great project for using up all those scraps left over from various projects.  Add in metal gears a stamped image from Joy Clair stamp's Good Vibes stamp set along with that wonderful phrase - Adventure is calling!!!   

I'm in.  What about you?

Can't wait to fill it up with notes and items from our travels.

Thanks for stopping by.

Steph


3/8/19

Let your Dreams Fly.....

Hi everyone, my newest post on the Arnold Grummer blog is this pretty Butterfly canvas panel.


Handmade papers can create amazing projects.

Using a 5" x 7" canvas, I spritzed the top 2/3 with several colors of Tattered Angels Glimmer Mists.


Using an assortment of hand made papers, I die cut butterflies from lighter papers and their shadows from darker papers.  Assemble the butterflies then ink them in assorted colors.


To complete the canvas, use molding paste randomly through a brick stencil.  Allow to dry.


Place the butterflies on the canvas.  Add several different colored dew drops on each butterfly, then add additional dew drops for the butterfly tails.


Using a left over scrap of hand made paper, stamp the phrase in black ink.  Tear around the phrase and ink the edges before adding it amongst the butterflies.


Now let your Dreams fly......

Thanks for stopping by.

Steph

2/10/19

Happy Valentine's Day with Canvas Corp.

Happy Valentine's Day!!   May your day be full of sweet surprises.

My newest post on the Canvas Corp. Brands Blog is a set of Valentine's Day cards.


Canvas Corp..  has an amazing selection of cardstock and pattern papers.  Solids and patterns are created to mix and match.  Using a minimal number of supplies, these cards were created quickly.


I used Tattered Angels Strawberry Ice Chalkboard with a paint brush to paint the hearts, then cut the papers to different sizes to create my cards.


Stop by the Canvas Corp. Brands Blog for complete details.

Thanks for stopping by.

Steph


2/3/19

Happy New Years with Tattered Angels Glimmer Glam

Cheers everyone.  I recently had some fabulous cards  on the Canvas Corp. Brands Blog using Tattered Angels Glimmer Glam.


I find Glimmer Glam to be an  amazing paint filled with chunky glitter in a sheer tinted paint.  These paints are wonderful to use for all your creations.  While I have added Happy New Year to my cards, these cards would be perfect for a birthday, for a retirement party, or even for someone heading off on a vacation, by simply changing up the 2nd sentiment.


Head over to the Canvas Corp. Brands Blog for complete details.


Thanks for stopping by.


Steph


1/12/19

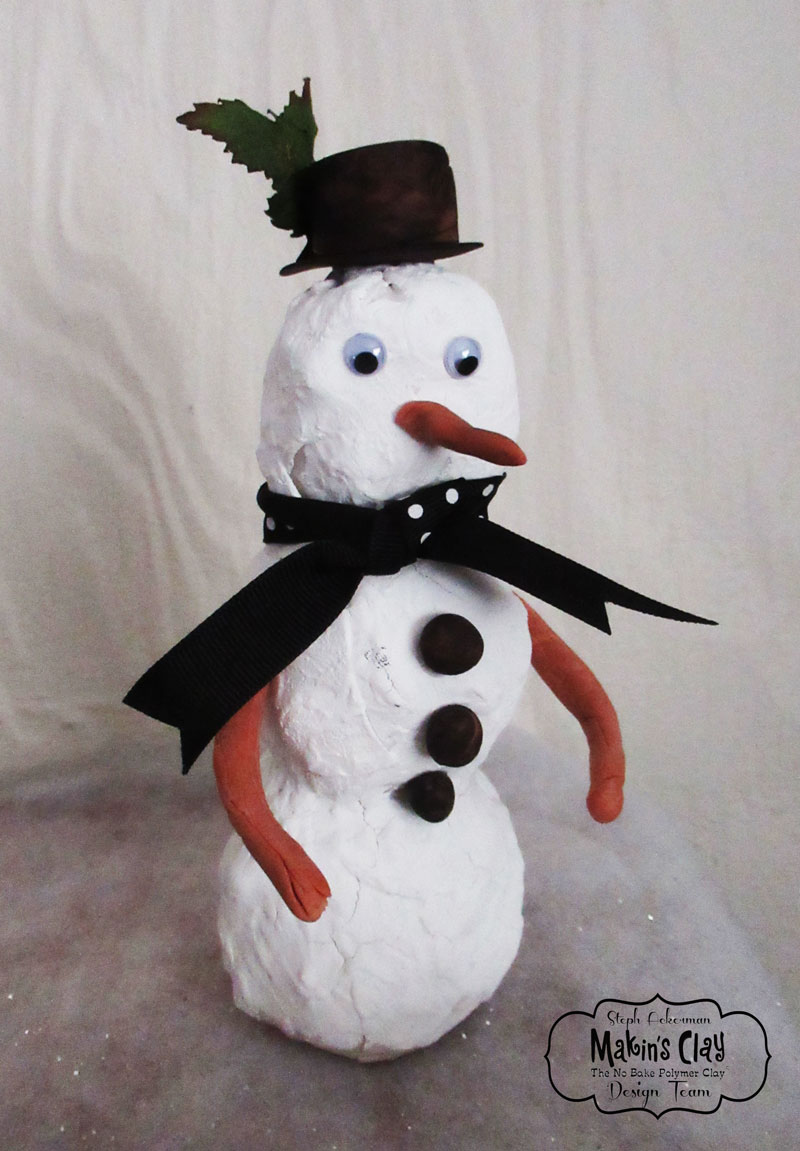
Makins Clay Snowman

Hi everyone, I'm on the Makin's Clay blog with a fun winter project.  With winter upon us that means snow will be here shortly.  Since it can be a little too cold outside to make snowmen, why not create your own snowmen from the comfort of your home.  


Supplies:
Tattered Angels Baseboard - Lava
Ribbon
Leaves
Wiggly Eyes


Start by creating the snowman using tinfoil which has been tightly rolled into 3 balls.  Continue adding tinfoil until you have 3 different sized shapes.  Place toothpicks between the balls and glue in place to hold the shape.  Put aside to dry.


Condition white clay for the outer layer.


Using the clay machine, roll each piece of clay starting at the highest setting.


Continue putting the sheets of clay through the clay machine reducing the setting each time until the panels are the thickness desired.


Wrap the clay around the snowman, folding and pinching where necessary to achieve a desirable snowman.  Since snowmen are not always smooth, don't worry about the lumps and bumps that show as a result of the underlying tinfoil.


Allow the snowman to dry 24 hours, then paint with white paint.


Roll out terracotta clay to create the arms.  Allow the edges to be a little raggedy so they look like tree limbs.  Adhere to the sides of the snowman.    


I had no black clay handy so I rolled out 3 little balls of terracotta clay for his buttons and his hat.  Then I spritzed them with Tattered Angels Lava mist to change the color of the clay. 


I placed the hat on his head and added leaves to the side.  Finally I tied ribbon around his neck.

Standing about 7" tall, he is a reminder of the winter weather that is to come.

Thanks for stopping by.

Steph


10/30/18

Halloween Box Card with Canvas Corp.

Hi everyone, a recent card on the Canvas Corp. and Tattered Angels blogs - a Halloween Box Card.


Supplies:
Tattered Angels Chalkboard Mist - Alaskan Salmon
Tattered Angels Baseboard Mist - Sandy Beach, Clay
Tattered Angels Glimmer Glaze Paint - Kelly
Tattered Angels High Impact Paint - Light Gold
Canvas Corp. Haunt It Halloween Pin Dot, Black on Kraft,
Joy Clair Stamps - Harvest Blessings
VersaFine Clair Nocturne Ink
Heartfelt Creations die


Stamp assorted pumpkins with Nocturne Ink.  Add color with High Impact Paint in Light Gold.  Allow to dry, then add additional color with Alaskan Salmon and Clay for definition.


Fussy cut the pumpkins then assemble on the box card with leaf sprays.  Stamp 2 different phrases with Nocturne Ink.  Add some Light Gold High Impact Paint around the phrases.  Mat each with black cardstock and add one to the front flap and mix the other in with the pumpkins.  Stamp and add some stalks.


Thanks for stopping by.

Steph


10/20/18

Happy Pumpkin Pallet with ClearScraps

Hi everyone, I'm on the Clearscraps blog using one of their new products - the Pumpkin Pallet.


This Pumpkin pallet is made of pine and comes assembled.  All you need to do is decorate as you desire. First I painted it orange.


Then I used the stencil with molding paste to create a design along the bottom.


Since pumpkins are never smooth, I added some warts with a circle stencil.  then I spritzed it with Tattered Angels Mists.


Finally, I painted the warts with brown ink and also added some brown ink randomly about the panel.  A decorative bow finished it off.


Thanks for stopping by.

Steph

8/16/18

Decorative Mitten with Proxxon Tools

Hi everyone.  Summer is winding down and you know what that means, right?  Christmas is on the horizon and it's never, ever, too early to start creating holiday projects.


Supplies:
Proxxon Scroll Saw
Proxxon Delta Sander
Proxxon Bench Drill Press
Plaint Texture Coastal Paint
Delta Ceramcoat
Plaid Stencil
Rinea Foils
Tattered Angels Glimmer Mist
Chipboard
Ribbon


Draw a pattern on a piece of plywood.


Cut around the pattern using the Scroll Saw.


Punch a hole in the top with the Drill Press.
Use the Delta Sander to sand the mitten.


Paint the mitten with Plaid's Coastal Texture Paint in Seal Grey.  
I first painted it black then realized I wanted it grey.
The Coastal Texture Paint easily covered the black paint.


Use painters tape to mask off sections of the mitten.
Add stenciled effects with molding paste.


Remove the masking tape and add strips of Rinea Foiled Papers across the mitten.


Paint chipboard elements and add them as shown.
Wrap ribbon around the mitten.
Die cut a pointsettia from Rinea Ruby/Gold Glossy Foil.


Place the pointsettia atop the ribbon.


Thanks for stopping by.

Steph