Showing posts with label winter. Show all posts

12/1/25

ScorPal Treat Box

 Hi everyone, it's time for a new Scor-Pal challenge.  Just create a project with more than one score.   I've created a treat box to give family and friends this year. They are extremely addicting and so much fun to make.


Supplies:  Scor-Pal
Scor-Tape
Whiskers Graphics Twine
Joy Clair Stamps


Cut cardstock 5" x 8".
With the 8" width across the Scor Pal, score at 1" and 7".
Rotate and score at 1" and 4".


Cut into each corner as shown above.
Add Scor-Tape to each corner and fold the corners in to create the box.


To create the top layers, cut 2 pieces of cardstock, each 3" x 5".
Score each at 1/2" and 1 1/2".
Add Scor-Tape along the 1/2" score.


Remove the Scor-Tape and add each panel to the bottom of the box, lining up the 1/2" score line with the bottom edge of the box.
To strengthen the box, add a separate panel of cardstock 2 7/8" x 5 7/8" across the exterior.
This also covers the added scored panels.


To decorate the box, proceed as follows:

Cut white cardstock:
2 pieces each 2 7/8" x 3 3/8".
2 pieces each 7/8" x 2 7/8"
2 pieces each 7/8" x 5 7/8"
1 piece 5 7/8" x 2 7/8"

Cut pattern paper:
2 pieces each 2 3/4" x 3 1/4".
2 pieces each 3/4" x 2 3/4"
2 pieces each 3/4" x 5 3/4"
1 piece 5 3/4" x 2 3/4"

Layer the pieces together and adhere each piece to the box.


Fill the box with assorted candies and a gift card.

Finish by wrapping with twine and adding a tag.

What a great way to give "a little something" to those you care about this year.

Thanks for stopping by.

Steph

1/31/24

BPM - Frosty Night Slimline Card

 Hi everyone, I'm using some amazing stamps and papers from Blank Page Muse.


Blank Page Muse Stamps:  Penguins on Ice
Blank Page Muse Papers: Frosty Night

Last minute Christmas card using some new digital papers from Blank Page Muse.
Add a sentiment to finish the card.

Punch holes in each bag and tie together with twine.

Thanks for stopping by.

Steph


Looking for more Inspiration? Click the links below!
The Blank Page Muse Shop https://blankpagemuse.com/

Save 15% of your Blank Page Muse orders with discount code:  BPMSteph

1/5/21

Always There For You with TLC Designs

 Hi everyone, it's getting colder here in New York and I've used TLC Designs dies and papers to create a sweet snow scene.


Using the stitched hillside die from the Land and Seas dies, I die cut 3 layers of white cardstock.  I lightly inked each with blue ink and adhered the 3 layers together.


Using paper from the Watercolor Naturals pattern paper, I embossed it with a snowflake embossing folder, then lightly inked  it with purple ink to coordinate with the purple card.  The snow mounds were layered on the embossed panel and the panel was then adhered to the card.


I printed the snowmen from the Snow Family Tree Fun digital set then colored them with Copic Markers.  After fussy cutting them, I placed them on the card, one behind a snow mound and one on top of the snow mound with foam adhesives for dimension.

The sentiment, from the Happy Bouquet digital stamp set, was slipped behind the snowman.  Stickles were added to the snow mounds for dimension.  Finally, I scattered pearls about  the snowflakes.

Thanks for stopping by.

Steph


10/23/20

Snowman Tags

Hi everyone, I'm on the Clear Scraps blog with a set of Christmas tags today.


The Chipboard Tag Album has 4 different shaped tags that can be used together for a shaped mini album, or can be used separately as I did to create different shaped tags.  

Selecting 2 tags, I inked them with green ink.  I also inked the Noel Chipboard Word Title to coordinate with the pattern paper I was planning to use.


Using the tags as stencils, I drew on the pattern paper and then cut the papers to fit the tags.


Next, I inked the edges of the paper with the same green ink and adhered them to the tags.


The Noel Chipboard Word Title was adhered to one of the tags on a slight angle.


Dashing through the snow...., a Crackerbox/Suzy stamp, was stamped with black ink, matted,  and adhered to the second tag with foam adhesives for dimension.


They would look really great on larger packages or hanging from the tree.  Turn the tags over and create a pocket to fit a gift card or even some cash!!


Aren't they sweet?

Thanks for stopping by.

Steph


1/12/19

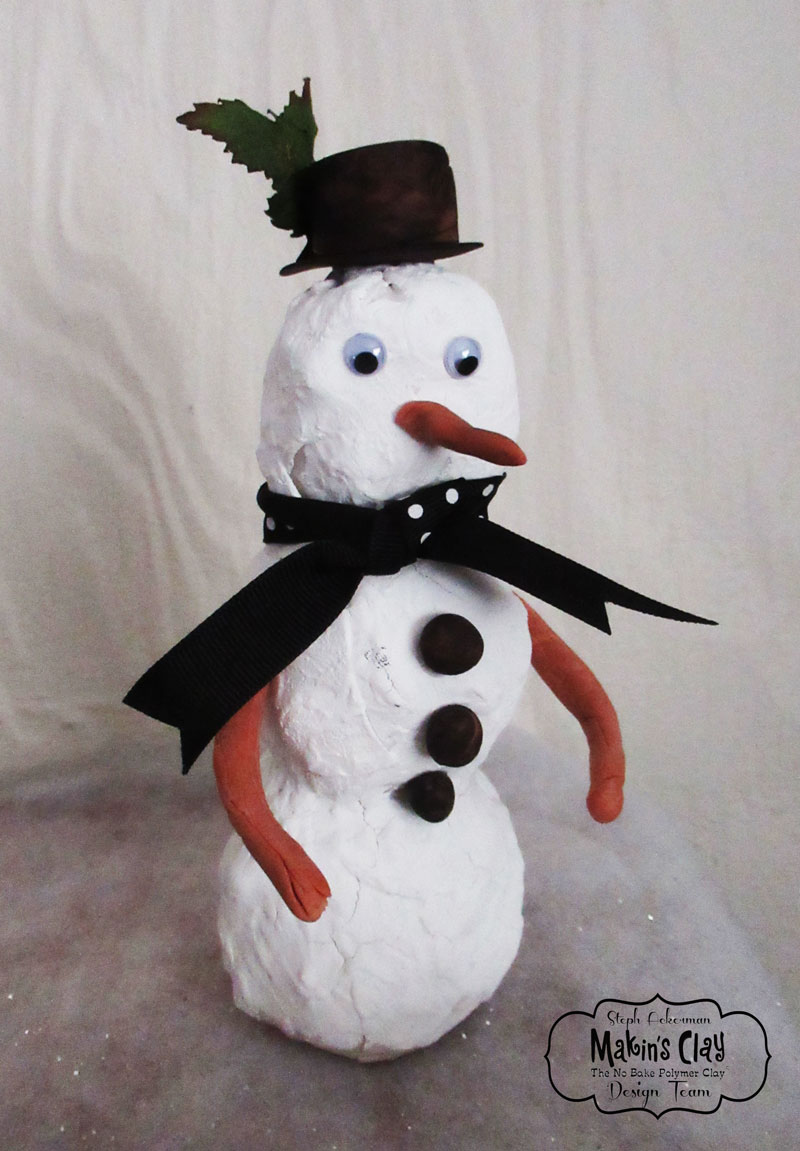
Makins Clay Snowman

Hi everyone, I'm on the Makin's Clay blog with a fun winter project.  With winter upon us that means snow will be here shortly.  Since it can be a little too cold outside to make snowmen, why not create your own snowmen from the comfort of your home.  


Supplies:
Tattered Angels Baseboard - Lava
Ribbon
Leaves
Wiggly Eyes


Start by creating the snowman using tinfoil which has been tightly rolled into 3 balls.  Continue adding tinfoil until you have 3 different sized shapes.  Place toothpicks between the balls and glue in place to hold the shape.  Put aside to dry.


Condition white clay for the outer layer.


Using the clay machine, roll each piece of clay starting at the highest setting.


Continue putting the sheets of clay through the clay machine reducing the setting each time until the panels are the thickness desired.


Wrap the clay around the snowman, folding and pinching where necessary to achieve a desirable snowman.  Since snowmen are not always smooth, don't worry about the lumps and bumps that show as a result of the underlying tinfoil.


Allow the snowman to dry 24 hours, then paint with white paint.


Roll out terracotta clay to create the arms.  Allow the edges to be a little raggedy so they look like tree limbs.  Adhere to the sides of the snowman.    


I had no black clay handy so I rolled out 3 little balls of terracotta clay for his buttons and his hat.  Then I spritzed them with Tattered Angels Lava mist to change the color of the clay. 


I placed the hat on his head and added leaves to the side.  Finally I tied ribbon around his neck.

Standing about 7" tall, he is a reminder of the winter weather that is to come.

Thanks for stopping by.

Steph


12/18/17

Quick and Easy Gift Ideas - Day 4

Hi everyone.  Christmas will be here before we know it.  The last three years I've blogged about last minute Christmas ideas you could make in under 60 minutes.  Well, it's that time again and I've got some new projects to share.

This winter panel starts with a metal panel which I covered with Gesso.  Once dry, I sprayed Jade Tint It over upper half.  Along the bottom, I painted molding paste to simulate snow and added some gauze.


All the elements were die cut with my Cricut and then adhered to the panel.


If you missed my previous posts, you can find them here: 

Day 1
Day 2
Day 3

Thanks for stopping by.

Steph

12/22/16

Quick and Easy Gift Ideas - Day 8

Hi everyone.  Christmas will be here before we know it.  The last two years I've blogged about last minute Christmas ideas you could make in under 30 minutes.  Well, it's that time again and I've got some new projects to share.

Today's project is a frame you can have the kids create for friends and family.


Using a wood frame, paint it any color you want.  I chose some blue glitter paint that would coordinate with the stickers.  Allow it to dry completely.


Add a selection of foam stickers including snowmen, sleds, snowflakes and snowballs.  The kids will have a ball creating this frame.


Thanks for stopping by today and don't forget to stop by daily as I show you more quick and easy Christmas projects you can make in less than 30 minutes.


If you missed my previous posts, you can find them here: 
Day 1
Day 2
Day 3
Day 4
Day 5
Day 6
Day 7


Steph

12/9/16

It's a snowy canvas

Hi everyone, it's my day on the Paverpol blog and I've got a fun snow canvas to share.

 
I used Paverpol to create the flowing snow at the base of the canvas.  For all the details, please stop by the Paverpol blog.
 
Thanks for stopping by.
 
Steph