8/26/11

Scor-pal Last Days of Summer Blog Hop


Summer is drawing to a close and what better way to celebrate Summer than by showcasing summer projects. Check out today's posting at Scor-pal to get all the details of today's hop.

I created this card using an assortment of products, showcasing how amazing the Scor-pal is. Since my card was a little plain around the edges, the Scor-pal added just the right amount of definition.


I cut my striped pattern paper into a block, then scored around the block twice 1/4" apart. A light swipe of white ink helps the score lines show up. Reversing my striped paper, I used the words to create the focal element which I backed with cardstock. I then wrapped Twine around it before adhering it to my card.

Summer was stamped in black ink, embossed and mounted on cardstock before adhering it to the card with foam adhesives. The circular image was stamped on which cardstock, colored with Copic Markers and added to the card with a paper tagger.


Enjoy.

Supplies:
Scoring Tool: Scor-pal
Cardstock: Bazzill
Pattern paper: Reminisce
Stamps: Serendipity, Hero Arts
Ink: Clearsnap Jasmine Mix'd Media Inkx, Stephanie Barnard Licorice and Tangerine Ink
Embossing Powder: Clearsnap Black
Markers: Copic Markers
Twine: The Twinery
Paper Tagger: Around the Block


8/25/11

Celebrate

Sometimes less is more when creating a stunning card. Using my Scor-pal and Design Adhesives and Designer Foils from Clearsnap, I created a very quick and easy birthday card.


My card measures 5 1/2" x 5 1/2". I scored the cardstock in half to create the card, then scored at the 10", 10 1/4" and 10 1/2" marks to create the bottom border.


After folding the card in half, I spritzed the card front with Vanilla Smooch Spritz. It's very pretty, but unfortunately, it's a little hard to see how shimmery the background is. Then I lightly sanded the edges of the card.

The Design Adhesives are created in such a way that you can use the entire piece or cut it apart. I chose to cut out and use just one of the words.


Then using Designer Foils, I covered the word. I chose to work with a piece of Foil that I had already used because I wanted to show you that you can reuse the Foil if there are still areas that were not used before. You just need to keep moving the Foil and rubbing until your word is completely covered.


I also cut apart the Cupcake Design Adhesives and used one cupcake as the focal point of my card. I placed it on white cardstock, then covered it with Foil. I then adhered it to a Scalloped Nestability Square.

For the interior of the card, I cut white cardstock 5" x 5" and then scored 1/2" around, then inked the edges with Clearsnap's Honey Mixed Media Inx.

Using a Party Design Adhesive, I placed it in the upper left corner and then embossed it with Gold Embossing Powder. So you can see that the Design Adhesives work with Foils, Embossing Powders and even glitter. How fun is that!


To finish, I wrapped Cappuccino Twine around the center of the card, then added my elements with foam adhesives.

Supplies:
Cardstock: Core-dinations
Scoring Tool: Scor-pal
Ink: Clearsnap
Design Adhesives: Clearsnap
Designer Foils: Clearsnap
Twine: The Twinery

8/24/11

Congratulations

Good morning. I love making cards and using the Papertemptress papers makes every card you create absolutely stunning!!! My card today showcases 4 paper selections and a different shaped card.


I used Poison Ivory as the base of my card, creating a 3 1/2" x 9" card. Since my paper was 11", I scored my cardstock at 9", allowing for a 2" flap. As I wanted a longer flap, I added an extra piece of cardstock on top to create a 4" flap. I then added Canyon Brown to the top flap (inside and out) to cover the joined area. Jellybean Green was cut to fit the inside.

Using Clearsnap adhesives and foils on Neenah Solar White , I created the font panel of my card. I inked the edges then matted the panel to Jellybean Green, Canyon Brown and Poison Ivory . While these layers allowed the panel to pop and provided stability to my card, it did not add much extra bulk or weight.

I used Clearsnap's Congratulations Design Adhesives and gently rubbed them on the cardstock. Peeling away the top layer, I added different colored Clearsnap Designer Foils to create the fun look to the sentiment. It was easy to do and I was able to reuse parts of the Designer Foils that I used in an earlier project - so NO waste!!!

I then used Clearsnap's new Honey Mix'd Media Inx around the edges of my card for some more dimension. Did I tell you I love this new ink!!!!!! And working with the Foils is amazing!!!


Supplies:
Cardstock: the Papertemptress
Ink: Clearsnap Honey Mix'd Media Inkx
Adhesive and Foils: Clearsnap

8/23/11

Blog Hop with Clearsnap & Scor-pal


Welcome to the Clearsnap & Scor-pal Summer Fun Blog Hop 2011!!

Our lovely Design Teams have created some wonderful summer fun projects with the Scor-Pal, brimming with inspiration and of course lots of Clearsnap inks! Visit each Design Team member's blog to see what inspiring projects they have to share. Leave a comment on each blog. We'll choose one winner form all of the comments posted to receive a prize pack from Clearsnap and another from Scor-Pal.

Clearsnap Blog
Scor-Pal Blog
Mary Dawn Quirindongo
Diane Zechman
Sabrina Alery
Gini Cagle
Jean Okimoto
Lisa Andrews
Daniela Dobson
Katie Tate
Charlotte Jenkins
Stephanie Ackerman HERE
Tami Sanders
Robyn Weatherspoon
Tami Mayberry
Jennifer Priest


Today I am sharing with you an Easel Card.


Starting with a piece of cardstock 6" x 12", place across the Scor-pal and score at the 6" mark.


Using the Grand Nestabilities Scalloped Circles (3rd from the smallest), lay on top of the folded card, allowing the top edge to be clear of the cutting edge. This creates the edge that keeps the card as one piece.


Once the card has been cut, open it and place on the Scor-pal again, and score at the 8 3/4" mark.


Fold on this mark and add Scor-tape to the bottom areas as shown. Cut another single layer scallopped circle with the same die. This will be used for the top of the card.


Refold the card and lay flat. Align the single layer on top, matching the scalloped edges. This creates the Easel effect.


To finish my card, I cut 2 circles from light blue cardstock and one smaller circle from white. On the white circle I stamped clouds with Chestnut Roan Fluid Chalk Ink, then lightly sponged Robin's Egg Pigment Ink about the panel. I stamped, colored and cut out my Magnolia images and placed them on this piece. The little fisherman ponders while fishing in the stream. Then I used Chestnut Roan Fluid Chalk Ink around the edge of the panel.


The Magnolia Ink sentiment was stamped with Chestnut Roan, then cut and mounted on blue cardstock. This was added across the center of my card with foam dots. This gives the card it's resting place so that it stands up.


Once I was done, I spritzed Ginger ale Smooch Spritz on the card. It's a little hard to see, but it gives a nice sparkly finish to the card.

Please continue along the hop, stopping at each designer's blog for some great inspiration!


Supplies:
Cardstock: Core-dinations, American Crafts
Scoring Tool: Scor-pal
Inks, Spray Mist: Clearsnap
Stamps: Magnolia, American Crafts
Markers: Copic

8/21/11

Witches

Yum - I've been using the new Stephanie Barnard Inks from Clearsnap. These ink pads are extremely juicy and take to glossy paper really well.


I used Pumpkin Ink and swiped it across my card base, then spritzed it with Gingerale Smooch Spritz.


Since I wanted more dimension, I then ran it through my Cuttlebug machine with Swiss Dots, then lightly inked the raised portions with Licorice Ink. What a great combination!

Then I stamped my image on glossy cardstock with Licorice and embossed it with Black Embossing Powder. I cut the image with a Circle Nestabilities and matted it with cardstock. After wrapping some ribbon around the card, I sewed the image to the left side. A little Pumpkin Smooch was added to the moon in the corner.

Too sweet, don't you think?


Clearsnap Supplies:
Stephanie Barnard Inks - Pumpkin and Licorice
Smooch Spritz - Gingerale
Smooch Ink - Pumpkin

Other Supplies:
Cardstock: American Crafts
Stamp: Art Impressions
Embossing Folder: Cuttlebug Swiss Dots
Die cuts: Spellbinders Nestabilities
Ribbon: Michaels
Other: Sewing machine

8/20/11

You are a Wonderful Friend

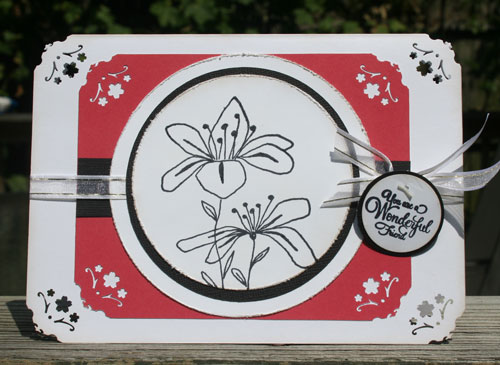
Good morning. There is something so right about creating with black, white and red. I love the color combination. Today's card at Just Imagine Crafts features punch 921, one of my favorites, along with the Circle Cutter, another favorite!

My card is 5" x 6 1/2" and I punched each corner, then lightly inked them. I cut a smaller mat of red to fit inside my punched area and also punched the corners.


I stamped my image on white cardstock and used the Circle Cutter to cut it to the size I wanted. Because the stamp was larger than I needed, I had to cut off part of the image. That is the beauty of using the Circle Cutter - if you need to make the circle smaller after you've cut it, you can, without a problem. I then cut a larger mat from black and another larger white circle. All the edges were distressed and lightly inked. I added a strip of black cardstock and ribbon across the center of the card which was tied into a bow on the right side.

The sentiment was stamped on white cardstock and also cut with the Circle Cutter - you can make any sized circles you need. Then a larger black circle was cut for the mat. The sentiment was added to the bow with a paper tagger.

Enjoy.

8/19/11

Fabulous

I am having so much fun creating with Clearsnap Inks and their Smooch Spritzes. Do you know how easy it is to create the perfect background paper for your projects using Smooch Spritz, Petal Point Inks, stamps and an embossing folder


Clearsnap Supplies:
Other Supplies:
  • Cardstock: Bazzill
  • Stamps: Art Impressions, Hero Arts
  • Die cuts: Spellbinders, Beaded Oval
  • Embossing folder: Provocraft, Cuttlebug
  • Ribbon: Berwick
  • Stickpins
 I first stamped the image and sentiment on white cardstock with black ink.

Next, I spritzed the white cardstock with Smooch Spritz in Cosmic Pink, Gingerale and Pralines & Cream, adding a nice shimmer and shine to the paper. Because I wanted to work with this paper immediately, I heat set it to speed the drying process.


I then embossed the paper with an embossing folder and used Ruby Ink around the edges and across the raised, embossed image. It's easy to ink just the areas you want using this unique style of ink pad because the pad is raised away from the base and the Petal Point allows for more precise control of where the ink is applied.


I cut out the image and inked the edges with the Ruby Petal Point ink and added it to the diecut black oval with foam dots.  The sentiment was also inked, matted with black cardstock and added to the card with foam dots just above the image. Stick pins were added to knot of the ribbon just for fun. I adhered the finished patterned paper to black cardstock, added a ribbon around the card, then placed the embellished die cut oval on top.
    Enjoy ~
     

    8/18/11

    Life in the Fast Lane

    Good morning one of the new products appearing at CHA was Clearsnap's Memory Essential Terrific Tool Tips . Here's a fun way to use the Tips.


    Using the square tip, alternately dab Wisteria and Creamy Brown across white cardstock.


    Using Cat’s Eye Dark Brown, run the ink pad between the patterns created by the other inks.


    Cut the paper to 5"x5" and ink the edges with Dark Brown. Mat onto a piece of lavender cardstock, then mount onto a brown card base.

    This is a look at the final background I created.


    Cut a scalloped shape from a Spellbinders die and adhere to the left side of the card, adding a strip of brown cardstock to finish.

    Stamp the image on white cardstock and color. Cut the image into a rectangle and corner round the edges. Ink the edges with Dark Brown ink, then sponge Creamy Brown around the image.


    Mat with cardstock and adhere to card front.

    Stamp sentiment in Dark Brown and emboss with Pearl Embossing Powder. This provides just a hint of sparkle. Ink edges with Creamy Brown and mat with cardstock. Adhere to card with foam dots.

    I added a rhinestone swirl to the card, but it did not stand out – so, out came my Smooch and I painted each rhinestone.


    Clearsnap Products:

    Inks: Dark Brown ColorBox Fluid Chalk Cat's Eye Inkpad ; Creamy Brown Cat's Eye Fluid Chalk Queue Chocolate and Blueberries
    Wisteria ColorBox Fluid Chalk Cat's Eye Inkpad
    Embossing Powder: Top Boss Pearl Embossing Powder
    Smooch: Smooch Sugarberry

    Other Supplies:

    Cardstock: American Crafts, Stampin Up
    Markers: Copic Markers
    Dies: Spellbinders, Nestabilities
    Stamps: Whiff of Joy, Limited Edition


    8/16/11

    Blog Hop w/Scor-pal & The Twinery


    Today we are excited not only about our very first Scor-pal blog hop but also to be celebrating the first anniversary of our friends at The Twinery. These two teams have joined forces for an amazing line up of projects that will show you the wonderful things you can create using your Scor-pal along with baker’s twine from The Twinery! From boxes and bags to cards and 3D projects the creativity by these two teams is sure to please.

    If you came here by way of Caroline Stender's blog, you are on the right track. If not, make sure you start at the beginning over at The Twinery's blog because there are terrific prizes for those who complete the hop by commenting on each blog. Since The Twinery is celebrating all week, you'll have five days to enjoy this hop, so relax and have fun!

    These are the prizes being given away this week:

    <

    My project uses the Scor-pal to create a background of diamonds for my card and I've used various twines from The Twinery in my buttons and around my card.

    I created the dark blue card base from cardstock and, using my Scor-pal, I scored the cardstock in half. I then cut a slightly smaller piece of cream cardstock and adhered that on top. I cut the light blue cardstock 5" x 5" and, using my Scor-pal, I scored on the angle every 1/4". Once done I flipped the cardstock and scored again, creating a nice diamond pattern for my card.

    I stamped my image using the Justrite By The Sea set and colored it with Copic Markers and Spica pens. Using Nestabilities, I die cut the image and the scalloped ovals, lightly inking the edges with with Clearsnap's Mix'd Media Inx.


    I added Cappuccino Twine around the center of the card, wrapping it twice, then tying it off at the left side. I then used Maraschino Twine to adhere the buttons to the upper left.

    Close up of the scoring and the twine:


    Supplies:
    Cardstock: Core-dinations
    Scoring tool: Scor-pal
    Twine: The Twinery
    Stamps: Justrite Stampers
    Ink: Clearsnap Mix'd Media, Memento Tuxedo Black
    Markers: Copics, Spica
    Buttons: stash

    I'm so glad you stopped by! I hope I've inspired you to give the Scor-pal a try.
    Please make sure you leave a comment on my blog because there are terrific prizes for those who leave comments on each designer's blogs! The deadline for commenting is 11:59pm EST, Friday, August 19th.

    Your next stop on the hop is Angelica Suarez's blog .

    Enjoy.


    8/15/11

    US - Clearsnap Color Challenge

    It's time for another color challenge on the Clearsnap Blog . Using Deep Lagoon, Berrylicious from the "Big Top" ColorBox Fluid Chalk Ink Queue , I created this card.


    I cut the card shape using my Cricut and Gypsy. The design was cut on white cardstock using the Damask cartridge. I then inked the design with Berrylicious, and used Butterscotch on the center. Thinking I'd make an anniversary card, I inked my chipboard letters with Berrylicious and Deep Lagoon, then added Clear Embossing Powder. I added the letters to the center of the card.


    I cut a large circle for the inside and inked the edges with Deep Laggon. I also stamped "Happy Anniversary" in Deep Lagoon as the inside sentiment.


    Supplies:
    Ink: Clearsnap ColorBox Archival Dye Queue Deep Lagoon, Berrylicious, Butterscotch
    Embossing Powder: Clear Top Boss Embossing Powder
    Cardstock: Bazzill
    Stamps: The Stamps of Life
    Die cuts: Cricut Expression, Gypsy
    Cartridge: Damask
    Chipboard: Basic Grey

    Enjoy.

    8/13/11

    Class of 2011

    I just love these photos of my friend's granddaughter.

    Using Kreaxions Punch 918 , I took the negative portion for this layout. I love that these punches allow you to be able to use all parts of the punched pieces. I punched two strips long enough strip to fit my page, then stitched them to my layout.


    Supplies:
    Cardstock: Bazzill
    Pattern paper: MyMindsEye
    Punch: Kreaxions
    Thickers: American Crafts
    Brads: Creative Impressions
    Quotes: Unknown

    8/12/11

    Trick or Treat

    Did you know that using the Colorbox Multi-Color Ink Pads with glossy paper can really add quite a bit of pizzazz to your creations? I used the Spooktacular Ink set on thess card, then used the Jumbo Rollagraph Stamp Wheel Wordwords to add additional depth.

    I first swiped the inkpad down my paper, then allowed a little time for it to dry. Once dry, I turned the paper 90 degrees and swiped the ink pad again. This allowed the inks to cross each other. Once dry, I used the Jumbo Rollagraph Stamp Wheel Wordwords with Wicked Black Ink and covered my paper.


    I cut the paper to size and matted with some coordinating orange cardstock. I cut the witches hat from black cardstock, then embossed the spider with Clear Embossing Powder to give it a shiny look and added some Carrot Smooch to the hat's buckle.

    I stamped Trick or Treat in Wicked Black Ink , matted it with orange and black cardstock, then it added to the card front with a black brad.

    Since I had a lot of left overs, I decided to create a square card. I cut the stamped paper into 2" squares and matted them with orange and black cardstock. Using Wicked Black Ink , I stamped spider webs in the corners of each square before mounting them to the card base. I also stamped Trick or Treat for the center square, adding it to the front with foam dots.


    Supplies:

    Cardstock: Bazzill, Core-dinations
    Inks: Clearsnap
    Stamps: The Stamps of Life
    Rollagraph: Clearsnap
    Brad: Creating Keepsakes
    Die cuts: Cricut Expression

    8/9/11

    Enjoy the Little Things

    I have a card up on the Papertemptress blog today. If you haven't checked out the papers in the store, you must. They are absolutely absolutely amazing!!!!!

    Using Gold Sparkle as my card base, I created a 5 1/4" x 5 1/4" square card. I then used Mint which I embossed with a Cuttlebug embossing folder. I love how it holds the dimension.


    I stamped my Flowersoft Image on Neenah Solar White and colored it with my Copic Markers. I then cut the image into a circular shape with my Nestabilities and added another Nestabilities as the base.

    Thanks for looking and don't forget to check out the blog.


    Supplies:
    Cardstock: Papertemptress
    Stamp: Flowersoft
    Markers: Copics
    Dies: Spellbinders, Nestabilities.
    Embossing: Cuttlebug

    8/8/11

    Nature Boys

    This is my new post on the Scrappin Stuff Blog . Loved working with Imaginisce this month.


    Directions:
    Use brown cardstock for the base of the layout
    Cut striped pattern paper 11” x 11” and adhere to cardstock base
    Cut Gone Fishing paper 3” x 12” and mat with red cardstock
    Using the 1” cut off from the striped paper, flip it and mat with green cardstock, then adhere this across the center of the Gone Fishing paper
    Adhere to center of base
    Mat 2 photos with green cardstock and adhere as shown

    Die cut “Nature Boys” from the Tree Hugger paper and mat with green cardstock

    Add to right side of layout

    Die cut date and add to lower left corner


    Supplies:
    Cardstock: Bazzill
    Pattern paper: Imaginisce
    Die cuts: Cricut Expression


    8/7/11

    Hello

    I've had fun playing with the new Mix'd Media Inks by Clearsnap. They really are amazing and fun to work with. I inked the dress with Chiffon, then masked and inked the remainder with Black. Then I added Pearl embossing powder for a subtle effect. The sentiment was stamped with Stephanie Barnard's Licorice Ink and embossed with black embossing powder.


    I used a Spellbinders frame and inked it with the Mix'd Media Chiffon Ink for a subtle shading. A little bling finished it off. Check out these items at Clearsnap.com .


    Supplies:
    Cardstock: American Crafts
    Pattern paper: Frances Meyers
    Inks: Clearsnap Mix'd Media Black and Chiffon
    Stephanie Barnard Licorice Ink
    Embossing Powder: Clearsnap Black and Pearl
    Stamp: Art Impression, Inkadinkadoo
    Dies: Spellbinders
    Pearls: Want2scrap

    8/6/11

    One Crazy Stamper 2

    This is my second post as the Guest Designer at One Crazy Stamper this month. I am very excited and I used this lovely stamp from Whiff of Joy. Isn't this stamp just precious? I colored her with Copic Markers. The sentiment is from Justrite Stampers.


    Be sure to check out One Crazy Stamper and see all the fun products that are available.


    Supplies:
    Cardstock: American Crafts
    Pattern paper: Stash
    Stamp: Whiff of Joy
    Ink: Memento
    Markers: Copic Markers
    Ribbon: Offray

    Good Times

    I love sending greetings to friends for no particular reason and today's blog post at Just Imagine Crafts is showcasing this card.

    I used punch #909 without the inserts to create a border along the bottom of my card. A small strip of cardstock above the border helps anchor it in place and highlights it. A sentiment, some bling, some flowers and ink and you've got a card anyone would love.


    Supplies:
    Punch: Kreaxions
    Cardstock: Bazzill
    Pattern paper: K&Co.
    Stamps: Justrite Stampers
    Ink: Clearsnap, Chocolate Roan
    Bling: Want2scrap

    8/4/11

    Shopping Therapy

    If you are looking for some really fun new inks to play with, look no further than the new Donna Salavar Mix'd Media Inks and the new Stephanie Barnard Inks by Clearsnap. The Mix'd Media Inks come in 8 beautiful colors and the Stephanie Barnard inks come in 10 beautiful colors.

    I stamped the image with Mix'd Media Black Ink and heat set with Black Embossing Powder which provided a really nice raised and shiny effect. The longer drying time on the Mix'd Media Inks allows you ample opportunities to decide how to proceed once you have stamped the image. I then die cut the image with a Circle Nestabilities and used Stephanie Barnard's Guava ink and a dauber to add ink around the image. These inks dry faster and allowed me to add just the right amount of color around my image.

    Loving these new inks. You have to check them out!


    I added a little Smooch to the flower in her hair and then assembled my card.


    Supplies:
    Cardstock: American Crafts, Stampin Up
    Pattern paper: SandyLion
    Ink: Clearsnap Mix'd Media Black, Stephanie Barnard Guava
    Smooch Siren, Snickerdoodle
    Stamp: Art Impressions
    Dies: Nestabilities
    Other: Sewing Machine

    8/2/11

    Shaped Card

    Good morning. I decided to use this beautiful Grape Popsicle paper from thePapertemptress as the base of my card and cut it with my Spellbinders Nestabilities for a different shaped card. I embossed the top layer with my Cuttlebug Embossing Folder. To frame my Magnolia image which I colored with Copic Markers, I cut another shape from White Pearl Linen and added a small piece of Gold Sparkle as her seat.


    The addition of a flower finishes her off beautifully.

    Be sure to check out thePapertemptress for all your paper needs - she has some beautiful papers in stock and shipping now.

    Supplies:
    Cardstock: thePapertemptress.com
    Stamp: Magnolia
    Ink: Memento
    Markers: Copic
    Dies: Spellbinders, Nestabilities

    8/1/11

    One Crazy Stamper

    I am thrilled to have been selected to be a Guest Designer at One Crazy Stamper this month.

    The challenge was to create a Fun in the Sun project. Perfect theme for these hot summer days, so I pulled out my stamps and created this card:


    Tip:
    The tag I used behind my image was not big enough to fit, so I cut it in half and realigned the pieces behind my image.

    Supplies:
    Cardstock: Bazzill
    Pattern paper: Stampin Up
    Stamps: Justrite Stampers, Great Impressions
    Ink: Memento
    Markers: Copic, Spica
    Die cuts: Spellbinders, Nestabilities

    Check out all the wonderful items the this store has in stock.