Showing posts with label rubber dance. Show all posts

11/26/17

Rubber Dance - Hummingbird

I'm on the Topflight blog showcasing stamps from a Norwegian Company - Rubber Dance.  I'm using the Hummingbird Stamp.  


I stamped the hummingbird stamp and phrase in pink and brown inks to coordinate with my background.  The hummingbird was die cut and matted with cardstock then added to the card.  After wrapping the card with twine, I added the phrase on top with foam adhesives.


Thanks for stopping.

Steph

10/24/17

Love and Friendship

Hi everyone, I'm on the Topflight blog today with a friendship card using stamps from Rubber Dance.

I've been sewing since I was a child and this So Sweet stamp set is so much fun.  I began by creating a card from pink cardstock and tying Whisker Graphics twine around the card.

 
Then I stamped the pattern randomly about white cardstock.


Next, I inked the panel with varying shades of brown inks to give the panel a vintage look.  For a more vintage appeal, I frayed the edges and matted the panel with brown cardstock.


I stamped the ruler and place it across a large oval and then fussy cut the dress makers dummy, placing it on top with foam adhesives.  The phrase was then added.

 
Thanks for stopping by.
 
 
Steph


10/17/17

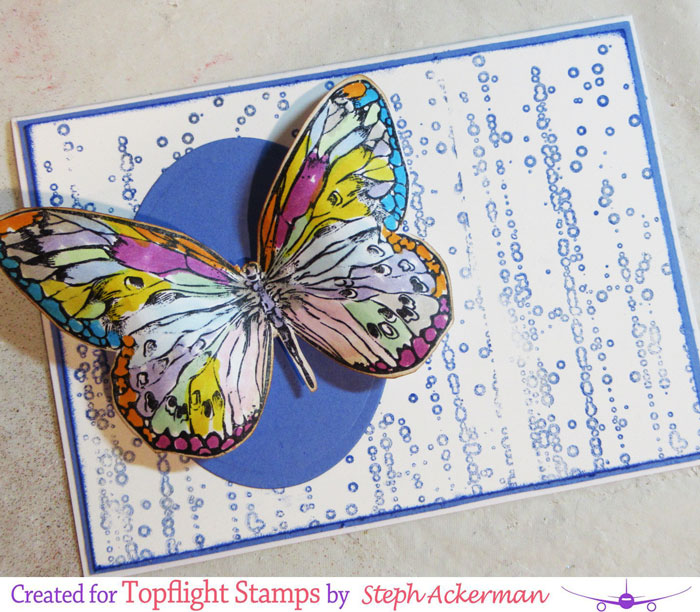
Dream.......

I'm on the Topflight Blog today creating with stamps from Studio Light, Rubber Dance Art Studio and IndigoBlu.


I stamped the  Studio Light butterfly  and colored with assorted colors of Copic Markers before fussy cutting it.


The Rain Droplets background  was stamped in blue ink on white cardstock and then matted with blue cardstock.


A die cut oval was added to the card and the butterfly was added on top.


The Rubber Dance Affirmations stamp set phrase was tucked in just under the butterfly.


Thanks for stopping by.

Steph


8/29/17

Believe in Butterflies

I'm on the Topflight Blog today creating with stamps from Studio Light and Rubber Dance Art Studio.


I wanted the butterfly to be 3 dimensional, so I first stamped it on cardstock and colored it with Copic Markers.  I then stamped and colored a second butterfly, fussy cut it and adhered just the body in place.


I created a black card, then added a panel of purple dots to coordinate with the butterflies.    Believe was stamped on white cardstock, matted with black cardstock and added to the card.

Thanks for stopping by.

Steph

4/20/17

Sew Sweet Card with Rinea Foils

Hi everyone, I am participating in the Designer Crafts Connection blog hop this month.  And this month we are working with Rinea Foils.  Rinea Foil is made up of a thin sheet of paper sandwiched between two layers of thin aluminum foil - the paper gives it sturdiness and stiffness while the foil gives it the shininess and the malleability to maintain the shape however you bend or fold it.

I know I've said it before, but these foils are absolutely amazing!  Check out all those gorgeous colors!


No automatic alt text available.

If you haven't worked with Rinea Foils, I've got an amazing card to share with you. 


Rinea Foils die cut beautifully and easily no matter the size or intricacy of the dies.  I paired some fun stamps from Rubber Dance - Sew Sweet, with a collection of Spellbinders dies - All Stitched Up.


I created the background for my card using the stamps from the Sew Sweet set.  I wanted to create a pattern effect by randomly stamping the images.  I lightly inked the panel and matted it with black cardstock before adding it to the card.


Next, I used assorted foils, both embossed and glossy, to die cut all the elements for my card.  How fun that all these elements came together effortlessly.  I even die cut 2 pairs of scissors and placed them to appear as if they were open and ready to cut the pattern.

I wanted all the sewing elements to pop, so I placed them atop a black cardstock oval, then adhered them to a large oval die cut from Embossed Violet Foil.


The sentiment was added at the end with foam adhesives for dimension.

What do you think?

Please stop by the  Designer Crafts Connection blog to see an assortment projects using Rinea Foils.

Steph


7/1/16

Proxxon Shadowbox


Hi everyone, I've got a new post on the Proxxon blog today.


Please stop by the blog for the complete details.
 
Thanks for stopping by.
 
Steph
 

5/18/16

Honey Bee Stamps Design Team 2016 Entry

Honey Bee Stamps is having a Design Team call.  I love stamps and the wide range of projects that use stamps.  They have some amazing stamps in the store and I can see myself creating a wide variety of projects.

These are some of my favorite stamped projects:

Wish card with stamps, inks, paint, stencils:


Bloom canvas with stamps, inks, stencils, paint


Crabby card with chipboard, stamps, inks, paint


ATCs with Gelatos, stamps, ink


Butterfly card with embossing folder, dies, stamps, inks, paints


Thanks for stopping by today.

Steph

2/12/16

Join our Combined Blog Hop!


Hello Crafters! We're excited to welcome you to the very first joint blog hop with EyeConnect Crafts and Rubber Dance Stamps!

Erin Sparler of EyeConnect Crafts (USA) and Bibi Lindahl of Rubber Dance Stamps (Norway) met online in the fall of 2015. They quickly hit it off and discovered that they had a LOT in common, or as Erin so eloquently put it: There is no word for old friends who have just met!  
 
The Design Teams have been generously supplied with chipboards from EyeConnect Crafts and rubber stamps from Rubber Dance Stamps and we are all thrilled to show you the results with this joint Blog Hop. 

What's in it for you?
Glad you asked!
One lucky winner will receive a Gift Certificate worth $25 from BOTH EyeConnect Crafts AND Rubber Dance to spend on their websites!
Another lucky winner will receive a surprise gift from BOTH 
Erin and Bibi, with $25 worth of products from their two companies!

What do you have to do?
Not much!
1) Visit all the blog posts in the hop and leave a comment.
2) Become a follower of the EyeConnect Crafts and Rubber Dance Stamps blogs. 
That's it! And who knows... maybe YOU will tie new bonds of friendships across the globe, too! :-) 

You have until Valentine's Day, Sunday the 14th at midnight EST (New York time), which is 6 am Monday 15th for those of you on Central European Time (Amsterdam, Berlin, Oslo),  and 5 am if you live in the UK. You can find a time converter here.
Winners will be announced 18th February. 

Enjoy the hop and good luck!


For my project, I've used EyeConnect Craft's Totem Peacock.  Because the male is more colorful than the female, I chose to create a male peacock.


I first painted the chipboard pieces with Gesso.   Gessoing first really allows the colors you use to pop.  Once dry, I used assorted colors of ColorBox Chalk Inks then assembled the peacock with Assorted Browns Mini Brads also from EyeConnect Crafts.


And this peacock really thinks he's sexy, hence the sentiment from Rubber Dance Art Stamps - Sarcastic Superpower - which is a fun and somewhat snarky collection of red rubber stamps.
 

The background was embossed with a Cuttlebug embossing folder then lightly inked for definition.  My peacock was mounted on two large ovals of white and kraft and the sentiment was slipped between the feathers.


Isn't he just adorable!


Please stop by everyone's blog to see what they've created today.


1. Erin, owner of EyeConnect Crafts
2. Susan
3. Lilian
4. Anita
5. Irit
5. Steph   you are here
6. Majo
7. Kim
8. Kristiina
9. Gail
10. Susanne
11. Bibi, owner of Rubber Dance Stamps
 
Challenge!
You may have noticed that the blog hop projects all use the colours from this months Rubber Dance Challenge, Kraft, White and Red. Play along for another chance to win Rubber Dance Stamps, this is the post you need to read (link opens in a new tab).

Thanks for stopping by my blog. I hope you will leave a comment and follow me! 

Steph


12/21/15

Quick and Easy Christmas Projects - Day 8

Hi everyone, it's day 8 of my 10 days of quick and easy Christmas projects.

Today is time for tags.  I love adding tags to my gifts and they don't take long to make.


Cut a tag to the desired size.  Cut cardstock and pattern paper to fit.

 
Die cut the Victorian Lamp post from black cardstock and adhere to the tag.
Stamp Joy in white ink on the post.
Add a pointsettia to the corner.


Ink the edges of the tags and add ribbon.
Now just add to the packages.

If you missed my previous posts, you can find them here: 

Quick and Easy Christmas Projects - Day 1
Quick and Easy Christmas Projects - Day 2
Quick and Easy Christmas Projects - Day 3
Quick and Easy Christmas Projects - Day 4
Quick and Easy Christmas Projects - Day 5
Quick and Easy Christmas Projects - Day 6
Quick and Easy Christmas Projects - Day 7


Thanks for stopping by today.

Steph

11/3/15

Cozy Christmas Card

Hi everyone, check out my newest video using EyeConnect Crafts chipboard elements and Rubber Dance Art Stamps to create this fun Cozy Christmas card.


The Lace Up Flags were perfect to support the pointsettias stamps.
 
 
Please check out my video.


Please leave me a comment.  I'd love to know what you think.

Thanks for stopping by today.

Steph

6/19/15

Beach themed card with Makin's Clay

Hi everyone, it's finally summer.  After the long cold winter we've had, it's awesome to feel the sun on my face.

I created lots of fun seashells using Makin's Clay clay and tools.  Earlier this month I created a canvas for the Makin's Clay blog and, since I had lots of left over elements, I decided to use them to create a card.


I found this watery paper in my stash and decided to use it as my card base.  I used gesso to add mesh to the left side of my card and added the Makin's Clay shells on top.  The sentiment is from Rubber Dance Art Stamps and was perfect to use for this beach themed card.


Since I knew the card would need to be hand delivered because of the dimension, I also created a coordinating envelope.  Using Rubber Dance Art Stamps, I randomly stamped around the envelope and added an address panel in the center.  I again added mesh to the left corner with gesso and placed a fish and several more shells on top. 

 
Perfect for hand delivering to the recipient. 

 
What will you create with Makin's Clay today?
 
Thanks for stopping by today.
 
Steph
 

5/20/15

Mixed Media Canvas

Hi everyone, my first post is up on the Earth Safe Finishes blog.


Please stop by the Earth Safe Finishes blog for the details on how I created this canvas.

Steph


3/22/15

Sea Shell Jar

Today was a lazy day.  I had lots of time in my studio playing with a variety of products and creating all kinds of things.  As I worked on one project, another came to mind and I started that, then another came to mind and I started that, so........ I have lots of projects in my studio in some stage of completion.

But this is one project I did complete because I was so excited to see how it would turn out. 


As I am sure you know, I love stamping and embossing.  I picked up this funky bottle and wanted to see how etchall dip 'n etch would work with my stamps.

Using a beach themed stamp from Rubber Dance Art Stamps, I inked it with ColorBox Twinkle Watermark Ink and stamped it directly on the bottle.


Next, I poured ColorBox Clear Embossing Powder on top and heat set.


Check out the beach scene on the bottle. 
Allow the bottle to cool completely before moving onto the next step.


Next, place the bottle in the etchall dip 'n etch and allow it to sit for 15 minutes.   Rinse the bottle and rub off the embossing powder using a baby wipe and your nails (gently).  Isn't it amazing?
 
 
I filled the jar with sea shells, added a stamped sentiment about the beach and tied it to the bottle neck.
 

I love how this turned out.  Next time, I think I'll fill it with sand because it's a little hard to see the design with the shells inside.

But what do you think?  I am having so much fun with stamping and embossing and etchall products.

Steph


1/3/15

It's Cold Outside

Hi everyone.  I think winter is finally hitting New York.  Today has seen the weather change from overcast to rain to snow showers.

Today's card uses some new stamps from the Rubber Dance.  This Winter Wonderland stamp set includes snowflake stamps and many winter sentiments.


The chipboard snowman was painted with Art Anthology's rough paste.  After inking his gloves and hat with red ink, I stamped snowflakes on his hat.


And I believe the sentiment says it all.  It was stamped in blue ink and matted with red cardstock before adding to the card.

Pop over to the store to see these stamps as well as all the fun stamps available.

Thanks for stopping by today.

Steph

12/18/14

A little birdie told me.......

Hi everyone, a little birdie told me something special.

I've used on of the birds from the  Vintage Birds stamp set along with I Love Leaves, a fun collection of assorted leaves in assorted shapes and sizes.


The background is the full plate of leaves stamped on white cardstock in shades of orange and brown.  The bird was stamped in orange then fussy cut and placed atop 2 die cut labels and the sentiment placed just beneath.


To see more of the stamps available, visit the Rubber Dance store.
 
For more inspiration, please visit the Rubber Dance blog.

Supplies:
Stamps:  Rubber Dance
Ink:  Clearsnap
Embossing:  Cuttlebug
Dies:  Spellbinders
 
 
Thanks for stopping by today.
 
Steph