9/17/19

Sparkle Cards

Hi everyone, I'm on the Clear Scraps blog using the new 4x6 stencil - Sparkle.  This stencil is the perfect size for cards so I've used it to take center stage.


Using Rinea Foiled Papers in Ruby/Gold Glossy Foiled Paper and Emerald/Gold Glossy Foiled Paper, I taped the stencil in place.  Using a spackle knife and modeling paste, I covered the stencil.


I removed the stencil immediately so I could create a second card.  Don't they look amazing?


Putting aside the panels to dry overnight, I created my cards.  I used some papers from my stash and added ribbon across the center.


The panels were matted with cardstock then added to the cards with foam adhesives for dimension.


Don't they look wonderful?  No embellishments needed.

Thanks for stopping by.

Steph

9/14/19

Longing to See You

Hi everyone, I've got another project for Dies R Us.   


Using the main die, die cut the center of the card.


Die cut


Stamp line of trees.


Mat with larger die and ink


Die cut the tree toppers and add.  Stamp and punch sentiment, adding it to the right side.


Stamp giraffe and color with Copic Markers.  Die cut and add to card front.


Please stop by the Dies R Us Store to see all the dies that are available!

Thanks for stopping by.

Steph


9/12/19

Happy Fall with Rinea and Joy Clair

Hi everyone, I'm on the Rinea blog with 2 different fall cards today.


Using Lawn Fawn dies, die cut Marigold/Gold Glossy Foiled Paper.  Using the Joy Clair Fall Leaves stamp set, stamp assorted leaves with Staz On Pigment Ink in Chocolate Brown.


Using the Poppy Stamps Botanica Frame, die cut Mocha/Mocha Starstruck Foiled Paper.


Add the die cut panel to a green card.  Place the Marigold/Gold Glossy Foiled Paper panel on top.


Add a strip of burlap across the center, placing a strip of Marigold across it's center, then wrap with twine.   Stamp the phrase on Marigold and die cut.  Mat it with a larger Mocha die cut and add to card with foam adhesives.


Finish by placing assorted dew drops about the card.


Using the same stamp set, I created a second card using Ruby/Gold Glossy Foiled Paper.


The leaves were stamped on Ruby/Gold  with StazOn Shamrock Green and the veins were stamped on top with StazOn Chocolate Brown.


Add a strip of burlap across the center of the card, placing a strip of Ruby/Gold across it's center, then wrap with twine.   Stamp the phrase on Ruby Starstruck with StazOn Piano Black Ink and die cut.  Mat it with a larger Mocha die cut and add to card with foam adhesives.


Add assorted dew drops about the card.

Does it feel like fall yet?

Thanks for stopping by.

Steph


Lavinia World Challenge #9

Hi everyone, it's time for the next challenge at Lavinia World Challenges.  Please check it out and join in the fun.


Today I'm using the same elements to create 2 different cards.


Create cards from green cardstock.  Cut striped papers slightly smaller and mat with light green cardstock.  Add to the cards.  Die cut headers from dark green cardstock and adhere to the cards.


On a smaller panel of green, stamp the Mini Berries several times  in green ink and the Toadstool Miniatures in brown ink.  Stamp the  Fairy Couple  in black ink and die cut them.  Then add them to the small panel.  Adhere this panel to the card.  Stamp Dreams from the Never Let Go stamp and add to card with foam adhesives for dimension.


Stamp Moon Fairy in black ink on white cardstock.  Die cut and mat with green cardstock.  Add to card.  Add Diamond Stickles to the Fairy wings and Gold Stickles to the moon.


Stamp Dreams from the Never Let Go stamp and add to card with foam adhesives for dimension.


Would love to see what you create for Challenge #9.  The winner of the challenge will receive a $15 gift certificate to Lavinia World to shop for more goodies.   Remember there is a new challenge every other Thursday.  Can't wait to see what you create.


Thanks for stopping by.


9/11/19

New York Wandering

Hi everyone, Just For Fun Rubber Stamps has disbanded the design team, but I still have projects to share. 


Today we are remembering that terrible day in history -  September 11, 2001.


I inked the stamps with assorted inks, then fussy cut them.


The tags were then matted with 2 colors of cardstock which were also fussy cut.  Twine was placed in the holes.


Creating a card from dotted cardstock, I added a torn strip of red cardstock across the card.  Then I added the tag to the card with foam adheisves for dimension.    The phrase was stamped, matted with 2 layers of cardstock and added to the tag.

Thanks for stopping by.

Steph


9/10/19

Mixed Media Cards

Hi everyone, I'm on the Clear Scraps blog with a set of mixed media cards.


Last month, I created a mixed media project using the 6" Shiplap and 6" Wood Grain stencils.  Rather than clean the stencils immediately, I turned them over and rubbed the excess modeling paste onto cardstock releasing the remaining modeling paste.  Then I cleaned the stencils.


I cut the panels into 5 1/2" squares then added color with spray inks.  After spraying each color I heat set the color before spraying the next color.


Once I liked the colors, the panels were matted with white cardstock and wrapped with white ribbon before being added to the cards.


Using Spellbinders dies, I die cut cardstock elements for the card.  


Joy Clair stamps were used for the center of the card.


The elements were added to the card with foam adhesives.  


Congratulations was added to the ribbon on each card with a paper tagger.


Thanks for stopping by.

Steph


9/7/19

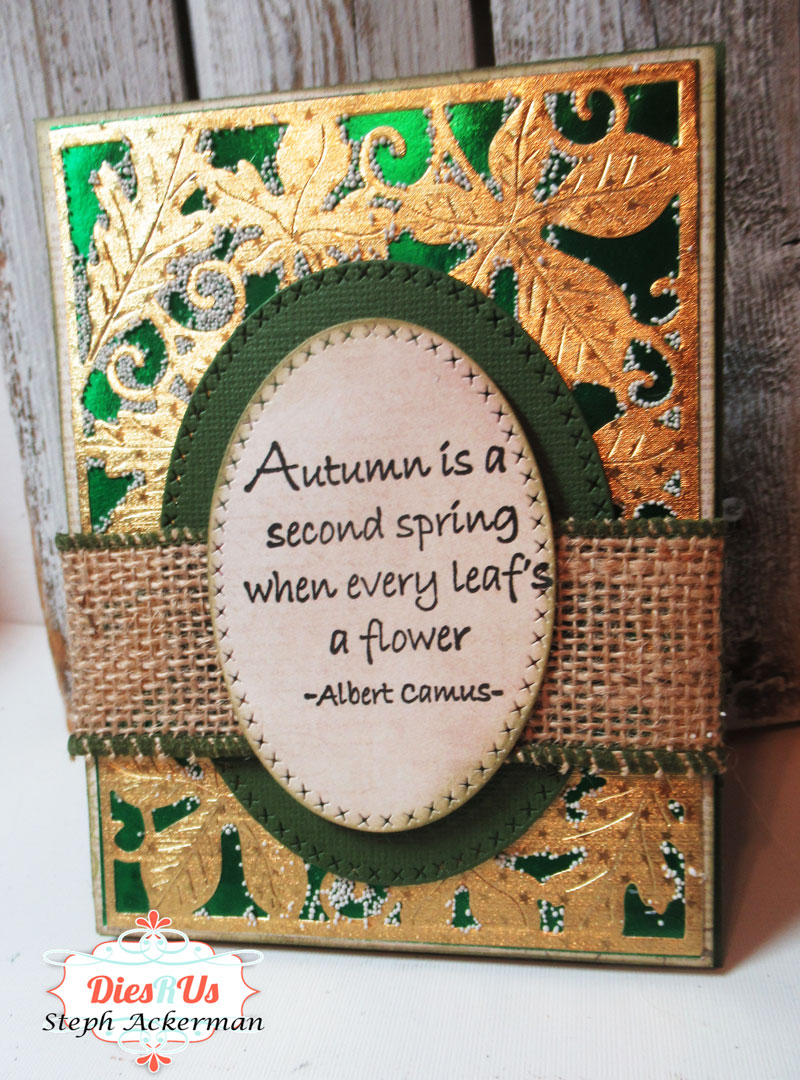
Autumn Card

Hi everyone, I've got another project for Dies R Us.   I've created a Fall card.

Fall is in the air and the Tutti Designs Leaves Background is a lovely die that can be used for fall creations.


I die cut Rinea foiled paper to create a delicate background.


The gold panel was then matted with a green panel using the Best Glue Ever.


Since I was a little too liberal with the adhesive, I added art stones to the panel.  The panel was then wrapped with burlap ribbon.


Die cutting 2 graduating sizes of oval dies, I stamped the autumn phrase with black ink.


Then I added the panel to a green card with foam adhesives for dimension.


Please stop by the Dies R Us Store to see all the dies that are available!

Thanks for stopping by.

Steph


9/5/19

Winter Purse and Notecard set

Hi everyone, my newest project for the Rubber Buggy is this cute winter purse and note card set.   Please visit the Rubber Buggy Store for all the fun products I've used today.


This project is not as difficult as you might think.  It consists of 4 main pieces that, when assembled, create this fun gift purse.

Cut 2 pieces of Lawn Fawn white cardstock 5 1/2" x 7".  Taper the panels by cutting 1/2" off both edges gradually ending in a point.

Cut pattern paper 5 1/4" x 6 3/4".  I used Maja Designs - Wrapped in Old Newspaper and Vintage Summer Basics 1903.  Create the same angle.


Ink all edges with Vintage Photo Distress Ink.


Cut a 3rd panel 5" x 6 1/2".  I used Maja Design - On Christmas Morning.  Create the same angle, then adhere to the outside panels.


To create the pockets, cut 2 pieces of cardstock 3 1/2" x 8".
Score the short edge at 1/2" and 1".
Score the long edge at 1/2", 1", 7", and 7 1/2".


Cut along the score lines as shown.  Ink edges with Vintage Photo Distress Ink.  Fold to create the pockets.  The pockets will have a 3d effect so you can slide cards in each one.


Add a strip of pattern paper across each pocket.  I used scraps of Maja Design papers.
To assemble the purse, cut a strip of white cardstock 1" x 6" and score in half lengthwise.
Add Scor-Tape to each side of the score line and fold in half.
Place the pockets on the 1" strip, on each side of the score line.


Add score tape along the edges of the pockets and adhere to the purse panels.


Create cards from the left over scraps of Maja papers.  Use Lawn Fawn Rectangle Dies to die cut panels for one of the card.  Use Lawn Fawn Marry Christmas die for the other card.  Add Raspberry Liquid Pearls to create berries on the first card.


Slip the cards into each pocket.


To finish the purse, cut 2 strips, each 1/2" x 12" for the handles.  
Cut 4 flaps, each 1" x 1 1/4".
Adhere the handles approximately 1/2" from each edge and add the flaps on top. 
Add brads for a finished look.
For the flap, cut cardstock 2" x 6" and score at 2 1/2" and 3 1/2".
Adhere to the back of the purse, and place a Velcro dot on the front.


A look at the back side of the purse.


This is definitely a fun project to create.  I can see creating them in a variety of styles for lots of occasions, such as birthdays, Christmas, teacher gifts, etc.


Thanks for stopping by.

Steph