Just posting a recent card I created, based on a sketch by CPS.
Using some gorgeous papers from Papertemptress along with my Scor-Pal, I created the card base (3 1/2" x 9"). Clearsnap has some amazing tools and inks, so using Stephanie Barnard's Tangerine Ink and the Butterfly Garden Rollagraph Wheel, I stamped the butterfly pattern on cardstock and then embossed it with Clearsnap Clear Embossing Powder.
To create the 3 panels, I cut apart the design and matted each piece on orange cardstock. A small strip of brown cardstock was placed on the card and wrapped with twine, then the 3 panels were added with foam adhesives.
Don't always take your stamps at face value - change them up a bit - you never know what you'll create!!
Clearsnap Supplies:
Ink: Stephanie Barnard Tangerine
Embossing Powder: Clear
Rollagraph: Butterfly Garden
Other Supplies:
Scoring Tool: Scor-Pal
Cardstock: Papertemptress
Twine: Mandorin, The Twinery
9/28/11
9/25/11
Butterflies
If you've noticed a pattern lately, I just can't seem to get enough butterflies!!!!And today's post is no exception!!
Kreaxions punches can create some wonderful projects and if you have tons of scraps like I do, it's so easy to use these punches to create border strips. So just dig out your scraps and punch away.
I used punch #907 and punched a number of strips. I layered them on my backgound piece so the punched pieces would almost appear to be a quilt-like design. I sewed around the edges to keep all the layers in place.
The butterfly was then cut and embossed with a Cuttlebug embossing folder and added to the card with foam adhesives. A trail of rhinestones completes the card.
Supplies:
Cardstock: Bazzill, Crate Paper, DCWV, K&Co
Ink: Clearsnap
Punch, Die: Kreaxions
Rhinestones: Want2scrap
9/23/11
Butterflies
Here's another fun card using the vast array of Papertemptress’ papers. Did you know that you can stamp, ink, and emboss with these papers and do such a wide variety of projects?
Using Eclipse Black and Double Duty Pink, along with my Scor-Pal, I created a Z-Fold card. The card measures 5 1/2″ x 11″, but the top panel has been scored, then folded to create the Z-Fold. The Scor-Pal makes scoring and folding so much easier, especially when you are working with a heavier cardstock as I am here.
I embossed the 2 smaller pink panels with a Cuttlebug embossing folder, then I lightly inked the edges with some Clearsnap Ink before adhering. On the larger panel, I stamped flowers from Justrite Stampers around the panel, then “painted” the petals with some Clearsnap Smooch Ink.
The labels were die cut with Spellbinder Nestabilities dies from both pieces of cardstock. The edges of the pink layer were again inked with Clearsnap Ink.
The butterfly is a Sizzix die that was cut from scoreboard, inked and embossed. The inner most layer of the butterfly was seperately inked, embossed and placed between the layers. I added some dimension adhesives to give the butterfly some height.
Supplies:
Cardstock: Papertemptress
Ink: Clearsnap
Embossing: Cuttlebug
Stamps: Justrite Stampers
Die and matboard: Sizzix
Labels:
clearsnap,
papertemptress,
sizzix,
spellbinders
9/22/11
Scor-Pal and Glue Arts
September is well under way and we are heading into Fall and that means Halloween isn't too far behind. This week, Scor-Pal and Glue Arts are hosting a blog hop and each DT member is creating amazing projects with their Scor-Pal and Glue Arts Adhesives.
Check out today's Scor-pal post for my spooky house card.
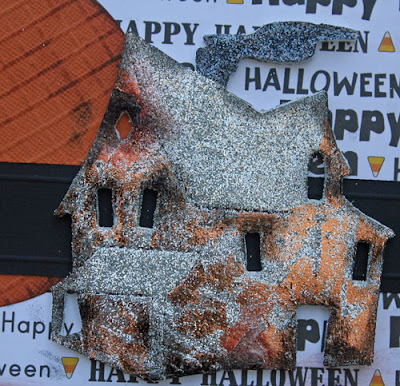
I chose to create this Halloween card. The UCutIt Foam Adhesive is amazing!!! It cuts like a dream and, as you can see, it can be used in a die cut machine.
Directions:
Die cut the Haunted House using a Sizzix die and the UCutIt Foam (save the little pieces for use on another project).
Gently pulling up the top layer, add Charcoal Glitter to the smoke and Silver Lining Glitter to the roofs.
Now add Clearsnap's Lucky Penny Foil to the remainder of the house.
In some spots, the Foil pulled away parts of the Foam, so I inked over those spots with Clearsnap's Black Mix'd Media Inx for a grungey look.
Die cut the "moon" from orange cardstock and score every 1/4".
Ink the embossed areas with Black Mix'd Media Inx.
Cut a 1" strip of cardstock to fit across the card front, then score along the top and bottom edges.
Add a metal tag with ribbon and twine using Glue Arts Adhesive Squares under the metal tag.
Supplies:
Scoring Tool: Scor-Pal
Adhesive: Glue Arts
Cardstock: Bazzil
Pattern paper, ribbon: Making Memories
Die Cut: Sizzix
Ink: Clearsnap Black Mix'd Media Inx
Foils: Clearsnap Lucky Penny Foil
Glitter: Clearsnap Charcoal and Silver Lining Glitter
Twine: The Twinery
Metal Tag: Miss Elizabeth
Check out today's Scor-pal post for my spooky house card.
I chose to create this Halloween card. The UCutIt Foam Adhesive is amazing!!! It cuts like a dream and, as you can see, it can be used in a die cut machine.
Directions:
Supplies:
Scoring Tool: Scor-Pal
Adhesive: Glue Arts
Cardstock: Bazzil
Pattern paper, ribbon: Making Memories
Die Cut: Sizzix
Ink: Clearsnap Black Mix'd Media Inx
Foils: Clearsnap Lucky Penny Foil
Glitter: Clearsnap Charcoal and Silver Lining Glitter
Twine: The Twinery
Metal Tag: Miss Elizabeth
Wee Henrietta Witch
Hambo Stamps had a DT call recently and I was given this Witchy image to work with as part of my application. Isn't she just the cutest?
I chose to color her with Copic Markers in traditional Halloween colors. Then I purposely die cut her off center so I would have room for brads and a sentiment. I lightly inked the outer edges of the die cuts with Clearsnap's Honey Mix'd Media Inx.
The background paper is by GCD and I chose to emboss it with my Cuttlebug Swiss Dots Embossing Folder. I then lightly inked the embossed areas with Clearsnap's Honey Mix'd Media Inx (love this stuff!).
Supplies:
Cardstock: Bazzill
Pattern paper: GCD
Stamps: Hambo, Hero Arts
Die cuts: Spellbinders, Nestabilities
Ink: Clearsnap
Markers: Copic Markers
Brads: Making Memories
Labels:
clearsnap,
copics,
hambo stamps,
spellbinders
9/19/11
You....
Today was a playful, whimsical day and this card was the result. It has has tons of Graphic 45, Clearsnap Inks and Spellbinders Nestabilities.
Justrite Stamps was the perfect sentiment and fit perfectly in the label die.
I used Clearsnap's Truffle Mix'd Media Inx as well as the new Decades Venetian Lace (only available through Hampton Arts).
Supplies:
Cardstock: Bazzill
Pattern Paper: Graphic 45
Stamps: Justrite You are my Anchor
Ink: Clearsnap Mix'd Media Inx, Decades Ink
Dies: Spellbinders Nestabilities
9/17/11
Have A Great Day
Hi there. I just want you to know that if you've not tried Kreaxions Glitter Paper, you are definitely in for a treat. This paper is fun to work with, punches well and doesn't "shed". I hate it when glitter paper leaves trails wherever I work.
I used Punch 902 in conjunction with the Punch Mate along the edge of the yellow Glitter Paper. The Punch Mate makes it so easy to use any number of punches. I then sized the glitter paper to fit my card and inked the edges. I trimmed the card about 1/2" to allow the punched edge to show, then placed a strip of brown cardstock underneath. This allowed the punched edge to really pop.
Just above the punched edge, I scored several lines for some dimension. I then stamped my sentiment within those scored lines. Some twine was wrapped around the upper section of the card. The butterflies were created using Clearsnap's Design Adhesives and Designer Foils. This piece was inked and matted on brown cardstock, then added to the card wth foam dots.
Then I just added some pearls to the punched edge.
Supplies:
Cardstock, Punch: Kreaxions
Ink: Clearsnap Chestnut Roan
Foils: Clearsnap
Stamp: Stampendous
Score Tool: Scor-Pal
9/15/11
Thank You
It's a new Color Challenge at Clearsnap . All you need to do is create a project using these fun colors chosen by Design Team Member Charlotte Jenkins.
This month's Challenge colors are Eggplant, Olive, and Aqua.
Now if you don't have these colors, choose something close and then upload your project the Clearsnap blog .
Here's my card:
I started with white cardstock cut to fit my Cuttlebug Embossing Folder. Then I gently wiped the colors randomly across the paper and then spritzed it with Vanilla Shimmer Smooch for a little shimmer. This created a nice background for the embossed words. Some coordinating cardstock colors, a stamped sentiment and a flower were all that was needed to finish this card.
Clearsnap Products:
Mix'd Media Inx in Black
Smooch Spritz in Vanilla Shimmer
Petal Point Inks in Aurora
Petal Point Inks in Primary Pastel
Other Supplies:
Cuttlebug Embossing Folder
American Crafts Stamp
Flower
9/13/11
Unity and Scor-Pal Blog Hop
Hi and welcome to the Unity Stamp Company and Scor-Pal Blog Hop!
Our teams have come together to show you ALL of the amazing things you can do with Unity Stamp Company stamps and Scor-Pal products!
Along the blog hop you will find cards and projects that are sure to INSPIRE you!
Oh and we have prizes, too, so BE SURE to leave a comment on ALL of the blogs on today’s Blog Hop! There will be 2 winners! 1 will get a Scor-Pal and 1 will get 10 Unity Itty Bitty stamps of their choice! Winners will be picked from ALL of the comments so the more comments you leave, the more chances you have to WIN!
The winners will be announced on Thursday, September 15th on the Unity Stamp Company blog and the Scor-Pal blog!
Today I'm sharing with you an easel card.
Using my Scor-pal, this shaped card was so easy to create. I cut my card from Core-dinations cardstock using Spellbinders Grand Calibre Scalloped Circle Dies, being sure a small section of the cardstock did not cut, thus creating a card. I scored the top panel at 7 1/2" and 8 1/4" to create the folded section of the card which would become the easel.
I folded this section and used Scor-tape to add a seperate Scalloped Circle on top, lining up the scallops.
I added a smaller circle on the card base, inked the edges and stamped butterflies from the Unity Stamp set using Clearsnap's Mix'd Media Inx which I then embossed with clear embossing powder.
I stamped the Lemonade Stand on Cryogen White cardstock and colored it with Copic Markers, then cut it out as I wanted it 3 dimentional. Since I wanted to add a small image behind the Lemonade stand, I cut out the center. The mini Magnolia image was also colored with Copic Markers and cut to fit behind the Lemonade stand which was adhered with foam adhesive squares. Before assembling the card, I added some twine behind the layers.
Thanks for stopping by. Remember to leave a comment on each blog for your chance to win some amazing prizes.
Your next stop on the blog hop is: Christi Snow.
In case you get lost, here's a complete list of the blog hop:
HOP ORDER:
Supplies:
Cardstock: Core-dinations, Cryogen
Scoring Tool: Scor-Pal
Stamps: Unity Stamps - Lemonade Stand; Mini Magnolia
Inks: Clearsnap Mix'd Media Inx
Embossing Powder: Clearsnap Top Boss Clear Embossing Powder
Pattern paper: K&Co.
Twine: The Twinery
Markers: Copic Markers
Our teams have come together to show you ALL of the amazing things you can do with Unity Stamp Company stamps and Scor-Pal products!
Along the blog hop you will find cards and projects that are sure to INSPIRE you!
Oh and we have prizes, too, so BE SURE to leave a comment on ALL of the blogs on today’s Blog Hop! There will be 2 winners! 1 will get a Scor-Pal and 1 will get 10 Unity Itty Bitty stamps of their choice! Winners will be picked from ALL of the comments so the more comments you leave, the more chances you have to WIN!
The winners will be announced on Thursday, September 15th on the Unity Stamp Company blog and the Scor-Pal blog!
Today I'm sharing with you an easel card.
Using my Scor-pal, this shaped card was so easy to create. I cut my card from Core-dinations cardstock using Spellbinders Grand Calibre Scalloped Circle Dies, being sure a small section of the cardstock did not cut, thus creating a card. I scored the top panel at 7 1/2" and 8 1/4" to create the folded section of the card which would become the easel.
I folded this section and used Scor-tape to add a seperate Scalloped Circle on top, lining up the scallops.
I added a smaller circle on the card base, inked the edges and stamped butterflies from the Unity Stamp set using Clearsnap's Mix'd Media Inx which I then embossed with clear embossing powder.
I stamped the Lemonade Stand on Cryogen White cardstock and colored it with Copic Markers, then cut it out as I wanted it 3 dimentional. Since I wanted to add a small image behind the Lemonade stand, I cut out the center. The mini Magnolia image was also colored with Copic Markers and cut to fit behind the Lemonade stand which was adhered with foam adhesive squares. Before assembling the card, I added some twine behind the layers.
Thanks for stopping by. Remember to leave a comment on each blog for your chance to win some amazing prizes.
Your next stop on the blog hop is: Christi Snow.
In case you get lost, here's a complete list of the blog hop:
HOP ORDER:
Unity Stamp Company
Angie Blom
Diane Zechman
Jimmi Mayo
Gini Cagle
Natalie Dever
Julie Koerber
Maren Benedict
Katie Tate
Stephanie Muzzulin
Robyn Weatherspoon
Steph Ackerman
Christi Snow
Tami Mayberry
Lisa Henke
Brooke Lien
Virginia Nebel
Wendy Chang
Lisa Andrews
http://scor-pal.blogspot.com/
Supplies:
Cardstock: Core-dinations, Cryogen
Scoring Tool: Scor-Pal
Stamps: Unity Stamps - Lemonade Stand; Mini Magnolia
Inks: Clearsnap Mix'd Media Inx
Embossing Powder: Clearsnap Top Boss Clear Embossing Powder
Pattern paper: K&Co.
Twine: The Twinery
Markers: Copic Markers
Labels:
clearsnap,
core'dinations,
cryogen,
scor-pal,
twinery,
unity stamps
9/10/11
Friends and Butterflies
Sometimes the gift wrapping can be just as important as the gift you give. Giving a gift card can be so impersonal, so why not dress up the packaging so the recipient has something nice to open.
Using a small gift bag from the local craft store, I decorated it with pattern paper and a Cuttlebug Embossing Folder, allowing "friends" to show. After inserting the gift card, I tied the bag together with ribbon. Then I used the Butterfly die on a large manilla tag. I cut the butterfly from cardstock and the same pattern paper I placed on the gift bag. I ran this layer through my Cuttlebug, then inked the embossed section. After placing the cardstock butterfly on the tag, I used foam adhesive to adhere the second layer, then added some pearls down it's center.
Check out the store for this butterfly die and some amazing punches.
Supplies:
Cardstock: Bazzill
Pattern paper: MyMindsEye
Embossing: Cuttlebug
Ink: Clearsnap Mix'd Media Inx
Pears: Want2scrap
9/9/11
Moving
9/8/11
Sled Hockey
Check out today's post at Scrapping Sports Stuff for directions and supplies to complete this layout.
9/5/11
Made in the USA
Proud to be MADE IN THE USA Blog Hop
Did you know that all Clearsnap Products are manufactured right here in the United States, at our headquarters in Burlington, WA? They are! Every inkpad is made right here under our loving, careful guidance so that it will be the best quality possible when it reaches your craft table (and for years to come).
To celebrate Clearsnap's commitment to manufacturing products in the USA we have released a Limited Edition 3 Color Pigment Inkpad, MADE IN USA. Our Design Team has created stunning projects with this inkpad to share with you today, Labor Day! This inkpad has only been available to retailers purchasing inkpads and distinctive accessories direct from Clearsnap, as a "thank you" for their support of our company.
But we're giving one of these inkpads away!!! Please visit all of the blogs listed below as part of today's blog hop and leave a comment on each blog. Each comment counts as an entry into the drawing. Comments must be posted by midnight 9-5-11 PST to be eligible for the drawing. A winner will be posted to the Clearsnap Blog on 9-6-11.
Clearsnap Blog
Cathie Allan
Robyn Weatherspoon
Stephanie Ackerman HERE
Tami Sanders
Charlotte Jenkins
Daniela Dobson
Sabrina Alery
Jean Okimoto
Mary Dawn Quirindongo
Jennifer Priest
Today I am sharing with you how to create your own background using this 3 color stamp pad. Take a sheet of white cardstock (or the back of some pattern paper you don't like) and swipe the USA ink pad across the paper as often as needed to cover it.
It dries quickly and soon I was able to create this invitation. I cut the backgound 4"x6", inked the edges with the blue ink in this trio, then matted it with red cardstock. I then tied some twine around the block and die cut my other elements using my Cricut Expression. I cut the starred paper 5 1/4" x 7" and also inked it with the blue ink in this trio. Adhering the invitation on top, I added a 1" topper, punched two holes in it and tied a ribbon.
With the left over paper, I decided to create a journal. I die cut the title from the same background paper I created earlier, using my Cricut Expression.
I cut a block of pattern paper to fit the front of my journal and I added the title to the center, surrounding it with some half circles I cut from the reverse side of the pattern paper. I inked the half circles and the edges of the block with the blue ink from this trio, and used Sparkle Fibers for the dot over the "i" just for fun, adhering it with Glue Gloss. I then cut additional circles to use as page breaks and inked them with USA ink pad.
Holding my pages flat together, I "kissed" the pages to my USA ink pad and moved it along until I had all pages covered. This just added a nice finished look to the journal.
I tied some ribbons and twine to the binding just to finish it off.
Your next stop is Tami Sanders blog.
Clearsnap Supplies:
USA Ink Pad
Sparkle Fibers http://www.clearsnap.com/products.cfm/77/Sparkle-Fibers
Glue Gloss http://www.clearsnap.com/product.cfm/2050/Glue-Gloss
Other Supplies:
Pattern paper: Bo Bunny
Die cuts: Cricut Expression
Ribbon: Offray
Twine: The Twinery
Memo Book: Office Supply
Merry Christmas Box
It's a double posting day for me. Be sure to check out the Clearsnap blog hop. Today, Scor-Pal is starting monthly challenges! On the first Monday of every month you'll be given a new challenge and there will be prizes!
Today's challenge is very easy.....we want you to make a BOX!
Starting with an 8"x8" piece of cardstock or heavy pattern paper, I scored the paper at 1", 3", 5" and 7". Then I turned the paper 90 degrees and scored again at 1", 3", 5" and 7". Once that is done, cut away all but the center square on each side.
Turn paper on an angle and score the corners diagonally, then fold on all score lines.
Add score tape to the 1" flaps. As you fold the box together, the flaps will fold inside to hold the box shape. Add a 1" strip of cardstock around the top of the box and the sentiment and you've got a cute little gift box to work with.
These little guys measure 2"x2", andd are so quick and easy to make. How about using them as table decorations for the upcoming holidays, filling them with candies or other little goodies for friends and family.
Supplies:
Score tool: Scor-pal
Pattern paper: Basic Grey
Ink: Clearsnap Destinations
Stamp: Hero Arts
Dies: Spellbinders, Nestabilities
Embossing Powder: Clearsnap
9/4/11
Gift Card/Ticket Holder
Check out this post on the Scrappin Stuff Blog for creating this wonderful little gift card/ticket holder.
Inside:
Supplies:
Cardstock: Bazzill
Imaginisce – Come One! Come All! Paper
Imaginisce – Step Right Up Paper
Imaginisce – Hot Buttered Popcorn! Paper
Stickers: Imaginisce
Gift card holder: Bare Elements
Ribbon: Offray
Circle Cutter: Kreaxions
Inside:
Supplies:
Cardstock: Bazzill
Imaginisce – Come One! Come All! Paper
Imaginisce – Step Right Up Paper
Imaginisce – Hot Buttered Popcorn! Paper
Stickers: Imaginisce
Gift card holder: Bare Elements
Ribbon: Offray
Circle Cutter: Kreaxions
9/3/11
Calendars
Every year or so I purchase a pocket book sized 2 year calendar. It's the perfect size for my bag and with a 16 year old in the house, I need to know what I'm doing and when!!! But, the calendars are always the same old cover from year to year. This year I decided to spice it up and alter the cover.
Using the Circle Cutter and Punch 913 I created a fabulous new look for my calendar.
Very simply, I remvoed the calendar from it's plastic covering, added red dotted pattern paper which was mounted on white cardstock atop the calendar, used Punch 913 (without the inserts) to create a border strip, then used the Circle Cutter to cut the white and black circles large enough to fit my die cut letter.
Can you see how versatile these punches are!!!!!
I printed the year on my computer, inked the edges and placed it on top of the punched edge before adding the circles. Then I added a little bling. Since my bling was clear, I used Clearsnap's Smooch Ink to color the bling.
This was one very quick, very easy and fun project to create.
Supplies:
Circle Cutter, Punch: Kreaxions
Ink: Clearsnap Smooch Siren Ink
Clearsnap Archival Black Ink
Cardstock: Bazzill
Pattern paper: Doodlebug
Rhinestones: Recollections
9/1/11
Spooky Treats
Halloween can be pretty and spooky at the same time when you combine one sweet child with the Cricut Happy Hauntings cartrige. This is my post at Scrappin Sports Stuff blog today.
Supplies:
Cardstock: Bazzill
Pattern paper: October Afternoon
Cricut: Happy Hauntings carridge
Supplies:
Cardstock: Bazzill
Pattern paper: October Afternoon
Cricut: Happy Hauntings carridge
Subscribe to:
Posts (Atom)