10/28/14

Beautiful cards with The Robin's Nest

The Robin's Nest is looking for a new design team.  I have worked with the Robin's Nest for the past year and have loved every minute of it.  The papers are gorgeous and lend themselves to create amazing cards and other projects.  And the dew drop are so much fun to work with.  I would love to remain for another term.

Nothing screams baby girl like these lovely papers and stickers from the Special Delivery Collection.  I chose to add the stickers to die cut circles and tie them to ribbon.


The Fleur Collection includes colors such as orange, yellow, purple and green.  Fussy cut around the images and make a wonderful assortment of cards. 


Create a fabulous Thanksgiving card with Turkey paper - fussy cut the turkey and other floral elements - and add them to a floral die cut card.


Don't forget to stop in the store and see all these wonderful products and much, much more.
 
Thanks for stopping by today.
 
Steph
 

10/27/14

Tombow Design Team Call

Tombow is looking for fun and creative people to join it's design team.  I absolutely LOVE Tombow products and am submitting an application for their design team call.

One of my favorite tags that has been inked, embossed and stamped.  Assorted die cuts were added to the tag and a stamped Prima image was fussy cut and added with foam adhesives for dimension.


A mini card and matching candy bar wrapper makes a sweet gift for someone special.


This butterfly card was embossed, the front was die cut with a Spellbinders oval die.  Then some mesh ribbon was added behind the die cut.  Flowers, butterflies and dew drops were used to finish a feminine card.


Nothing says I'm thinking of you more than flowers and butterflies.  The pink panel was added on a slight angle with foam adhesives for dimension.  Ribbon was added amongst the flowers giving the illusion of leaves.  Add in chipboard elements and the card comes together quickly.


And one of my favorite pieces is this 3" x 9" canvas.   I selected  Wendy Vecchi's  Stamp It Stencil It - In Full Bloom - to work with.  I love stamps and I love stencils so seeing them working in harmony was going to be fun. 
 
 
I stamped the leaves along the side of the canvas first in ColorBox Limelight Ink, then added the flowers with ColorBox Berry Ink. 


I stamped the flowers in black ink on top and as you can see, I didn't get a wonderful impression.  Honestly, I was ok with it because I knew I wanted some dimension and would "fix" this issue later.

 
After stamping the 3 flowers, I created masks of the flowers so I could add 2 additional flowers between them. 
 
 
Then as I wanted the flowers to be 3 dimensional, I stamped, colored and fussy cut 5 flowers.  I placed dimension adhesives between the flower layers. 
 
 
Some Robin's Nest Dew Drops finished off the centers of each flower.  I used Claudine Hellmuth Gesso to adhere torn strips of book paper to the canvas before spritzing with Art Anthology Patience.  It dries very quickly and I was able to add color around the outside of the canvas using the Inkssentials Foam Blending Tool,  with Ranger Distress Ink in Worn Lipstick and Tattered Rose.  I probably should have added the book pages before I began my project, but a work in progress takes on a life of it's own, doesn't it? 


I loved the Prima doll stamps when I first saw them.  While a little big for cards, I love how well they work with a canvas.  I used Pocket Doll, fussy cutting her as well as the dress.  I redressed her before adding her to the canvas with foam adhesives for dimension.  A little ink in her hair and headband and she look lovely amongst the flowers.  I had some tiny stickers in my stash and used them to provide the phrase - "stop and smell the flowers" which I placed around my gal.

Here is a close up of the gorgeous flowers.


 I hope you enjoy this canvas as much as I did creating it.
 
Thanks for stopping by today.
 
Steph
 

10/25/14

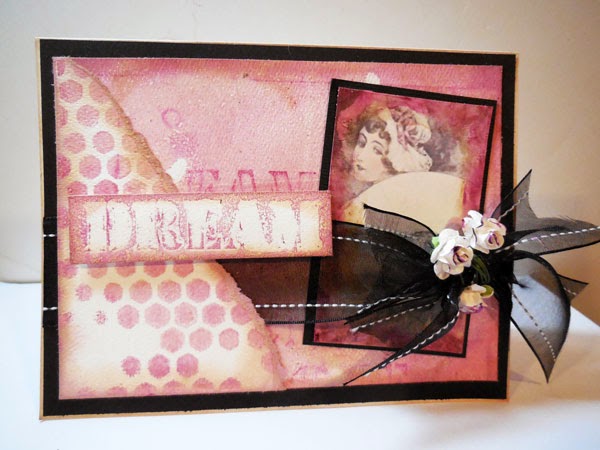
Dream

Hi everyone, today I'm working with the newest stamps from Rubber Dance - DaVinci.  This collection of stamps includes images, collaged elements and so much more.


I found vintage inspired papers and tags in my stash and thought they would work well with these stamps.  I stamped the image in brown ink on cream cardstock, fussy cut the image, inked it with a darker brown and matted it with cream cardstock before adding it to the card.

 
Dream was stamped in brown ink on white cardstock and matted with black cardstock.
 
Thanks for stopping by today.
 
Steph


10/24/14

Initial "S" Fun

clip_image001

This week the teams of Susan K Weckesser and The Crafter's Workshop are blog hopping.  Check out the wonderful creations both teams have created all week.


I altered a chunky letter with  Art Anthology paints, stencils from The Crafter's Workshop, stamps and pattern paper from Susan K. Weckesser and inks from ColorBox. 


Stop by the blog to see everyone's creations this week.

Thanks for stopping by today.

Steph


10/21/14

Fall Harvest

It's a new challenge at Cornish Heritage Farms, and Maureen has asked us to use pumpkins on our cards. 

I've used the Trees Backgrounder stamp with ColorBox Black Cherry Chalk Ink, then stamped the pumpkins and sentiment on scraps using the same ink.  I love this color - it's so rich!


The Fall Harvest stamp set is a fun set containing    images and words to mix and match.


Don't forget to check the Cornish Heritage Farms Design Team's cards on their blogs: 

  • Amber Hillman
  • Ann Marie Saunders
  • Irit Shalom
  • Kelly Santi
  • Kristine Reynolds
  • Maureen Russell


  • Thanks for stopping by today.

    Steph

    10/20/14

    ColorBox and StencilGirl Blog Hop

    Jennifer Priest's photo.

    Jennifer Priest's photo.     Jennifer Priest's photo.


    Welcome to the Clearsnap and StencilGirl blog hop.

    I had so much fun with these products - inks are great with stencils.   My first project is a glass case I found.  It was originally intended to be cross stitched, but I decided to use ColorBox Crafter's Ink with StencilGirl stencils instead.
     

    I used the StencilGirl Uplifting Words Stencil with ColorBox Stone Crafter's Ink selecting "I am fearless" as the focal point.


    Used the Apter Stencil with ColorBox Stone Crafter's Ink and Ann Butler's Berry and Lilac Crafter's ink, I added a variety of elements around the case.  This is a perfect reminder that I can do anything.


    I couldn't pass up this cute little change purse.   It was just begging to be modified!!


    Love the random lines on the purse and since Crafter's Ink is very moist, you have time to ink up a sheet of cardstock using the reverse stencil technique when done with the purse.


    It's best to place the cardstock on top of the stencil and roll over it with the ColorBox Art Wheel.  I ended up with a cool distressed effect.


    Next, I used the Past, Present, Future Stencil with ColorBox Crafter's Inks, inking just the portions of the stencil I wanted to use.


    Put all those elements together and this card is the result.


    Be sure to stop by the Clearsnap blog for the list of participants and a chance to win an amazing prize package.

    Here is today's line up...
    Steph Ackerman     here

    Thanks for stopping by today.
     
     
    Steph
     

    10/19/14

    Art Anthology and Altered Pages Victorian Inspired projects

    Have you seen my tags and cards on the Art Anthology blog?  We are have partnered this month with Altered Pages and I created some vintage inspired projects.
     
    These Victorian tags were easy to create with fussy cutting the images and painting with several Art Anthology paints.

    This background was painted, the image torn and painted and crocheted lace painted.  Several stamped wings were added behind the image.


    These cards are the result of creating backgrounds using Art Anthology stencils and painting around the digital images.  "Dream" was cut from the stenciled words.  A little paint on the flower added some nice color.
     
     
    I painted the lace with Art Anthology before adding it to the card. Several stamped words were added to one of the images.


    Check the Art Anthology blog the rest of this month to see what the gals have been creating.
     
    Thanks for stopping by today.
     
    Steph


    10/18/14

    Just a Note to a friend

    Hey everyone, have you stopped by the Rubber Dance store yet?  You must see all the fun stamps that are available.

    Today I've used #T1-7F: Road Map, #TR1-6D: Vintage Hotel Recipt, and #JNEN-2E: Just a note.


    Love how all the stamps work so well together.


    To see more of the stamps available, visit the Rubber Dance store.

    For more inspiration, please visit the Rubber Dance blog.


    Supplies:
    Stamps:  Rubber Dance
    Ink:  Clearsnap
    Cardstock:  Bazzill

    Thanks for stopping by today.
     
     
    Steph

    10/17/14

    Craftwell Guest Designer - Perfect Backgrounds

    Hi everyone, I am thrilled to be guest designing again for Craftwell USA today.  Craftwell is the maker of eBrush, Teresa Cut 'N' Boss, eBosser,  and eCrafter as well as some amazing large format embossing folders.

    I received this awesome Theresa Collins embossing folder - Snapshots.  This embossing folder is  approximately 8 1/2" x 12".  The possibilities are endless with an embossing folder of this size. 


    It's almost Halloween and what better way to say Happy Halloween than with a hand made card.  The card is 5 1/2" x 5 1/2" and I used the Snapshots embossing folder on Bazzil cardstock to create the background.  I inked  across the embossed sections to add additional color to the card.


    Just add some black matting, fussy cut some pumpkins and add to the card with foam adhesives for dimension.  A Halloween card is quickly and easily created.
     
     
    I've created another card, but this time I've used some Robin's Nest pattern paper for my background.   It's amazing to see how different papers become when you use an embossing folder.


    After embossing the pattern paper, I inked the paper with brown ink to highlight the embossed sections to create some definition.


    Next, I added fussy cut butterflies,  added a sentiment plus some dew drops to create the butterfly tail.


    Dress up your papers with embossing folders.  You will find the results will be amazing.
     
     
    Be sure to stop by the Craftwell blog and check out what their designers have been creating.
     
    Thanks for stopping by today.
     
    Steph

    10/15/14

    Butterfly Garden

    Hi everyone.  It's Wednesday and that means its time for a new challenge at Mark's Finest Papers &;Stamps.   This week's Simple Salutations Challenge # 116 is to create Things with Wings.


    The Butterfly Essence Stamp set is gorgeous.  I inked the butterfly stamp with several colors of chalk ink, then stamped it onto white cardstock.  Cutting around the image, I matted it with black, brown and pink cardstock before adding it to a panel of red.  The sentiment was stamped in black ink on white cardstock and matted with black.

    Thanks for stopping by today.

    Steph

    10/11/14

    Thinking of You

    Hey everyone, I've been thinking about you.

    It's been an extremely busy month and I just wanted to share this  tag card today with stamps from the Rubber Dance.


    I created a pocket for a tag,  For the exterior, I used #NP1-M: I Love Leaves using several colors of Clearsnap Inks.  After wrapping twine and ribbon around the pocket, I added a fussy cut leaf.
     

    To see more of the stamps available, visit the Rubber Dance store.

    For more inspiration, please visit the Rubber Dance blog.


    Supplies:
    Stamps:  Rubber Dance
    Ink:  Clearsnap
    Cardstock:  Bazzill

    Thanks for stopping by today.
     
     
    Steph
     

    10/8/14

    My Diary with Ann Butler Designs

    I've got a post on the Ann Butler Designs blog today.


    I took apart a store bought journal.  Cardstock was cut to fit the front and stamped with Ann Butler's Crafter's Ink by Clearsnap in Berry using the 2" Doily Picnic Stamp - Ann Butler Designs Faux  Quilting Stamps by Unity Stamp Company.


    I put some Ann Butler's Iridescents by Earth Safe  Finishes in Aquamarine on a craft mat and spritzed it with water to make it more liquid.  Using a paint brush, I painted a canvas dress form.


    Once dry, and it didn't take too long, I stamped the dress from with Berry Ink and Unity's 2" Stripes, Dots, Hearts.  The stand was stamped with Unity's 2" Stripes, Dots, Hearts and Clearsnap's Stone Crafter's Ink.  I frizzed the edges of the dress form a little before adding it to the front of the diary.  Stickers were added to the cover and May Arts ribbons were tied to the spirals.


    Thanks for stopping by today.

    Steph