6/15/19

Handmade Paper Set

Hi everyone, I've got  a new project using handmade papers created with the Arnold Grummer Papermaking Kit. 


It's so easy to make your own paper.  Use a variety of papers to create amazing one of a kind designs.  Use the Large Envelope Template to create the envelope.  Using the ScorPal you can create the fold lines for the perfect envelope!


Using Stampendous Spring Border Cutting Dies, die cut the edges for a nice scalloped effect.  Handmade papers die cut easily in one pass!


Using additional handmade papers, die cut assorted panels for the card and envelope.


Use the Stampendous Giraffe Stamp and Die set with Versafine Onyx Black ink to stamp the phrases.


Create a card from kraft cardstock then adhere the panels.


Add the additional panels to the envelope.


Thanks for stopping by.

Steph


With Love Card

Hi everyone, I'm back  with another project for Dies R Us.

I've got a card that could be given to newlyweds or perhaps to celebrate an anniversary.  Just change up the colors for the recipient.


Using the Tutti Designs Bird Tapestry die, die cut blue cardstock.


Place a panel of white behind the die cut panel, leaving the edges free.


Place brads in the flower centers and mount the panel on the card with 3D adhesives.


Stamp sentiment and add to the left corner.


Stop by the blog for all the details.

Thanks for stopping by.

Steph

6/13/19

Celebrate with Bowdabra

Hi everyone, I've got a fun card on the Bowdabra blog.  Bows always add a splash of beauty to projects so why not add one to a card.


Simply create your favorite card for any occasion.  Then add a bow using lots of different scraps.  Once added to the card, place a button in the center and twirl the bow wire.


Complete directions can be found on the Bowdabra Blog.

Thanks for stopping by.

Steph


6/12/19

Wishing you calm seas

Hi everyone I'm on the Just For Fun Rubber Stamps blog sharing a new card on the Just For Fun Rubber Stamps Blog using some great stamps available from the store to create my card.  


The background is a Long Script stamp, repeatedly stamped with distress ink on a white panel.  The panel was matted with kraft cardstock before being added to the card.


The Striped Lighthouse was stamped in black ink, colored with Memento Markers and die cut.  It was then added to a larger oval and added to the card.  The Calm Seas phrase was added across the bottom of the card.

Thanks for stopping by.

Steph


Happy Father's Day

Hi everyone, I'm on the Rinea blog with a Father's Day project.


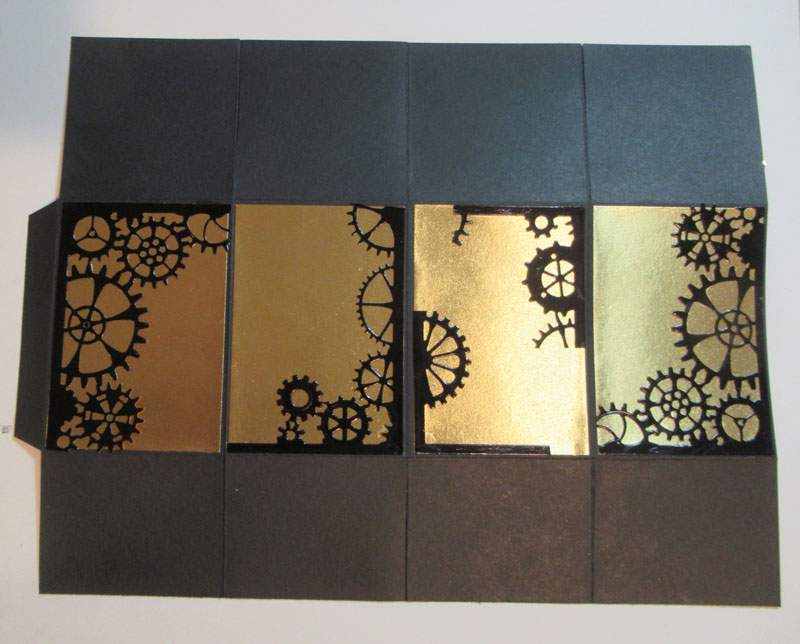
Start by creating a card from black cardstock.  Placed a panel of corrugated paper on the card.  Using a MemoryBox Gears Frame, die cut Ebony/Gold Glossy Foiled Paper.  Adhere to the corrugated panel.


To add additional emphasis, I added several wood gears about the card then added the phrases


To create the box, follow the directions here.  Cut Ebony/Gold Glossy Foiled Paper to fit each panel. Use the Gold side and adhere to each panel.


Die cut the MemoryBox Gears Frame again then cut it apart and place it around the box.


This is a great way to use a larger die.


Add wood gears randomly about the box.  Fill with somthing special for Dad, then tie closed with twine.


Thanks for stopping by.

Steph

6/10/19

Clear Scraps Beach Tag

Hi everyone, I'm on the Clear Scraps blog sharing a new mixed media beach tag.


Using one of the tags from the Chipboard Tag Album, I began by first painting it with gesso. The Tag Album has 4 different shaped tags that  can be used for an assortment of projects.  I decided to use one to create a mixed media tag with an assortment of elements.  Once the gesso dried, I added several colors of spray inks to create the background.

Mesh was also spritzed then adhered to the left corner.  I also added several sizes of art stones as well as some sea shells created from Makin's Clay for dimension.


Once dry, I spritzed additional colors of inks to give the tag more life.  In the center of the tag, I added more art stones.


I stamped and colored a Prima doll stamp, fussy cut her and added her to the tag with foam adhesives.


Isn't she sweet?


Thanks for stopping by.

Steph

6/9/19

Happy Mother's Day

Hi everyone, I've created a beautify card for Mother's Day (but forgot to share).  I used amazing Gold/Gold Glossy Foiled Paper from Rinea and a lovely bow created with the Bowdabra.


To create the card, I cut the foil 5 1/4" x 5 1/4" then embossed it.  The foil embossed really well and you can see all the amazing details.  I created a bow using the Bowdabra and added it to the panel by poking holes and threading the bow wire through.  Then I brought the bow wire back through the holes and rolled the wire on a craft tool to create the spirals.


Finally, I placed the foiled panel on a green card.  The sentiment, from Joy Clair stamps, was stamped, die cut and added to the lower corner.


For complete directions, check out the Bowdabra blog.

Thanks for stopping by.

Steph

6/8/19

Masculine Cards with Crafyscrappers

Hi everyone, I've got a set of  masculine cards created with stamps from Craftyscdrappers.  The Distress Diamonds Background stamp is perfect for creating backgrounds for masculine cards.  And I've combined it with the phrases from the Thank You stamp set.


Using Distress Ink, stamp onto white cardstock.

Cut panel to the size of the stamp, then ink the edges.


Add a strip of burlap ribbon across the panel.
Mat panel with brown cardstock, then adhere to card.


Stamp phrase from the Thank You stamp set; mat with cardstock and add to card.
Create a  keyhole from Makin'sⓇ white clay and a Prima mold, then ink with Distress Ink.
Add a key under the phrase.


Since this stamp is 4" square, consider creating a larger card by stamping the image again.


Ink stamp with brown ink and stamp the main image.
Re-ink the stamp and rotate it before stamping again.


Randomly tear the panel and ink with distress ink.
Mat with brown cardstock.


Ink several chipboard elements and adhere to the card.


Stamp phrase from the Thank You stamp set and clip to card.

Thanks for stopping by.

Steph


6/7/19

Do you keep Secrets?

Hi everyone, Steph here today with another altered jar.  I must say I have been having so much fun altering jars and Makin's ClayⓇ is a fantastic medium to use on jars to create amazing projects.

Do you keep secrets?  Do you write them down?  Where do you put them?  Instead of putting them in a box or an envelope, why not put them in a special secret jar?


Supplies:
Imagine Crafts Fireworks! Shimmery Craft Spray - Posie, Bamboo Leaves
The Crafter's Workshop Stencil
Prima Metallique Paints, Art Stones
Graphic 45 Key
Any size/type of jar
Mesh


Use brown clay (or any color of choice) and form it around the jar.  Use your fingers to move the clay around the jar until the clay meets.  Fresh clay will adhere to the glass as well as itself  so no adhesive will be necessary to seal the edges.  Your fingers will leave indentations in the clay and that just adds to the texture around the jar.


Use a Crafter's Workshop stencil with molding paste randomly around the jar.  Let it dry completely.


Add color with a variety of Prima Metallique paints.


Continue adding color until you are satisfied with the results.  Allowing the colors to blend creates some amazing colors on the clay.


Spritz the jar with Fireworks! Shimmery Craft Spray in Posie and Bamboo Leaves.


Spritz a piece of mesh with Fireworks! Shimmery Craft Spray in Bamboo Leaves and then glue it around the jar.


Once dry, start adding a variety of elements.  I attached a key engraved with "Secrets" and assorted sized art stones along the mesh.


Finally, I glue additional mesh around the neck of the jar.  This hides any imperfections at the top of the jar as well as gives it a nice finished look.


What do you think?

Thanks for stopping by.

Steph