Showing posts with label burlap. Show all posts

4/2/20

Welcome Burlap Panel

Hi everyone, what are you doing to stay busy during this pandemic?  I've been organizing and seeing what I have.  I pulled out a bunch of products I wanted to use and created a mixed media burlap panel.


Using a burlap panel, I inked it with Ranger Distress Ink in Walnut Stain using a Ranger Ink Blending Tool.  I cut Graphic 45 papers to fit, tearing the top layer and adding strips of Bazzill Licorice Twist Cardstock to help the panel pop.  With so many different Graphic 45 papers available, any of them would be perfect for the center of this panel.  I used US Art Quest Perfect Paper Adhesive to adhere the papers to the burlap panel.


I found some metal words at the Dollar Store, so I inked welcome with Ranger Embossing Ink and added color with Ranger Perfect Pearls in Forever Green and Perfect Copper.  The embossing ink was a great foundation for adhering the perfect pearls.  Allow to set for a few minutes, then brush away the excess.


Then I assembled the panel with burlap tags, paper tags (similar to the 7 Dots Studio tags), assorted flowers and clothes pins.


Welcome was added to the panel with US Art Quest Perfect Paper Adhesive as well as Scrapbook Adhesives 3D Foam Adhesives to pop it up in the center.


Think about using whatever you have handy and see what you can create.

Thanks for stopping by.

Steph

11/18/19

Fall Stencilled Cards

Hi everyone, I've got a new post on the Clear Scraps blog using two of their stencils.


Using the 6" Shattered Glass Stencil, I placed it on white cardstock, then used gold metallic paste


I also used the 6" Swirl Pumpkin, placing it on white cardstock and used the same gold metallic paste on the swirl portion.


Once dry, I cut the shattered glass stencil  to fit my card front and matted it with cardstock.  The left over strip was used for a second card.


I stamped and colored 2 mice, die cut them and added them atop a strip of Rinea Mocha/Gold Glossy Foiled Paper.  The phrase was stamped and die cut, then matted upon a larger die.  The second card uses the left over strip and which was placed atop a strip of burlap.  Pumpkins, die cut from Rinea Marigold/Gold Glossy Foiled Paper and backed with Rinea Gold Starstruck Foiled Paper,  were added along the bottom edge.  The phrase was stamped and die cut, then matted upon a larger die.


The swirl panel was fussy cut and matted with cardstock which was also fussy cut, creating a doily-like panel.  It was then placed atop a striped panel.  A burlap strip was placed across the card.  A third mouse was stamped and die cut, then  added to the card.  Two pumpkins were stamped on Rinea Marigold/Gold Glossy Foiled Paper and die cut.  They were then added to the corner of the card.


Happy Fall.

Thanks for stopping by.

Steph

11/12/19

Always Grateful Cards

Hi everyone, I've got another project for Dies R Us.


Tutti Designs has some wonderful dies and this particular Grateful die is perfect for the upcoming Thanksgiving season. 


I die cut the image from gray and orange cardstocks, then used the opposite color to fill in the pumpkins, giving them definition.  


For additional definition, I die cut green cardstock for the leaf sprays.   Using The Best Glue Ever, I adhered the layers together.


The die cuts are approximately 4" square and are perfect for the focal points of my cards.  The panels were inked with brown ink then matted with cardstock.  I created  5 1/2" square cards, added pattern papers and strips of burlap across the centers, placing the panels on top.


To finish, I added gems to the flowers using The Best Glue Ever.


Please stop by the Dies R Us Store to see all the dies that are available!


Thanks for stopping by.

Steph


10/2/19

Happy Fall Basket

Hi everyone, I've got a new project on the Proxxon blog.


Taking a paper mache pumpkin, I used the Rotary Precision Tool to drill several contiguous holes in the pumpkin - long enough to get the Jigsaw blade inside the pumpkin.


The Jigsaw cut the pumpkin without issue.


Since I had raggedy edges, I used the Delta Sander to sand down the edges.


I ran a bead of adhesive around the edge of the pumpkin and placed a pleated strip of burlap.  I used paper clips to hold the burlap in place until the glue dried.


While waiting for the glue to dry, I used the Hot Wire Cutter to cut a circle from Smoothfoam that would be placed in the bottom of the pumpkin.


  Then I gathered some silk flowers and placed them inside the basket.


Thanks for stopping by.

Steph


11/18/16

The Color and Texture of Fall

Hi everyone, I have a new project on the Paverpol blog - a fall canvas.  I absolutely LOVE fall - the colors, the crunchy leaves, the cooler weather.  And I love my project.  I think it really epitomizes fall and all it stands for.


I used the Proxxon Hot Wire Cutter to cut a Smoothfoam ball in half.  Then used Paverpol Light Flesh Tone with fabric and wrap the fabric around one of the half balls.  Twist the fabric at the top and allow some fabric folding for dimension.  This created the pumpkin onto which I added more Paverpol with Pavercotton to add dimension.  Makin's Clay was added as swirls around the pumpkin.


I wrapped fabric around the 2nd Smoothfoam ball and smoothed it, then painted with red and green to create the apple.  Makin's Clay was created for the apple stem.

 
FALL was created using Makin's Clay clay and Alphabet Cutters and added to the corner with Beacon Adhesives.
 
Then I added assorted twigs, flowers, twine to finish and spritzed it with Tattered Angels Glimmer Mist.
 
For the complete tutorial, please stop by the Paverpol blog.
 
Thanks for stopping by today.
 
Steph
 

11/17/16

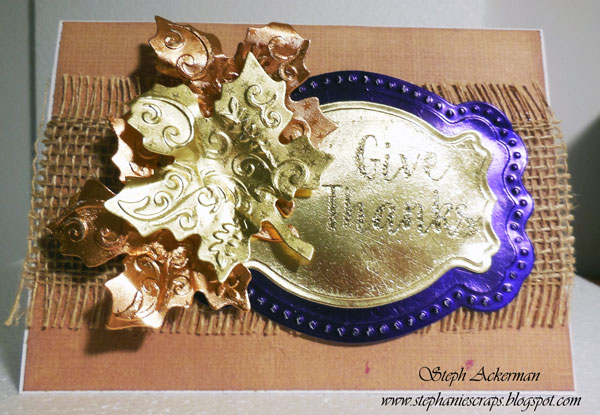
GIve Thanks with RInea Paper Foil


Hi everyone, I am participating in the Designer Crafts Connection blog hop this month.  This month we are working with Rinea paper foil from Global Crafting.

I was thrilled to receive a selection of paper foils in a myriad of colors, each one gorgeous.

 
I love how easily the foils die cut and embossed.  Look at all that dimension!
 

I used a white card and added a panel of kraft cardstock.  Next, I added some burlap to give the card a nice fall theme.

 
After die cutting the foil, I stamped and embossed the JoyClair sentiment directly on the foil. 


Rinea paper foil comes in a variety of colors and surfaces.  You can find more information about Rinea paper foil here: www.globalcrafting.com.
 
Please stop by the DCC blog to see projects from all the designers.
 
Please leave me a comment, I'd love to know what you think! 
 
Thanks for stopping by today.
 
 Steph


11/6/16

Glass jars for Fall

Hi everyone, I've got a great fall project on the Makin's Clay blog.


Take some glass jars, wrap each with burlap and add clay elements using an assortment of clay colors and dies.  Clay cuts easily with die cut equipment, punches and clay cutters.

See the full project on the Makin's Clay blog.

Thanks for stopping by today.

Steph