Showing posts with label stamps of life. Show all posts

12/5/19

Happy Birthday Cupcake

Hi everyone, I'm on the Clear Scraps blog today creating with the Cupcake Wood Card.

Cupcake-card-clearscraps-1-steph-ackerman

At approximately 4" x 6", this is a fun card to give to someone special.  I first painted it with gold metallic paint.

Cupcake-card-clearscraps-steph-ackerman

I chose a large birthday stamp with lots of different phrases and stamped it with black ink on the front cover.  Inside I added layers of pattern papers.  A wordy paper was added behind the cupcake so it would peek through.

Cupcake-card-clearscraps-3-steph-ackerman

I added ribbon and twine to the pre-drilled holes, tying my card together.

Cupcake-card-clearscraps-2-steph-ackerman

Since I had a bare spot above the cupcake, I adhered some Lovely Sequins.

Cupcake-card-clearscraps-4-steph-ackerman

Now I have a sweet card to share with someone special.

Thanks for stopping by.

Steph

6/14/16

Happy BIrthday Mom

I have this amazing Spellbinders die I wanted to use so I created a birthday card for Mom.  I know she would have loved it - it's her colors and her style!
   

The Spellbinders die cuts and scores the cardstock so you simply fold it into shape.  It comes with all the coordinating dies to add panels and borders so no card ever looks the same.


Using red and white  clays from Makin's Clay®, I mixed them to get the pink color I wanted, then mixed green and black clays to get a darker green for my flower stems.   I used a Wilton mold to create the flowers and a Mod Podge mold to create the letters. 


I stamped and die cut assorted sentiments from The Stamps of Life to fit the steps. 

 
The flowers and stems were added to the front of the card and Mom was added to the back.   A few gems were added to the flowers.  When the card is folded you see all the clay elements.
 
 
Thanks for stopping by today.
 
Steph
 

5/24/14

Spring blog hop with Ann Butler and Walnut Hollow


Hi everyone I am so thrilled to be participating in the Ann Butler and Walnut Hollow blog hop today.

The Walnut Hollow product I am working with is the 11" x 11" Rustic Pallet.  It has so many possibilities!!!


I lightly white washed the pallet with yellow paint.  Since I really wanted a white washed appearance, I spritzed it with a lot of water as I painted.  Once dry, I added some Earth Safe Finishes - Iridiscents to the top three panels, applying it with my fingers.  Spritzing with water allowed it to be a little more fluid.


Using burlap from DCWV, I die cut the 2 banner layers using Sizzix dies and added brads to hold the banners together.  The Kellycraft 2" Flourish ABCs were stamped with ColorBox Berry Ink and then heat set with Clearsnap Opalescent Embossing Powder.  Once the letters cooled, they were fussy cut and added to the banner.


Along the bottom panel, I painted some ColorBox Limelight Ink which I mixed with water.  When dry, a striped stamp from Ann Butler's acrylic stamps from Kellycraft was stamped along the bottom twice to give the illusion of grass.

Using another Sizzix die, I cut the tree trunk in brown cardstock and then fussy cut the tree top from burlap.  I then used a stamp from Ann Butler's 2" Doily Picnic stamp set from Unity, stamping it on the tree top in Limelight and Tangerine Inks to give the tree some dimension.

The fence was cut with my Cricut Expression.   Before adhering, I held it in place and stamped the leaves from Ann Butler's 1" Leaves All Over stamp set on and about the fence.  The fence was then added with foam adhesives for dimension.


The birds were stamped in Sunshine Ink and once they were die cut, they were inked with Tangerine Ink.  The flowers were added to the fence after being stamped in Tangerine Ink and Berry Ink and then fussy cut.

I had so much fun working on this pallet and it looks amazing hanging in my room.

Now what is a blog hop without prizes!!!!!   To Enter for the giveaway please leave a comment.  For each blog you leave a comment on your name will be entered into the giveaway drawing, so be sure to check out the entire Blog Hop for more chances to win!  Thanks for stopping by today.

The Prize:

  Download Ann Butler Designs - Walnut Hollow Blog Hop - Giveaway.JPG (116.2 KB)

 
Blog hop order:
Beth Watson
Connie Hall
Irit Shalom
Kristi Parker 
Larissa Pitman
Lisa Rojas
Paula DeReamer  
Roberta Birnbaum
Steph Ackerman         HERE
Vishu Reberholt
Judi Kauffman
Sara Shirman
Chris Wallace
Emma
 
Steph


4/25/14

Wish

Check out my blog post today for Basically Bare

The canvas may be small, but it's packed full of lots of Basically Bare embellishments and Art Anthology paints. 


The background was created with a Crafter's Workshop stencil - Bricks - and some modeling paste.  Once it dried, I went to town will all kinds of fun products.


The sun is actually 2 Basically Bare Gear embellishments that I "modified", inked and embossed with Clearsnap products before adding twine and a brad.  The tree was painted in 2 colors of Art Anthology paint and the bird and leaves were stamped/die cut from a Stephanie Barnard/Sizzix Framelits set.  
 
I needed something to fill in the empty space so I dug through my stash and found these fun stickers.  One word says it all!
 
What mix'd media project are you working on today?
 
Thanks for popping by today.
 
Steph


2/14/14

Happy Valentine's Day

Hi everyone, I'm so thrilled to be a part of the Ann Butler design team.  

Since it's Valentine's Day, I wanted to show you a card I created using Ann Butler's stamps from Unity Stamps and her inks from Clearsnap.  Ann has quite a few assorted sized faux quilting rubber stamps at Unity as well as an assortment of clear stamps at Kellycraft.  I love them all!


I stamped several rows of the 1" stamps using Berry Ink and embossed them with clear embossing powder.  These inks are very wet and have a longer drying time than most inks, so you can stamp what you need then add the embossing powder.  I positioned several heart dies about the stamped images and die cut them.  I also die cut several solid pink hearts and inked the edges of all pieces before continuing.


Using the Sizzix Hearts Flip-its by Stephanie Barnard, I created the card from pink cardstock.  This die not only die cuts the card, but also provides the scoring lines.  Love it!  The Sizzix Framelits Hearts perfectly match the Flip-it die and I stacked them on the card, inserting an inked and embossed Basically Bare chipboard arrow between the layers.  To fit the arrow how I wanted it on the card, I cut it apart before adding it to the card.


Two smaller hearts were adhered to the flipping heart and a stamped strip was added to the base of the card with a sentiment on top.


The ribbon just added a finishing touch.
 
Thanks for stopping by today.
 
Steph


10/22/13

My Treasure Box

Good morning everyone, Steph  here today.  This week Scor-pal  and Graphic 45 are working together to create some wonderful projects for you.

I received the awesome Graphic 45 Secret Garden Collection and knew I wanted to create some type of box.  This paper collection is gorgeous with it's assorted colors and designs and I knew it would be perfect for the mini treasure box I had in mind.  Then I also created some mini cards to fit inside


To create the box:
Using Spellbinders Grand Calibre Label Dies, die cut two pieces of green cardstock.
Cut 2 strips of green cardstock 3" x 12".


Adhere the 2 strips together to create one continuous strip and then cut it down to 17 1/2".
Score horizontally as follows:
1/2", 4 3/4", 9".
Rotate the strip and score at 4 1/4".


Rotate the strip vertically and score  at 1/4", turning the strip to finish scoring.
Add Scor-tape to the length of the vertical strip.
Snip through the tape to the vertically scored lines (these will create the shape of the box).
Adhere the ends together to create the box sides.
Center over one of the die cut labels and adhere to create the box.


For the exterior:
Cut pink cardstock 2 1/2" x 4".
Cut pink pattern paper 2 3/8 x 3 3/4".
Cut brown cardstock 2" x 3 1/2".
Cut blue pattern paper 1 3/4" x 3 1/4".
Ink all edges with Clearsnap's Chox Ink in Sparrow before assembling.


To create the "hinge", cut green cardstock 3" x 3" and score in half. 
Add Scor-tape to one half and adhere inside the box.
Add Scor tape to the top half.


Center the second green die cut on top of the "hinge" and adhere.
Using several different sized dies, cut white cardstock and pattern paper to finish the box top, inside and out.


Adhere a Graphic 45 keyhole to the center of the front using ScraPerfect's The Best Glue Ever.
Add Want2Scrap bling around the key hole letting it flow around the sides.


Finish off the inside -
Cut pink cardstock 2 1/2" x 4".
Cut pink pattern paper 2 3/8 x 3 3/4".
Cut white cardstock 4" x 4" for the bottom.
Ink all edges with Clearsnap's Chox Ink in Sparrow before assembling.


Now let's create some cards to go inside the box.


Use left over scraps to create assorted cards.
Cut cardstock 8" x 4" and score at 4" to create 4" x 4" cards.
Add strips of cardstock across the center of each.
Cut apart elements of the pattern paper and ink edges with Clearsnap's Chox Ink in Sparrow.
Stamp assorted sentiments on each using ColorBox Wicked Black Archival Dye Ink.
Adhere to card fronts.


The cards are a perfect fit.  


Wouldn't this make a great birthday gift set or perhaps a Mother's Day gift set?

Thanks for stopping by today.

Steph


9/20/13

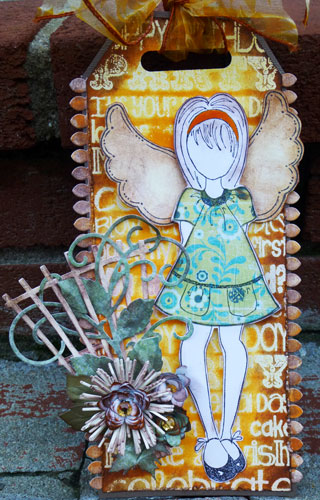
Mix'd Media Birthday Tag

Good morning everyone.   I love these wonderful Prima doll stamps by Julie Nutting.   There are rather large stamps (about 7") and I wasn't too sure what I'd create with them.  After seeing what Julie created with her stamps, I thought a mix'd media tag would be fun to create.


Start by creating a tag, slightly larger than the stamp.
Stamp a Birthday background stamp to cover the tag using Top Boss Watermark Ink.
Add Opalescent Clear Embossing Powder and heat set.


Using a brayer, add ColorBox Tangerine Ink to tag.  The embossed words will resist the ink and the ink will cover the tag.  Use a baby wipe to create a watercolor effect by gently rubbing it across the tag.  Some of the ink will be removed from the tag and the embossed words will stand out.


Distress the edges of the tag and add Chocolate ink around the edges, moving the color into the tag with the ColorBox Color Blender until the desired look has been achieved.

Die cut cardstock strips for the edges of the tag and ink with Tangerine Ink. 
Lightly rub the die cuts with a baby wipe and then add Chocolate Ink. 
Add to the sides of the tag and mount the tag on brown cardstock.


Stamp the doll on white cardstock using black ink.  Stamp image again on pattern paper.
Fussy cut image, then fussy cut the dress and adhere to the main image.
Ink edges with Chocolate Ink.
Color headband with Pumpkin Smooch Ink.
Stamp wings on cream cardstock with Wicked Black Ink.
Lightly ink with Chocolate Ink using ColorBox Color Blender, then adhere to the tag.
Adhere the doll to the tag with foam adhesives for dimension.


Die cut Trellis from cream cardstock, gently rub with a baby wipe then add Chocolate Ink to provide a water color effect.
Die cut flourishes,  flowers and leaves from assorted papers.
Ink all with Tangerine and/or Chocolate Ink before assembling.
Add flowers to the trellis and add rhinestones to the center of each.


So what do you think? 

Thanks for stopping by today.

Supplies:
Cardstock: Bazzill
Dies:  Cheery Lynn Designs, Heartfelt Creations, Prickley Pear
Stamps:  Stamps of Life, Prima Marketing
Ink, Embossing Powder, Smooch Accent Ink:  Clearsnap
Ink Tools: Clearsnap
Rhinestones:  Want2Scrap
Adhesive:  Scor-tape, The Best Glue Ever, Xyron
Ribbon:  Offray

Steph


8/17/13

Clearsnap and the Stamps of Life Blog Hop

Welcome to The Clearsnap & The Stamps of Life Blog Hop! All day today we're stamping and inking, creating and sharing. Be sure to visit everyone on the hop and leave a comment to be entered to win a fabulous prize of Stephanie Barnard's line of ColorBox inkpads, Stephanie Barnard Sprays!, and Stephanie's new SCREENS!...

Ahhh Photoshop took a beating but I finally got something put together without crashing :) I think I need an update or something...but who has time for that?! LOL

Thanks for your patience!


Today I'm using the birthday4subways clear stamp from the Stamps of Life.  This 4" x 6" stamp has 10 words and phrases in assorted fonts and sizes.  It's the perfect backdrop for all things birthday related.

Using an assortment of Stephanie Barnard Dye Inks  by ColorBox, I created a gift bag and coordinating card.


Gift bag:
I randomly inked the stamp with Tangerine, Cornflower, Grape, Raspberry, Mustard, then stamped on white cardstock. 


After inking the edges of the panel with Grape Ink, it was matted with yellow and  purple cardstock.  A sheer May Arts ribbon was wrapped around the panel allowing the underlying words to show through and a flower was added over the knot which had been tied with some twine. 
This panel was added to brown cardstock and placed on the gift bag.
A heart shaped doily was also inked with Grape Ink and place between the layers.


White tissue paper is so boring, so I spritzed it with Stephanie Barnard Sprays  in Grape, Sky, Banana and Tangerine Sprays.   The tissue was  dry in a matter of moments, then it was placed in the gift bag.

Card:

Using another sheet of tissue paper which had also been spritzed with Grape, Sky, Banana and Tangerine Sprays, I tore it into pieces to use as the background of my card.
To keep those stubborn little pieces in place, Glue Gloss  works wonders.


The stamp was inked with Chocolate Ink and stamped on yellow cardstock, then die cut into an oval.  Tangerine Ink was sponged around the edges before adhering to a mat.
To use one of the words in this stamp set, I created a mask around the word I wanted, then inked it with Chocolate Ink.
Pulling the mask off, I then stamped the word on yellow cardstock and inked the edges with Tangerine before matting with brown cardstock.


 I tied some twine around the center and added the sentiment with foam adhesives for dimension.


Thanks for stopping by today and be sure to comment on everyone's project for a chance to win some fabulous prizes.


If you get lost along the way, just start back here:  Clearsnap Blog: http://blog.clearsnap.com


Supplies:
Cardstock:  Bazzill
Ink, Sprays, Adhesive: Clearsnap
Stamp:  The Stamps of Life 
Ribbon:  May Arts
Flower: Prima Marketing
Twine:  The Twinery
Other:  Gift bag

6/6/13

May Arts DT Call

Hi everyone, did you know that May Arts is having a DT call?  I am thrilled because I would love to work with this team.  And, having a wonderful supply of beautiful ribbons on hand wouldn't hurt either!!!!

My samples for the call include:

Catty Christmas card
Love this wonderful May Arts ribbon in pink - awesome  that I could "shed" it as if the cat got a hold of it before I used it on my card - simple but effective don't you think?

 
Happy Mothers Day card
Loved this wood grain pattern paper, but wanted a more feminine look - out came May Arts crocheted trim - the perfect finishing touch.  Love that the cream color of the trim worked well with the pattern paper I chose.
 
Hello card
May Arts Crocheted trim adds texture, color and dimension to this sweet card.  The trim "gives" a little so you can stretch and tie it as needed, and it still retained its shape.

 
Baby Buggy Favors 
Nothing screams baby shower like a baby buggy
Adding May Arts lace trim and little bits of ribbon were the perfect finishing touch to this little party favor and it was so easy to make!!!


And finally, a tutorial for my Friendship Box using May Arts lace and glitter ribbon.


Cut blue cardstock into a 9” square.
Score at 3” and 6”.
Rotate cardstock 90 degrees and score at 3” and 6”.
Turn cardstock so that the points are at the 6” spot and score from the point to the first score line.
Repeat for each corner.
Fold on score lines, folding the corners inward.


Using a floral rollagraph wheel, roll over white cardstock with Pinkolicious Ink.


Cut floral cardstock into 5 squares – each 2 7/8” x 2 7/8”.
Ink edges with Pinkolicious Ink and adhere 4 of them to the outside base within the scored lines.


Using a wordy rollagraph wheel and Squash Ink, roll across white cardstock.


Cut cardstock into a 9” square.
Score at 3” and 6”.
Rotate cardstock 90 degrees and score at 3” and 6”.
Cut out the 4 corners, creating a "T" shape.
Cut the corner pieces on a diagonal and trim to fit the corners of the base.
Ink edges with Squash Ink and adhere with the words showing.
Using the white side of this piece, ink the edges with Squash Ink.
Trim to fit.
Add Scor-Tape to the center panel and adhere, leaving the other flaps free.


Stamp 6 assorted sentiments on white cardstock with Very Berry Ink and emboss with Clear Embossing Powder.  
Cut, ink edges and mount 5 sentiments on blue cardstock.
Add 4 sentiments to the interior white flaps.
Stamp flourish on the center flap with Squash Ink and emboss with Clear Embossing Powder.
Die cut a sentiment into a circle and add to the center with foam adhesives.


To create the box top:

Cut blue cardstock 5 1/8" x 5 1/8” and score 1” around this piece.


Adhere the remaining floral panel to the center.
Cut along score line to the next scored line on each side. 
Add Scor-Tape to the smaller flaps and fold in to create the box top.


Add Scor-Tape around the edge of the box top.
Add Eyelet Trim  lace around the edge.
Clip at the corners so the ribbon lays flat.


Add Scor-Tape to the pink ribbon.


Place pink ribbon on top of the lace ribbon, pulling off the Scor-Tape in sections as you work.


Adhere the final sentiment to the box top.
Stamp a butterfly with Very Berry Ink and emboss with Clear Embossing Powder.
Add dots of color to the butterfly with Smooch Ink.
Adhere to the top with foam adhesives for dimension.


Add pearls around the box to finish.


Supplies:
Scoring tool:  Scor-Pal
Adhesive:  Scor-Tape
Ribbon:  May Arts
Ink, Smooch, Rollagraph, Embossing Powder:  Clearsnap
Cardstock:  Bazzill
Stamps:  The Stamps of Life, Hero Arts
Dies: Sizzix
Pearls: Hero Arts

Thanks for stopping by today.
 
Steph