10/28/16

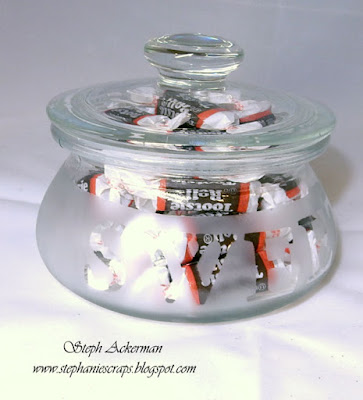
Etched Candy Jar

Hi everyone.  Now that the holidays are approaching, it's time to start thinking about decorations and even gifts. 

Here's a quick gift that would be perfect to give as a hostess gift or even use as a decorative element around your own home.


Etchall is a reusable glass etching crème.  It works amazingly well and quickly!   

First, I taped off the portion of the glass that I did not want etched using painters tape.

 
Next, I die cut "SWEET" from vinyl using my Cricut Expression.
 
Placing the negative vinyl on the glass, I used the spatula to get a good seal.  Then I covered the entire jar with etching crème.  Following the directions, I allowed it to sit for 15 minutes.

 
Since etchall is reusable, I simply used the spatula and returned the excess to the jar.  Next, I rinsed the jar and removed the vinyl and painters tape.  This process ensures that what you wash off does not come into contact with portions of the glass you did not want etched.


And there you have it - a sweet jar for all your candy!
 
Thanks for stopping by today.
 
Steph
 

10/27/16

Away in a Manger

I've got a new post on the JoyClair blog using a new stamp set - Away in a Manger.

 
This is a wonderful set that is not only good for bible journaling but for all your card making needs.
 
Stamping the baby and the phrase as one unit, I then die cut the image.  Leaving the images in the die, I sponged ink around it. 
 
 
Keeping the card base simple, I repeatedly stamped the star in gold ink, then sponged blue ink on the card.
 
 
I added dew drops around the card.
 
 
Thanks for stopping by today.

Steph

10/26/16

Just For Fun Stamps - October 31

I've got a new post today on the Just For Fun Rubber Stamps blog.

This Stamptangle pumpkin is awesome to work with.  It's a larger size stamp so it take center stage on a card.  Ink it up and then fussy cut it.

 
I tied some ribbon to the stem, then added it to the card with foam adhesives.

 
Please stop by the blog for complete details.
 
Thanks for stopping by today.
 
Steph

10/24/16

Halloween watercolor skull

I'm on the Susan K. Weckesser blog today with a fun, not so creepy skull just in time for Halloween.

 
I used inks like watercolor paints and painted the skull.  Then used an assortment of Unity stamps to add interest.
 
Please stop by the blog for the details.
 
Thanks for stopping by today.
 
Steph
 

Last Minute Halloween Treat Bags with Bowdabra

Halloween is almost here.  Time to get ready for all the little visitors who come knocking.

I've created some fun candy tubes for the kids and created bows using the Bowdabra!    


 Stop by the Bowdabra blog for details.

Steph

10/20/16

Framed Skull Card with Amazing Casting Products

Hi everyone, I am participating in the Designer Crafts Connection blog hop this month.  This month we are working with Amazing Casting Products

Amasting Casting Products was kind enough to send me a selection of their products. to work with.


As we are hearing Halloween, it's the perfect time to create some Halloween cards for family and friends.  I used Amasting Casting Products to create the frame and the skull.


I began by creating the frame.  Using equal parts of the mold putties, I combined them until I had a solid color with no streaks.

 
Next, I formed the base for the frame that I wanted to create.  I placed the frame on the mold putty and pushed until the design was embedded in the putty.  I left the frame in place for about an hour. 


And this is the result - a beautifully detailed mold.  Some of the color from my frame became embedded in the mold, but that did not affect the final piece.

 
The next step was to prepare the resin according to the manufacturers instructions, then pour it into the mold I created.  Allow the resin to cure per the manufacturer's instructions - 24-48 hours.  Since I had some left over resin, I poured it into a silicone skull mold.  And these are the results.


I painted the resin elements with red and blue paints to coordinate with the background papers.


To create the card, I used a print I pulled from my work with Gel Press last month. I embossed the print with a Cuttlebug embossing folder, then used Distress Ink across the embossed portions.    Since I wanted the skull to stand out, I die cut an oval to place behind the frame and painted it to match the card.  Then I adhered the resin elements to the card with Beacon Adhesives.


 I stamped a So Suzy sentiment inside the card.


I love how this turned out.


Please stop by the DCC blog to see projects from all the designers.
 
Please leave me a comment, I'd love to know what you think! 
 
Thanks for stopping by today.
 
 Steph


10/19/16

Fall Inspired Office Wreath

Hi everyone, I have a new post on the Bowdabra blog.  I wanted a wreath for my office - something simple but inspired by fall.  This is the wreath I created.


I used heavy canvas ribbon and creating the bow was so easy with the Bowdabra.

For my tutorial, please visit the Bowdabra blog.
 
Thanks for stopping by.
 
Steph


10/15/16

Fall Time Decorative Gift Bag

Hi everyone, I've got a fun and festive  Fall Gift Bag on the Whisker Graphics blog.


Supplies:
Middy Bitty Bags - Orange Chevron
Divine Twine Collection - Bright White Solid
Small Colored Tags - White
Large Colored Tags - Gray
JoyClair Stamps -  Harvest Blessings
Clearsnap Ink - Brown
Copic Markers


The Orange Chevron Middy Bitty Bag was the perfect size to use with the scarecrow stamp - one of JoyClair's newest releases.  Think how much fun this would be to fill with little goodies and then leave on everyone's place setting this season.


Stamp and color the scarecrow image on white cardstock.  Ink and distress the edges before matting it with brown cardstock.
 
 
Stamp Happy Fall Y'all on a gray tag then tie it to a white tag with Bright White Divine Twine. 
 
Next, wrap the Bright White Divine Twine several times around the image, tying it in the corner.  Spread out the Twine and then adhere the panel to the bag, inserting the tags behind the image.


Fill with goodies and enjoy.
 
Thanks for stopping by today.
 
Steph


10/14/16

Happy Scarecrow and Harvest Blessings

I've got a new post on the JoyClair blog using a new stamp set - Harvest Blessing.

 
This a great stamp set for fall, including all the elements you need for fall cards.

 
Another card I created with this set focuses on pumpkins.
 
 
Please stop by the Joy Clair blog for the details.
 
Thanks for stopping by today.
 
Steph
 

10/13/16

Painted Christmas Stocking

Hi everyone, I know it's a little early, but Christmas will be here before we know it!  I found a canvas Christmas stocking in my local store and I picked it up knowing I'd do something with it.

Well, I used Ann Butler Designs reinkers and water to paint the stocking.  I love how it turned out.


Please stop by the Ann Butler Designs blog for the full tutorial.

Thanks for stopping by today.

Steph

10/12/16

Fenced Pumpkins

I'm so excited to show off my newest pumpkin card for the Just For Fun design team.  Be sure to pop by the store and check out the fun stamps that are available.   You are going to love them!!


I've used the Candy Corn Fence stamp, and Stamptangle Pumpkin Large, both nice sized stamps that can take center stage on your cards.

 
I stamped the fence posts first, then masked them and stamped the pumpkins.  I used lots of brown ink to finish the card then wrapped ribbon around the panel before matting with orange cardstock and adhering to a brown card.
 
Thanks for stopping by today.
 
Steph
 

10/10/16

Halloween Party Favors with Bowdabra

Halloween is almost here.  Time to get ready for all the little (and not so little) Trick or Treaters.

I've created some fun candy tubes for the kids and created bows using the Bowdabra!    


Stop by the Bowdabra blog for details.

Steph

10/7/16

Pumpkin Jars

My newest Paverpol project on the Paverpol blog -  Halloween Pumpkins.

Did you know you could use Paverpol to decorate glass?


Add left over Makin's Clay® elements to decorate the jars and you have an awesome Halloween decoration.

Please stop by the Paverpol blog for the details on how I created my project.

Thanks for stopping by today.

Steph

10/6/16

Festive Fall Canvas with Makin's Clay

Hi everyone,  I think Fall is my favorite time of year.  Don't you love the crunching leaves, the falling temperatures, the assorted pumpkins and decorations that are everywhere!!
 
Today, I'm featured on the Makin's Clay blog with a fun Fall project and all of my elements have been stamped on Makin's Clay. 


Stamping on clay is fun and so much easier than you think.  Just be sure to use permanent ink.


Please stop by the Makin's Clay blog for the details. 
 
 
What do you think of stamping on clay?  I love it.
 
Thanks for stopping by.
 
Steph
 

10/4/16

Home Mixed Media Canvas

It's mixed media month on the Susan K. Weckesser blog.  Check out what I've created today.


Details are on the blog.

Would love you to pop by and check it out.

Thanks for stopping by today.

Steph

10/3/16

Joy Clair October Release


It's new release day at Joy Clair and the new stamps are amazing once again!!

I'm using the new Merry Christmoose clear stamps.  This is such a fun stamp set to create with.  I didn't want to use the usual red/green Christmas colors to I chose pink and gray.  Isn't she adorable?

 
This card consists of 10 layers, and looks amazing.  A pink striped background is the base of my card.  A floral pattern and a wordy paper were added with cardstock layers between.

 
The Moose was colored with Copic Markers and the sentiment was fit around it.
 

Be sure to stop by everyone's blog and leave comments.   Don't forget there are prizes to be given away.
 
Steph Ackerman - Merry Christmoose -    YOU ARE HERE
LeeAnn McKinney
Donna Green Idlet
Helen Gullett -
Martha Lucia Gomez Hernandez
Jessica Pascarella
Cornelia Wenokor
Lori Kobular
Monica Edwards

 
Thanks for stopping by today.
 
Steph
 

10/1/16

Just for Fun October Challenge

It's time for a new challenge at Just for Fun Stamps.  Since this is October, the theme is Halloween.  Stop by the blog and enter for a chance to win.

I used some wonderful stamps to create a tag for the challenge.


Stop by the blog and enter for a chance to win.
 
Thanks for stopping by today.
 
Steph
 

Halloween Treat Boxes with Scor-Pal

It's a new challenge at Scor-Pal and this month it's all about Halloween.  What fun Halloween projects can you create with your Scor-Pal? 


These milk box style boxes are easy to create with your Scor-Pal.
Start with cardstock that is 8 1/2" x 11".
With the 11" length across the board, score at 1/2", 3 1/4", 6", 8 3/4".
Rotate and score at 3", 6", 1/2"


Fold on all score lines.
Cut away the edges as shown below.
Cut assorted pattern papers to fit the sides.

 
Add Scor-Tape along the sides and assemble.
Add Scor-Tape along the bottom edge and fold up to create the box.

 
Staple closed the top section that was not scored.

 
Wrap the box with ribbon.  Add a stamped phrase.


Thanks for stopping by today.

Steph