12/31/20

Hello 2021

Hi everyone, it's Thursday and my day to share another Fairy Stamper project.   As we head into 2021, I'm wishing everyone a better year to come.


I created a slim line card using the Stream Scene and Moana.  I created the background with Brusho Color Crystals then stamped the Stream Scene in black ink.  I fussy cut Moana and placed her in the corner, looking at the stream and perhaps wishing for better times.  Hello was die cut from Rinea Sapphire/Gold Glossy Foiled Paper.


The panel was die cut with Lawn Fawn die, matted with a larger die and added to a white card.

Thanks for stopping by.


Lavinia World Challenge #43

Hi everyone, it's time for the next challenge at Lavinia World Challenges.  Please check it out and join in the fun.


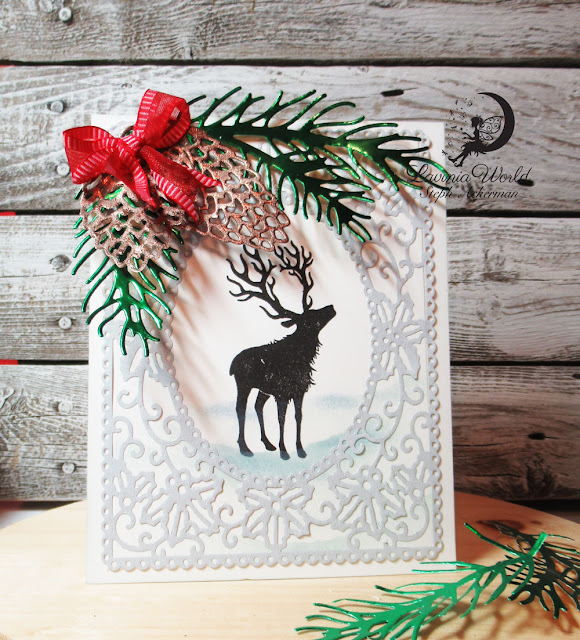
I used a Tutti Designs die to die cut Rinea Arctic Starstruck Foiled Paper for the card front.


I stamped the Lavinia Small Reindeer with black ink on white cardstock and it fit perfectly in the center of the oval.


Using Ranger Distress Oxide Ink in Speckled Egg, I created snow mounds under the reindeer.  Then I used Ranger Distress Oxide Ink in Faded Jeans to add additional dimension.


I adhered the die cut panel to the reindeer panel, then adhered it to a white card.  I love the white on white effect.


Using Tutti Designs Cones and Branches dies I die cut them from Rinea Foiled Papers in Emerald  Starstruck and Mocha Starstruck.


Then I adhered them to the corner of the card.


Needing a little "something", I added a small red bow over the branches.


Would love to see what you create for Challenge #43.  The winner of the challenge will receive a
$15 gift certificate to Lavinia World to shop for more goodies.   Remember there is a new challenge every other Thursday.  


Thanks for stopping by.


Like us on Facebook
Follow us on Instagram: LaviniaWorldStore
Join our NEW Anything Lavinia Facebook Group here
 Don't forget to include #laviniaworldstore on your projects and tag us at @laviniaworldstore so we can be sure to see and comment on your Lavinia projects!
Sign up to receive our Lavinia World Challenges and all the amazing inspiration from our Designers sent directly to your emails.

Please note that although we carry the full Lavinia range, we are not part of any other entity or Facebook group that carries Lavinia stamps. ONLY the cards posted to Lavinia World Challenges will be entered into the drawing for the Lavinia World prize.  Also note that the gift certificates are ONLY valid at the Lavinia World website.

Can't wait to see what you create.


Happy New Year's Eve

Hi everyone, I'm on the Dies R Us blog today wishing you a Happy New Year's Eve.  Hoping for a much better 2021!!!


Using the Cones and Branches die, I die cut Rinea Foiled Papers in Emerald/Gold Glossy and Mocha/Mocha Starstruck..  There are 2 different sizes of each die so they work well together. 


I also used a rectangle die to die cut Arctic/Gold Glossy Foiled Paper which would anchor the elements to my card.  I stamped Season's Greetings  in the upper left corner.

Using Distress Oxide Ink in Ground Expresso,  I used one of the die cut branches as a stencil.  Moving it around the card, I inked it creating the pattern you see.  It makes a nice base for the white foiled panel.


The white foiled panel was adhered to the card and the cones and branches were assembled in the opposite corner. 


Chunky glitter was then added sporadically about the cones and branches.  Once dry, the cones and branches could be shaped on the card.


Dies R Us Supplies used:


Thanks for stopping by.


12/27/20

Merry Christmas Reindeer

Hi everyone, hope you enjoyed your Christmas.  I have a Christmas card I neglected to share earlier.


I used some amazing dies from Amazing Paper Grace.
I die cut the base die from red cardstock, making sure the die cut edge was off the card.  Then I created a full die to adhere on top.
Using the intricate layer, I die cut Rinea Emerald/Gold Glossy Foiled Paper.


After assembling the card, I die cut the center panel using the reindeer panel with Gold/Gold Glossy Foiled Paper, Emerald/Gold Glossy Foiled Paper and Ebony/Gold Glossy Foiled Paper.  I used the Emerald die cut panel as the base and placed the gold layer on top, after first cutting away the leaves.  This panel was then placed atop the black layer.


Using poinsettia and leaf dies, I die cut Ruby/Gold Glossy Foiled paper and Emerald/Gold Glossy Foiled Paper. 


Finally I used liquid pearls to create 3D berries.

Thanks for stopping by.

Steph


12/25/20

Happy Holidays with Blank Page Muse

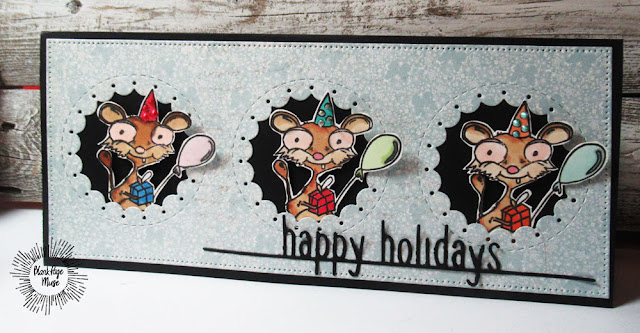
 Hi everyone, Happy Holidays to you with these cuties from Blank Page Muse!


Supplies:

Stamp: 

Party Gryz & Born to be a Star Art Rubber Stamps designed by Magda Polakow

Instructions:
Create a slim line card from black cardstock
Die cut blue cardstock and add to the card base
Stamp the image 3 times and colors with Copic Markers
Fussy cut each

Using foam adhesives, place the images in each opening on the card front
Die cut happy holidays and add to the card


Thanks for stopping by.

Steph


12/24/20

Oh Christmas Tree

Hi everyone, it's Thursday and my day to share another Fairy Stamper project.   It's also Christmas Eve and the fairies are finishing up their decorations.


Because I wanted to use this Christmas Tree die, I needed a larger card. 


I cut pattern paper 5" x 7" then cut green cardstock 5 x 7 1/4".  I scored and folded at the 1/4" mark and used the lip to adhere the pattern paper.


This has now created a 5" x 7" card.


The tree was die cut from Rinea Emerald Starstruck Foiled Paper and adhered to a large die cut oval which was then matted to a larger oval.  Tiny fairies from the  Fairy Hugs Condo Dwellers stamp set were stamped around the tree as if they were placing ornaments which are Robin's Nest dew drops.  The panel was then added to the card with foam adhesives for dimension.


Inside the card, I added 2 additional ovals on which I also stamped several more fairies from the Condo Dwellers as well as the Fairy Merry Christmas stamp.

Thanks for stopping by.


Quick and Easy Christmas Projects Day 10

Hi everyone.  Christmas will be here before we know it.  The last six years I've blogged about last minute Christmas ideas you could make in under 60 minutes.  Well, it's that time again and I've got some new projects to share.

It's Christmas Eve and I needed some gift bags.


Cutting Rinea Ruby/Gold Glossy Foiled Paper to fit within an embossing folder, emboss with a Christmas embossing folder.  You get amazing embossed details with Rinea Foiled Papers.  Mat the embossed panel with green cardstock and adhere it to a white gift bag.


Create a tag using a Spellbinders die.  Stamp and color a Christmas image with Copic Markers then fussy cut and add twine.  Add ribbon then tie to the gift bag.


And you've got a pretty gift bag in no time at all.


Thanks for stopping by today and don't forget to stop by daily as I show you more quick and easy Christmas projects.

If you missed my previous posts, you can find them here:

Thanks for stopping by.

Steph


Merry Christmas

Hi everyone, It's Christmas Eve I'm on the Dies R Us blog today with a Merry Christmas card.


Stamp the stamps with black ink, then die cut with the coordinating dies.


Using the Slimline dies, die cut pattern paper layers.


Create a card from green cardstock and cut red cardstock slightly bigger than the top layer.  Stamp Merry Christmas in the right corner.   Color the images with Copic Markers.


Assemble the card layers, then adhere the die cut elements.


Stop by the Dies R Us Store to see all the amazing dies that are available.

Thanks for stopping by.

Steph


12/23/20

Quick and Easy Christmas Projects Day 9

Hi everyone.  Christmas will be here before we know it.  The last six years I've blogged about last minute Christmas ideas you could make in under 60 minutes.  Well, it's that time again and I've got some new projects to share.

I'm on the Rinea blog today with some last minute quick and easy Christmas cards.


All you need is some beautiful colors of Rinea Foiled Papers, a  Spellbinders full card background die plus some stamps and coordinating dies.  Aren't they pretty?


Since the panel is the same size as a card, I then adhered the panel to the card front.


I added the Silver die cut panel to Ruby/Gold Glossy Foiled Paper, then adhered it to a card.


For the green panel, ornaments were stamped with red ink, then die cut.  Touches of color was added using liquid pearls.  A stamped and die cut phrase was added to the card.  Robin's Nest dew drops were then added about the card.


For the red card, ornaments were stamped with green ink, then die cut.  Touches of color was added using liquid pearls.  A stamped and die cut phrase was added to the card.  Robin's Nest dew drops were then added about the card.


Thanks for stopping by today and don't forget to stop by daily as I show you more quick and easy Christmas projects.

If you missed my previous posts, you can find them here:

Thanks for stopping by.

Steph