10/30/20

Trick or Treat with Papertemptress

Hi everyone, I've got a cute Halloween card to share today.


This slimline card uses Hambly Screen Print papers from the Papertemptress which I die cut with Lawn Fawn dies and  I used both sides of the paper.

I used Joy Clair's October Fun stamp set, coloring the figures with Copic Markers and then fussy cutting them.  The phrase is from the same stamp set.  They look great popped on the spiderweb paper, don't they?


Thanks for stopping by.

Steph


10/29/20

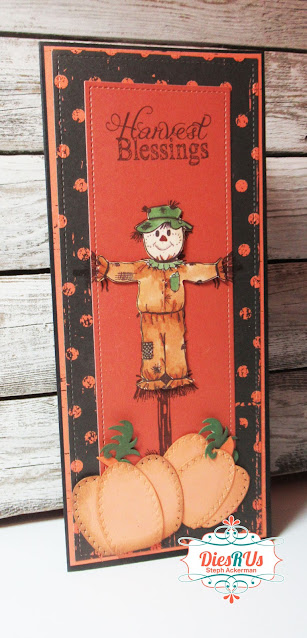
Harvest Blessings Card

  Hi everyone, my newest card for Dies R Us is a new Fall card.


I love Fall and fell in love with this scarecrow.


I used both dies in the Lawn Fawn Slimline dies set to create this card.  On the top layer I stamped the scarecrow from Joy Clair's Harvest Blessings stamp set, in brown ink.  Because I wanted him to take center stage on the card, I stamped the scarecrow a second time, colored him with Copic Markers, then fussy cut him.

Using Tutti Designs Oval dies, I cut 6 of the smallest die and arranged them to create 2 different sized pumpkins, inking the edges with brown ink before gluing each pumpkin together.  Then I added some greenery and cut off the bottoms of each.


The colored scarecrow and pumpkins were added to the card with foam adhesives for added dimension.  Harvest Blessings, also from the Joy Clair stamp set, was stamped at the top of the card.


Please stop by the Dies R Us Store to see all the amazing dies available.

Thanks for stopping by.

Steph


10/28/20

Swimming Raphael

Hi everyone, this sweet card was featured on  the British Craft TV Hochanda on October 6.  They showcased Fairy Hugs stamps with some amazing creations by the design team.


I used Distress Oxide Inks in a variety of colors to create the background.  Raphael was then stamped  in the center using VersaFine Clair Ink.

Cutting the stamped panel to size, I matted it with brown cardstock before adding it to a blue card.  2 sets of cattails were die cut, assembled, and placed one atop the other slightly off center for a 3 dimensional effect across the bottom of the card.


Thanks for stopping by.

Steph


10/27/20

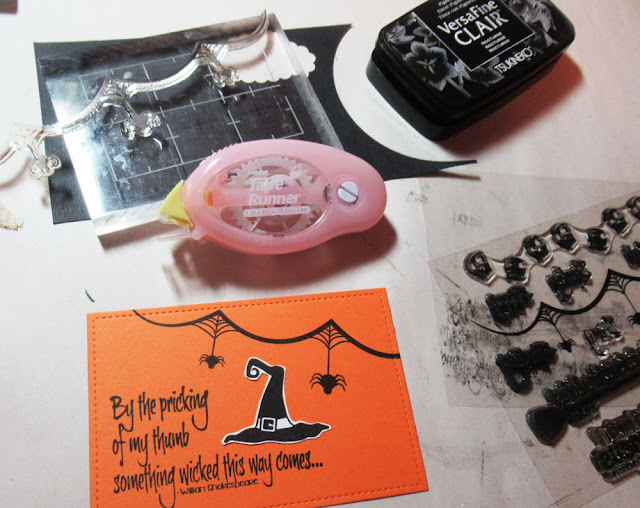
Something wicked this way comes.......

 Hi everyone, hope you have a witchy Halloween.


Using Joy Clair Halloween stamps  I stamped the phrase and spiders using VersaFine Clair Nocturne Ink on an orange panel. which had been die cut with Lawn Fawn dies.   I stamped the witch's hat  in Nocturne Ink on white cardstock, fussy cut it and added it to the panel between the spiders which I stamped on a slight angle.


I added a spider panel to the card, then placed the panel on top.


Hope you have a happy and spooky Halloween.

Thanks for stopping by.

Steph


10/24/20

Bowdabra Halloween treat bags

Hi everyone, I'm on the Bowdabra blog with some Halloween treat bags.  
With Halloween approaching, these treat bags were very quick to put together and the recipient will know exactly what they are getting.


I plan on giving these to my friends.

Please stop by the blog for the details.

Thanks for stopping by.

Steph

10/23/20

Snowman Tags

Hi everyone, I'm on the Clear Scraps blog with a set of Christmas tags today.


The Chipboard Tag Album has 4 different shaped tags that can be used together for a shaped mini album, or can be used separately as I did to create different shaped tags.  

Selecting 2 tags, I inked them with green ink.  I also inked the Noel Chipboard Word Title to coordinate with the pattern paper I was planning to use.


Using the tags as stencils, I drew on the pattern paper and then cut the papers to fit the tags.


Next, I inked the edges of the paper with the same green ink and adhered them to the tags.


The Noel Chipboard Word Title was adhered to one of the tags on a slight angle.


Dashing through the snow...., a Crackerbox/Suzy stamp, was stamped with black ink, matted,  and adhered to the second tag with foam adhesives for dimension.


They would look really great on larger packages or hanging from the tree.  Turn the tags over and create a pocket to fit a gift card or even some cash!!


Aren't they sweet?

Thanks for stopping by.

Steph


Snowmen Card with Rinea Foiled Papers

Hi everyone, I'm on the Rinea blog and this month Rinea is partnering with Joy Clair Stamps.


Using Spellbinders/APG dies, I die cut Silver/Gold Glossy Foiled Paper and Cobalt/Gold Glossy Foiled Paper.  These piece are extremely delicate and look amazing when die cut from foiled paper.


I also cut Silver/Gold Glossy Foiled Paper to fit my card, then embossed it with a snowflake embossing folder.  I assembled the 2 die cut pieces and placed them on the sides of the embossed panel to create my card.


The snowman family from Joy Clair's Snowy Greetings stamp set, was stamped on Silver/Gold Glossy Foiled Paper, die cut and matted with a scalloped circle die cut from Cobalt/Gold Glossy Foiled Paper.  


I added color to the image with Ranger Liquid Pearls and Nuvo Crystal Drops.  I even ran a bead under the snowmen to create some snow.  As they dried, the colors became more translucent.


Once dry, the image was added to the card with foam adhesives for dimension.  


Hello Winter, also from this stamp set, was stamped on a scrap of silver and die cut, then added  to the stamped image.


Finally, tiny pearls were added to the blue swirls about the card.

Thanks for stopping by.

Steph


10/22/20

Lavinia World Challenge #38

Hi everyone, it's time for the next challenge at Lavinia World Challenges.  Please check it out and join in the fun.


Using Lindy's Stamp Gang Shimmer Spray in TiffanyLou and Sea Mint, I spritzed white cardstock.


Once dry, I  die cut the center from the cardstock using a Lawn Fawn rectangle die, then stamped  Meadow Grass  on the die cut panel using VersaFine Clair Shady Lane Ink.  To get the depth, I stamped Meadow Grass several times as both a first and second generation stamping.  


Using art daubers, VersaFine Clair Shady Lane Ink was inked around the bottom section of the panel  and VersaFine Clair Warm Breeze Ink  was inked around the top portion of the panel.


Words of Spring was stamped over the panel using VersaFine Pinecone Ink.  To get the lighter color, I first stamped  the phrase onto a scrap of cardstock, then on the panel.   Flutterbies were stamped using VersaFine Clair Nocturne Ink.  They appear to be enjoying the day, don't you think?


The panel was matted with blue cardstock then reassembled on the original spritzed panel.   Using the Quickie Glue Roller Pen, I added dots around the top of the card then pour on  Fairy Hugs Glitter in Lapis.


The panel was added to a blue card, then Let your spirit take flight was stamped in Nocturne Ink, matted with blue cardstock and added across the card with foam adhesives for dimension.


Would love to see what you create for Challenge #38.  The winner of the challenge will receive a
$15 gift certificate to Lavinia World to shop for more goodies.   Remember there is a new challenge every other Thursday. 


Thanks for stopping by.


Like us on Facebook
Follow us on Instagram: LaviniaWorldStore
Join our NEW Anything Lavinia Facebook Group here
 Don't forget to include #laviniaworldstore on your projects and tag us at @laviniaworldstore so we can be sure to see and comment on your Lavinia projects!
Sign up to receive our Lavinia World Challenges and all the amazing inspiration from our Designers sent directly to your emails.

Please note that although we carry the full Lavinia range, we are not part of any other entity or Facebook group that carries Lavinia stamps. ONLY the cards posted to Lavinia World Challenges will be entered into the drawing for the Lavinia World prize.  Also note that the gift certificates are ONLY valid at the Lavinia World website.

Can't wait to see what you create.


Would love to see what you create for Challenge #40.  The winner of the challenge will receive a
$15 gift certificate to Lavinia World to shop for more goodies.   Remember there is a new challenge every other Thursday. 


Thanks for stopping by.


Like us on Facebook
Follow us on Instagram: LaviniaWorldStore
Join our NEW Anything Lavinia Facebook Group here
 Don't forget to include #laviniaworldstore on your projects and tag us at @laviniaworldstore so we can be sure to see and comment on your Lavinia projects!
Sign up to receive our Lavinia World Challenges and all the amazing inspiration from our Designers sent directly to your emails.

Please note that although we carry the full Lavinia range, we are not part of any other entity or Facebook group that carries Lavinia stamps. ONLY the cards posted to Lavinia World Challenges will be entered into the drawing for the Lavinia World prize.  Also note that the gift certificates are ONLY valid at the Lavinia World website.

Can't wait to see what you create.


10/21/20

Fairy Hugs BIrthday Card

Hi everyone, so excited to be sharing that several of the cards I created for Fairy Hugs were part of the British Craft TV Hochanda on October 6.  They showcased the new Fairy Hugs stamps

You can watch Hochanda here:  https://www.hochanda.com/


I created a birthday card using  Luna, stamping her on Fairy Hugs Under the Sea Background.  Tearing the top edge, I placed it atop cardstock creating a slimline card and purposely left the top edge open.  Happy Birthday was added.


I created a tag which was embossed with a birthday embossing folder.  Adding a left over strip of the Undersea Paper, I created a band under which you can slip some cash.


Thanks for stopping by.

Steph


Halloween Wood Decorations

Hi everyone, I'm on the Proxxon Tools blog today showing you how to create an assortment of Halloween Decorations.


I drew the designs on scraps of plywood.


Using the 2 Piece Scroll Saw I cut each piece.

Once I had all the pieces I wanted, I used the Delta Sander to sand each piece.

I used the Bench Drill Press to drill holes in each piece so I could hang them on a tree.


Next, I used Plaid Paints to add color to each piece.


I left the black cat and white ghost as is, but I decorated the Witch's shoe and the Candy Corn with assorted colors of Robin's Nest Dew Drops.


I tied twine to each piece and then hung them on a tree.  


I did use scraps to create these ornaments, but just think how fun they'd be in a variety of sizes, perhaps standing outside your door or fence.

Thanks for stopping by.

Steph